Establishing User-Level Security
For most business environments, share-level security is not sufficient. Therefore, it is necessary to take a more sophisticated approach toward securing the objects in a database. User-level security enables you to grant specific rights to users and groups in a workgroup. This means that each user or group can have different permissions on the same object. With this method of security, each user begins by entering his or her username and password. The Jet Engine validates the username and password and determines the permissions associated with the user. Each user maintains his or her own password, which is unrelated to the passwords of the other users. |
In this method of security, users belong to groups. You can assign rights at the group level, the user level, or both. Users inherit the rights of their least restrictive group. This is highlighted by the fact that security is always on. By default, Access grants the Users group all rights to all objects. Every user is a member of the group called Users and therefore implicitly gets all rights to all objects. If you have not implemented security, Access logs all users in as the Admin user, who is a member of the Users group and the all-powerful Admins group. The Jet Engine determines that the Admin user has no password and therefore does not display an opening logon screen. Because members of the Users and Admins groups get rights to all objects by default, it appears as though no security is in place.
With user-level security, you can easily customize and refine the rights to different objects. One set of users might be able to view, modify, add, and remove employee records, for example. Another set of users might be able to only view employee information. The last group of users might be denied access to the employee information, or it might be allowed access only to specific fields (such as fields for name and address). The Access security model easily accommodates these types of scenarios.
These are the major steps to implementing user-level security:
Use the Workgroup Administrator to establish a new system database.
Start Access and change the Admin user's password to a non-null password.
Create a new user who will be the administrator of the database.
Make the user a member of the Admins group.
Exit and restart Access, logging on as the new system administrator.
Remove the Admin user from the Admins group.
Assign a password to the new system administrator.
Open the database you want to secure.
Run the Security Wizard.
Create users and groups consisting of members of the workgroup defined by the system database.
Assign rights to users and groups for individual objects.
Each of these steps is described in detail throughout the remainder of this hour.
You can accomplish many of these steps by using the User-Level Security Wizard. Although the Security Wizard is a powerful tool, it does not provide the same level of flexibility afforded to you when you perform the steps yourself. The next several sections therefore focus on performing the steps without the Security Wizard. The Security Wizard is covered in detail in the section "Step 9: Running the Security Wizard," later in this hour. Throughout this hour, I designate which steps the Security Wizard performs. |
Step 1: Creating a Workgroup
The first step in establishing user-level security involves setting up a workgroup. Then you can define groups and users who belong to that workgroup and assign rights to those groups and users. You define groups and users only in the context of a specific workgroup. You can think of a workgroup as a group of users in a multiuser environment who share data and applications.
When you establish a new workgroup, Access creates a workgroup information file. The workgroup information file contains tables that keep track of the following: |
The name of each user and group
The list of users who make up each group
The encrypted logon password for each user who is defined as part of the workgroup
Each user's and group's unique security identifiers (SIDs)
A SID is a machine-generated binary string that uniquely identifies each user or group. The system database contains the names and SIDs of the groups and users who are members of that particular workgroup and, therefore, share a system database. |
All application databases can share the same workgroup file, or you can maintain separate workgroup files for different application databases.
Understanding Workgroups: The System.mdw File
The default name for the workgroup information file is System.mdw. Access associates each application database with a specific workgroup information file. This combination of the information stored in the workgroup information file and the information stored in the database grants or denies individual users access to the database or to the objects in it. Multiple databases can share the same workgroup information file.
You can create many workgroup information files. Access stores the name of the workgroup information file currently being used in the Windows registry. You can view it under HKEY_CURRENT_USER in the key Software\Microsoft\Office\11.0\Access\Jet\4.0\Engines. (See Figure 22.4.)
Figure 22.4. Viewing the current system information file in the Windows registry.
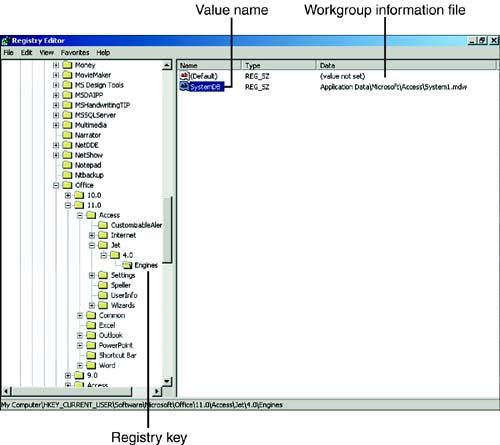
Because the machine used for the screen shots in this book contains multiple versions of Access, the name of the system file in Figure 22.4 is System1.mdw. Microsoft changes the name of the file like this so that the versions of Access I have running will not conflict with one another. |
You can access the Windows registry by using the RegEdit utility. To run this utility, you select Start | Run and then type RegEdit. |
Establishing a Workgroup
One way to establish a new workgroup is to use the Workgroup Administrator. Prior to Access 2002, the Workgroup Administrator was a separate program that you executed outside Microsoft Access. With Access 2002 and Access 2003, the Workgroup Administrator is integrated into Access. To launch the Workgroup Administrator, with the Database window active, you select Tools | Security | Workgroup Administrator.
Figure 22.5 shows the Workgroup Administrator dialog box.
Figure 22.5. The Workgroup Administrator dialog box.
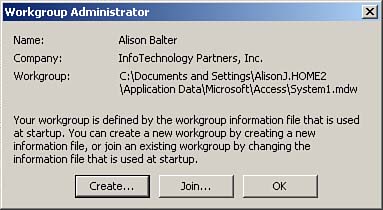
From the Workgroup Administrator dialog box, you can create a new workgroup or you can join one of the existing workgroups. If you click Create, you see the Workgroup Owner Information dialog box, which is shown in Figure 22.6.
Figure 22.6. The Workgroup Owner Information dialog box.
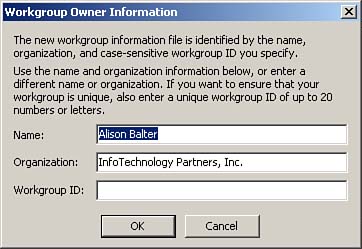
In the Workgroup Owner Information dialog box, you can enter a name, an organization, and a case-sensitive workgroup ID to uniquely identify the workgroup to the system. If you do not establish a unique workgroup ID, the database is not secure. As you will see, anyone can find out your name and organization. If you do not establish a workgroup ID, anyone can create a new system information file with your name and company, rendering any security that you implement totally futile.
It is important that you record and store all workgroup information in a very safe place so that you can re-create it in an emergency. |
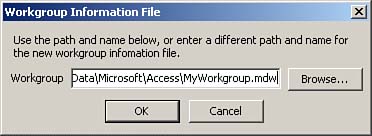
After you enter the workgroup owner information, click OK. The Workgroup Information File dialog box appears, prompting you for the name and location of the workgroup information file, as shown in Figure 22.7.
Figure 22.7. The Workgroup Information File dialog box.
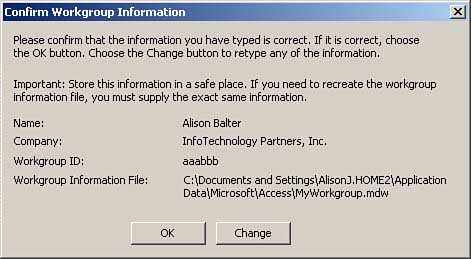
After you type the name of a new workgroup file and click OK, Access gives you one final opportunity to change any information: It prompts you to confirm the information, as shown in Figure 22.8. Click OK to confirm the information. Next, Access notifies you that it has successfully created the workgroup. You can then click OK to close the Workgroup Administrator.
Figure 22.8. The Confirm Workgroup Information dialog box.
You can use the Security Wizard, covered later in this chapter, in the section "Step 9: Running the Security Wizard," to create a new workgroup information file. The Security Wizard prompts you for the information that is necessary to create the workgroup information file. It doesn't matter whether you opt to create a workgroup information file using the Workgroup Administrator or the Security Wizard: The results will be the same.
Joining a Different Workgroup
If different groups of users in an organization work with entirely different applications, it might be appropriate to create multiple workgroup information files. To access a database that you have properly secured with a specific workgroup information file, you must access the database while the user is a member of that workgroup. If the same user requires access to more than one database, each associated with a different workgroup information file, it might be necessary for the user to join a different workgroup. You can accomplish this by using the Workgroup Administrator or by using a desktop shortcut that associates a specific database with a workgroup file.
To join a different workgroup using the Workgroup Administrator, follow these steps:
Launch the Workgroup Administrator.
Click the Join button. The Workgroup Information File dialog box appears.
Locate the name of the workgroup file you want to join. You can click the Browse button to help locate the workgroup file.
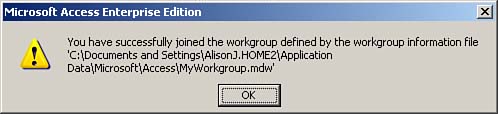
Click OK. Access notifies you that you successfully joined the workgroup, as Figure 22.9 shows.
Figure 22.9. Confirmation that a workgroup was joined successfully.
Click OK to close the Workgroup Administrator.
Step 2: Changing the Password for the Admin User
After you create a new workgroup, you can change the logon for the workgroup by adding a password for the Admin user. This is necessary so that Access will prompt you with a logon dialog box when you launch the product. If the Admin user has no password, the logon dialog box never appears when you log on, and you will never be able to log on as yourself.
To change the password for the Admin user, you launch Access and select Tools | Security | User and Group Accounts. The User and Group Accounts dialog box appears. It does not matter what database you are in when you do this. In fact, you do not need to have any database open because the password that you create applies to the workgroup information file rather than to a database.
The User and Group Accounts dialog box enables you to create and delete users and assign their group memberships. It also enables you to create and delete groups and invoke a logon password for Microsoft Access.
It is important to understand that even if you access the User and Group Accounts dialog box from a specific database, you are setting up users and groups for the entire workgroup. This means that if you assign a password while you are a member of the standard SYSTEM.MDW workgroup and others on your network share the same system workgroup file, each user on the network is prompted with a logon dialog box when he or she attempts to launch Microsoft Access. If you do not want this to occur, you must create a new system workgroup file before you establish security. |
When you are sure that you are a member of the correct workgroup and are viewing the User and Group Accounts dialog box, you are ready to assign a password to the Admin user. You click the Change Logon Password tab of the User and Group Accounts dialog box to select it, as shown in Figure 22.10.
Figure 22.10. The Change Logon Password tab of the User and Group Accounts dialog box.
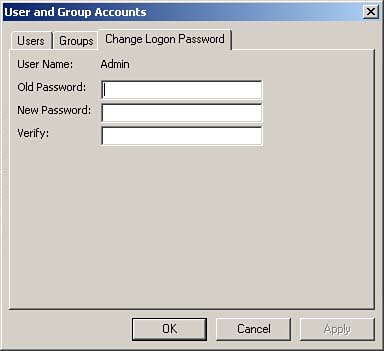
You assign a new password and verify it. (There is no old password unless you think of the old password as blank.) Then you click Apply to establish a password for the Admin user. You are now ready to create a new user who will administer the database.
If you choose to use the Security Wizard to secure a database, it changes the password for the Admin user. This ensures that the logon dialog appears when you use the workgroup file created by the Security Wizard.
Step 3: Creating an Administrative User
After you assign a password to Admin, you are ready to create a new administrative user. The administrative user is someone who will manage your database for you. You accomplish this from within the User and Group Accounts dialog box. Access comes with two predefined groups: the Admins group and the Users group. The Admins group is the system administrator's group account. This group automatically contains a member called Admin. Members of the Admins group have the irrevocable power to modify user and group memberships and clear user passwords, so anyone who is a member of the Admins group is all-powerful within a system. The Admins group must contain at least one member at all times.
It is extremely important to create a unique workgroup ID when you create a new workgroup. The workgroup administrator uses this workgroup ID to create a unique identifier for the workgroup. If you do not create a unique workgroup ID, people using other copies of Microsoft Access or Visual Studio can create their own workgroup files and grant themselves permissions to a database's objects. Furthermore, it is important to ensure that the Admin user does not own any objects and that you do not give the Admin user any explicit permissions. Because the Admin user is the same across all workgroups, all objects that Admin owns or has permissions to are available to anyone using another copy of Microsoft Access or Visual Basic.
The predefined Users group in Access is the default group composed of all user accounts. Access automatically adds all users to the Users group, and you cannot remove them from this group. Access automatically grants the Users group all permissions to all objects. As with the Admin user, the Users group is the same across all workgroups. It is therefore extremely important that you take steps to remove all rights from the Users group, thereby ensuring that you properly secure the objects in the database. Fortunately, the Security Wizard, covered in the section "Step 9: Running the Security Wizard," accomplishes the task of removing all rights from the Users group. Because you cannot remove rights from the Admins group and the Admin user is the same across all workgroups, you must create another user. This new user will be responsible for administrating the database.
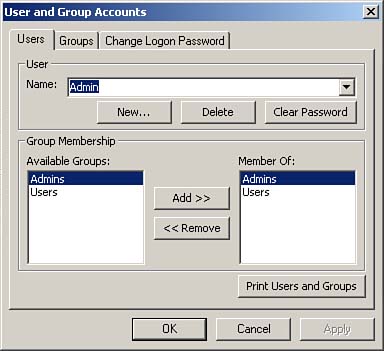
To create a new user to administrate a database, you select the Users tab of the User and Group Accounts dialog box. (If you closed the dialog box after the last step, choose Tools | Security | User and Group Accounts to open the dialog box again.) Just as when you assign a password for the Admin user, it does not matter which database you are in when you do this; it is only important that you are a member of the proper workgroup. Remember that you are defining a user for the workgroup?not for the database. Figure 22.11 shows the Users tab of the User and Group Accounts dialog box.
Figure 22.11. The Users tab of the User and Group Accounts dialog box.
To establish a new administrative user, click New. The New User/Group dialog box appears, as shown in Figure 22.12.
Figure 22.12. The New User/Group dialog box.
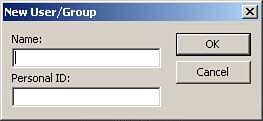
The New User/Group dialog box enables you to enter the username and a unique personal ID. This personal ID is not a password. The username and personal ID combine to become the encrypted SID that uniquely identifies the user to the system. Users create their own passwords when they log on to the system.
The Security Wizard allows you to create one or more administrative user for a database. In fact, the Security Wizard automatically creates a user called Administrator, and this user becomes the owner of the database.
Step 4: Making the Administrative User a Member of the Admins Group
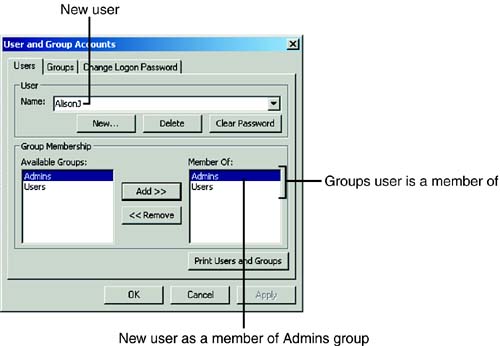
To make the new user a member of the Admins group, you open the User and Group Accounts dialog box, select the Admins group from the Available Groups list box, and then click Add with the new user selected in the Name drop-down list box. The new user should appear as a member of the Admins group, as shown in Figure 22.13.
Figure 22.13. Adding the new user to the Admins group.
If you use the Security Wizard, Access automatically adds the user called Administrator to the Admins group. Of course, you can also add other users to the Admins group.
Step 5: Exiting Access and Logging On as the System Administrator
You are now ready to close the User and Group Accounts dialog box and exit Access. After you exit Access, attempt to run it again. After you attempt to open any database (or if you created a new database), Access prompts you with the Access Logon dialog box, as shown in Figure 22.14.
Figure 22.14. The Access Logon dialog box.

Log on as the new system administrator. You do not have a password at this point; only the Admin user has a password. It still does not matter which database you open.
Step 6: Removing the Admin User from the Admins Group
At this point you should remove the Admin user from the Admins group. Remember that the Admin user is the same in every workgroup. Because the Admins group has all rights to all objects in the database (including the right to assign permissions to and remove permissions from other users and objects), if you do not remove Admin from the Admins group, the database will not be secure. To remove the Admin user from the Admins group, follow these steps:
With the Database window active, select Tools | Security | User and Group Accounts.
Make sure you select the Users tab.
Select the Admin user from the Name drop-down list box.
Select Admins from the Member Of list box.
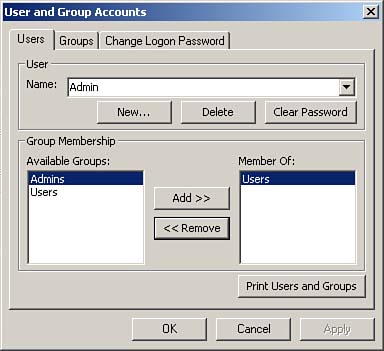
Click Remove. The User and Group Accounts dialog box appears, as shown in Figure 22.15.
Figure 22.15. The User and Group Accounts dialog box.
If you use the Security Wizard to secure a database, Access automatically removes the Admin user from the Admins group. In fact, the Security Wizard does not make the Admin user a member of any group besides Users (the group of which all users must be members).
Step 7: Assigning a Password to the System Administrator
Now that you have logged on as the new Administrator user, you should modify your password. If you have closed the User and Group Accounts dialog box, choose Tools | Security | User and Group Accounts to open the dialog box. Click the Change Logon Password tab. Remember that you can assign a password only for the user who is logged on.
One of the really cool aspects of the Security Wizard is that it allows you to assign passwords for all users who are members of a workgroup. This saves you a lot of time and effort when establishing a large number of users.
Step 8: Opening the Database You Want to Secure
You are finally ready to actually secure the database. Up to this point, it has not mattered which database is open. Everything you have done so far has applied to the workgroup rather than to a particular database. At this point, you need to open the database you want to secure. At the moment, the Admin user owns the database, and members of the Users group have rights to all objects in the database.
Step 9: Running the Security Wizard
Unless you are creating a brand-new database after you perform all the preceding steps, the first thing you should do to secure an existing database is to use the Security Wizard. The Security Wizard allows you to perform the following tasks:
Join an existing workgroup or create a new workgroup information file
Designate the database objects you want to secure
Assign a password for the Visual Basic project
Select from predefined groups that the wizard creates
Assign desired rights to the Users group
Create users
Assign users to groups
Create an unsecured backup copy of a database
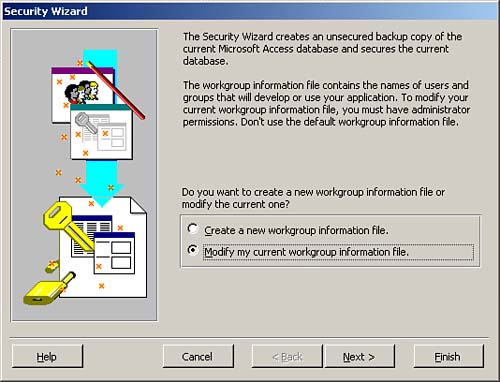
To run the Security Wizard, you choose Tools | Security | User Level Security Wizard. You cannot have the database open exclusively when you attempt to do this. The first step of the Security Wizard dialog box appears, as shown in Figure 22.16.
Figure 22.16. The first step of the Security Wizard, which prompts you to select an existing workgroup file or create a new workgroup information file.
You cannot run the Security Wizard if you have set a Visual Basic Environment (VBE) password for the project. You must unlock the VBE project before you run the wizard. This book does not cover VBE passwords. Refer to Alison Balter's Mastering Office Access 2003 Desktop Development, published by Sams, for more information on this topic. |
The first window of the Security Wizard prompts you to select an existing workgroup information file or create a new workgroup information file. You need to select Create a New Workgroup Information File and click Next to proceed to the second window of the Security Wizard (pictured in Figure 22.17). If you opt to create a new workgroup information file, the second window of the wizard prompts you to provide required information about the workgroup information file that you are creating. The wizard asks you to enter a filename, a workgroup identifier (WID), your name, and your company name.
Figure 22.17. The second step of the Security Wizard, where you enter required information about the workgroup file.
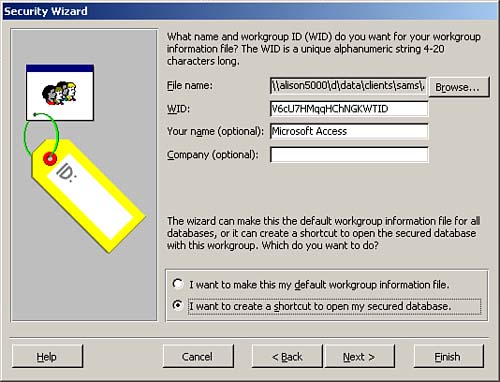
You can designate the new workgroup file as the default workgroup file on your computer, or you can have Access create a shortcut to the secured database, including the name and path to the workgroup file.
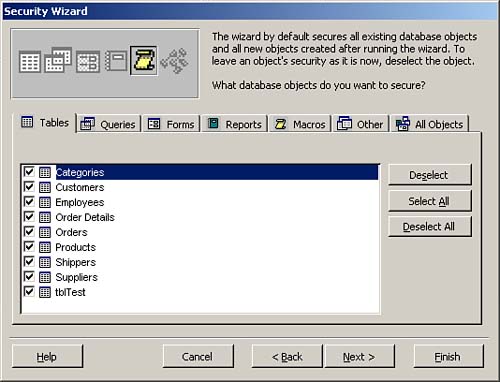
The third window of the Security Wizard, shown in Figure 22.18, allows you to select the objects you want to secure. Notice that you can secure all objects or you can opt to secure specific tables, queries, forms, reports, or macros. Modules, including the code behind forms and reports, are secured separately (that is, not as part of this wizard).
Figure 22.18. The third step of the Security Wizard, where you select the objects you want to secure.
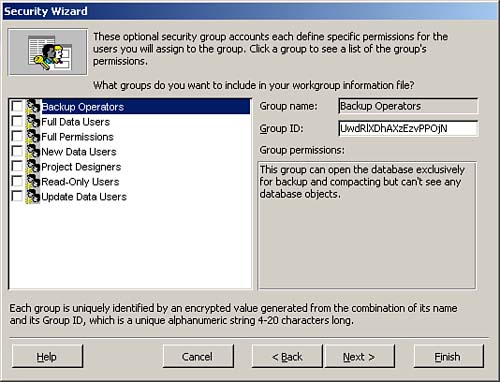
The fourth window of the Security Wizard, pictured in Figure 22.19, allows you to easily create group accounts. If your security needs match those predefined by one of the default groups, you can save yourself a significant amount of time by allowing the Security Wizard to create the necessary groups for you. An example of a predefined group is read-only users who can read all data but cannot modify data or the design of database objects. Another predefined group is for project designers who can edit all data and the design of application objects but cannot modify the structure of tables or relationships.
Figure 22.19. The fourth step of the Security Wizard, where you create groups from a list of predefined group accounts.
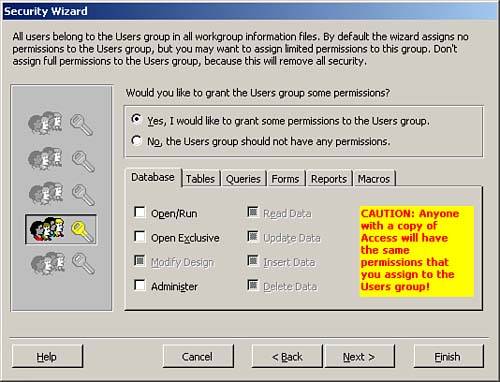
In the fifth window of the Security Wizard, shown in Figure 22.20, you designate what permissions, if any, you want to grant to the Users group. It is important to remember that all users are members of the Users group. Therefore, any permissions that you grant to the Users group Access grants to all the users of the application. As a general rule, I recommend not granting any rights to the Users group. It is better to assign rights to other groups and then make specific users members of those groups.
Figure 22.20. The fifth step of the Security Wizard, where you grant specific rights to the Users group.
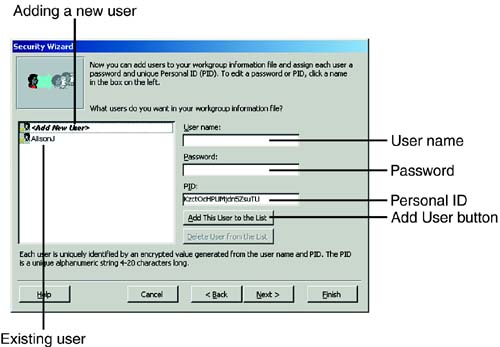
The sixth window of the Security Wizard allows you to define the users who will use your database. In this step of the wizard, you supply each user's name, a password, and a unique personal identifier (PID), and then you click the Add This User to the List button (see Figure 22.21). To delete a user, you select that user and then click the Delete User from the List button. You click Next when you are finished defining all users.
Figure 22.21. The sixth step of the Security Wizard, where you define the users of your database.
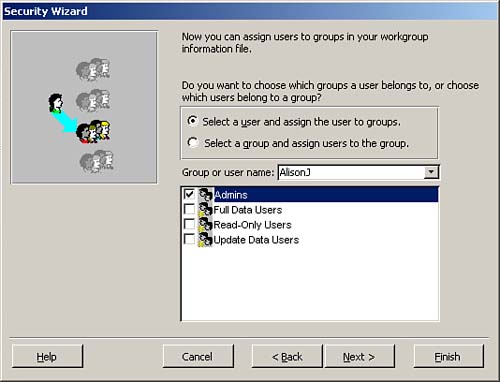
In the next window of the Security Wizard, you assign the users created in the sixth window to the groups designated in the fourth window. To assign a user to a group, you click Select a User and Assign the User to Groups. Next, you select a user from the Group or User Name drop-down list box. Then you click to add the selected user to any of the predefined groups (see Figure 22.22).
Figure 22.22. The seventh step of the Security Wizard, where you assign users to groups.
The final window of the Security Wizard prompts you to enter the name of the backup copy of the unsecured database. After you click Finish, Access secures the existing database, and it gives the original unsecured database the name designated for the backup.
You cannot change the owner of a database, and the owner of a database always has rights to everything in the database. Because Admin is the owner of the database and is the same in all workgroups, Access must copy all the database objects to a new, secure database that is owned by the new user. The wizard is intelligent enough to create a new secure database with the original database name and create a backup with the name that you designate. Access in no way modifies the existing, unsecured database. When the process is complete, the security report shown in Figure 22.23 appears.
Figure 22.23. The One-step Security Wizard Report.
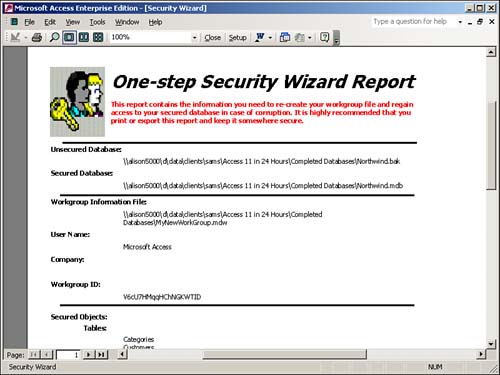
The One-step Security Wizard Report contains detailed information about the workgroup the wizard created, the objects it secured, and the groups and users it created. The new system administrator owns the new copy of the database. The Security Wizard revokes all rights from the Users group.
When you close this report, Access prompts you to save it as a snapshot so that you can view it again later. Because the report contains valuable information about the workgroup and the secured database, I strongly suggest that you save it in a very safe place. Armed with the information contained in the report, a savvy user could violate the security of the database.
Step 10: Creating Users and Groups
Any time after you establish and join a workgroup, you can establish the users and groups who will be members of the workgroup. Users represent individual people who will access your database files. Users are members of groups, and groups are categories of users who share the same rights. You can assign rights at the user level or at the group level. Administratively, it is easier to assign all rights at the group level. However, this involves categorizing access rights into logical groups and then assigning users to those groups.
Establishing groups properly greatly facilitates the administration of a system. If you need to change the rights of a category of users, you can modify those rights at a group level. If a user is promoted and needs additional rights, you can make that user a member of a new group. This is much easier than trying to maintain separate rights for each user.
You generally create groups and then assign users to the appropriate groups. It is important to evaluate the structure of the organization as well as the application before you begin the mechanical process of adding groups and users.
Adding Groups
To add new groups, follow these steps:
Make sure you are a member of the correct workgroup. With or without a database open, select Tools | Security | User and Group Accounts.
Select the Groups tab of the User and Group Accounts dialog box.
Click New. The New User/Group dialog box appears.
Type the name of the group and enter a PID that uniquely identifies the group.
Click OK.
Repeat steps 3 through 5 for each group you want to add.
The PID is a case-sensitive, alphanumeric string that can be from 4 to 20 characters in length. In combination with the user or group name, the PID uniquely identifies the user or group in a workgroup. You should store PIDs in a very safe place. In the hands of the wrong person, access to PIDs can lead to a breach of security. On the other hand, if the database is damaged and an important PID is not available, the data and objects in the database will not be accessible, even to legitimate users. |
Adding Users
To add users through the user interface, follow these steps:
Choose Tools | Security | User and Group Accounts. (You do not need to have a database open to complete this step.)
Select the Users tab if it is not already selected.
Click New. The New User/Group dialog box appears.
Enter the name of the user and the PID associated with the user. Remember that the PID is not a password; instead, it combines with the username to create a unique identifier for the user.
Click OK.
Repeat steps 3 through 5 for each user you want to define.
Assigning Users to the Appropriate Groups
Before you assign rights to users and groups, you should make each user a member of the appropriate group. A user can be a member of as many groups as you choose, but you need to remember that each user gets the rights of his or her most forgiving group. In other words, if a user is a member of both the Admins group and a group with read-only access to objects, the rights of the Admins group prevail for that user in all cases. To assign users to the appropriate groups, follow these steps:
Choose Tools | Security | User and Group Accounts. (You do not need to have a database open to complete this step.)
Select the Users tab if it is not already selected.
From the Name drop-down list box, select the user for whom you want to create group membership(s).
Double-click the name of the group to which you want to add the user, or single-click the group and then click the Add button.
Repeat steps 3 and 4 for each user to whom you want to assign a group membership.
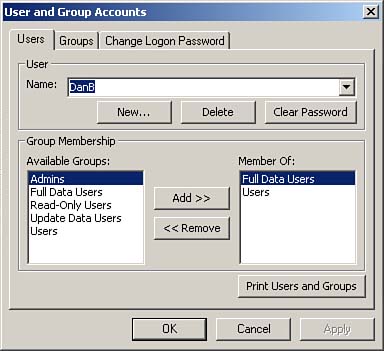
Figure 22.24 shows a user named DanB who has been added to the Full Data Users group.
Figure 22.24. Assigning a user to the appropriate group.
Remember that the users and groups you create are for the workgroup as a whole?not just for a specific database. |
Step 11: Assigning Rights to Users and Groups
So far, you have created groups and users, but you haven't given any of your groups or users rights to objects in the database. The key is to assign specific rights to each group and then to make sure that all users are members of the appropriate groups. After that, you can assign each group specific permissions to the objects in the database. Access maintains user and group information in the system database; it stores permissions for objects in system tables in the application database file (that is, the .MDB file). After you establish a workgroup of users and groups, you must assign rights to specific objects in the database by following these steps:
Open the database that contains the objects you want to secure.
Choose Tools | Security | User and Group Permissions. The dialog box shown in Figure 22.25 appears. Notice that as you click each user in the User/Group Name box, as indicated by the check boxes in the Permissions section of the dialog box, you see that only the Administrator has rights to any objects. The Security Wizard automatically removed all permissions from the user named Admin. If you select the Groups option button, you see that only the Admins group has any rights. (If you have previously run the Security Wizard and added other users and groups, they have rights as well.)
Figure 22.25. The User and Group Permissions dialog box.
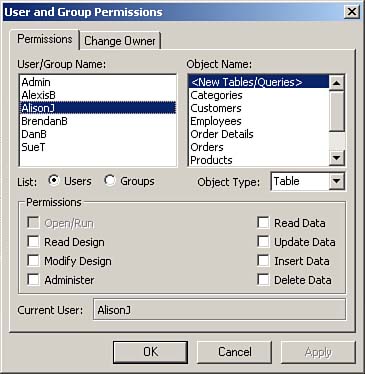
To assign rights to a group, select the Groups option button. All the available groups appear in the User/Group Name box.
From the Object Type drop-down list box, select the type of object you want to secure.
From the Object Name list box, select the names of the objects to which you want to assign rights. You can select multiple objects by pressing the Ctrl and Shift keys.
Enable the appropriate check boxes in the Permission section of the dialog box to select permissions for the objects. The text that follows discusses the types of available permissions.
Repeat steps 4 through 6 for all objects to which you want to assign rights.
I recommend that you assign groups the rights to objects and then simply make users members of the appropriate groups. Notice that you can use the Object Type drop-down list box in the User and Group Permissions dialog box to view the various types of objects that make up the database. |
To assign permissions appropriately, it is important that you understand the types of permissions available and what each type of permission allows a user to do. Table 22.1 lists the types of permissions that are available.
Permission | Allows User To |
|---|---|
Open/Run | Open a database, form, or report, or run a macro. |
Open Exclusive | Open a database with exclusive access. |
Read Design | View tables, queries, forms, reports, macros, and modules in Design view. |
Modify Design | View and change the design of tables, queries, forms, reports, macros, and modules. |
Administer | Set the database password, replicate the database, and change startup properties (when the user has Administer permission of a database). Have full access to the object and its data (when the user has Administer permission of a database object?such as a table, query, form, report, macro, or module). Assign permissions for that object to other users (when the user has Administer permissions for an object). |
Read Data | View the data in a table or query. |
Update Data | View and modify table or query data. A user with this permission cannot insert and delete records, however. |
Insert Data | Add records to a table or query. |
Delete Data | Delete records from a table or query. |
Some of these permissions implicitly include associated permissions. A user must first have the rights to read the data and the design of a table before he or she can update data in the table, for example.


