Working with Field Properties
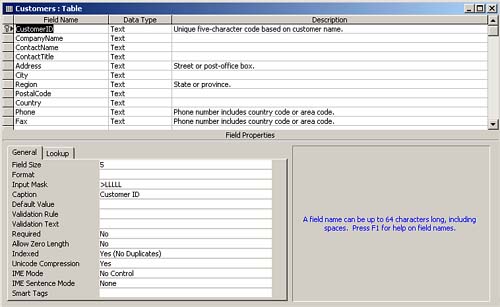
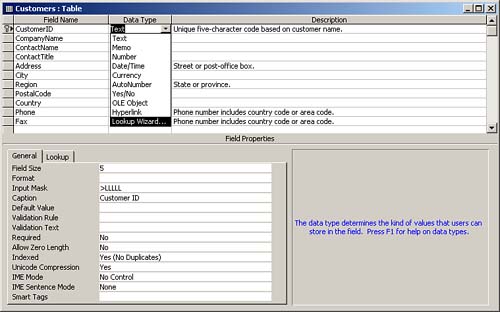
After you have added fields to a table, you need to customize their properties. Field properties let you control how Access stores data as well as what data the user can enter into a field. The available properties differ depending on which field type you select. You can find a comprehensive list of properties under the Text data type (see Figure 14.1). The following sections describe the various field properties. Notice that the lower portion of the Design view window in Figure 14.1 is the Field Properties pane. This is where you can set properties for the fields in a table.
Figure 14.1. Using the Field Properties pane of the Design View window to set the properties of a field.
The Field Size Property: Limiting What the User Enters into a Field
The Field Size property is available for Text and Number fields only. It's best to set the Field Size property to the smallest value possible. For Number fields, a small size means lower storage requirements and faster performance. The same is true for Text fields. To modify the Field Size property, follow these steps:
Select the desired field name from the top pane of the Design view window.
Click the Field Size property text box in the Field Properties pane.
Type the desired field size. Figure 14.1 shows 5 as the field size of the CustomerID field.
It's important to note that for Number fields, you should select the smallest Field Size property value that can store the values you will be entering. Limiting the Field Size property of Number fields saves disk space. |
A couple of tips that can save you a lot of time. First, you can move between the two panes of the Design view window by pressing F6. Second, to get help with a field property, you click the property line in the Field Properties pane and press F1. |
Task: Working with the Field Size Property
It's important that you practice building tables and setting field types. To get the practice that you need, you can build a table with the following fields and types: |
CompanyID: AutoNumber

CompanyName: Text

State: Text

PhoneNumber: Text

ContactDate: Date/Time

CreditLimit: Currency
When you've added all the fields and set their types, you're ready to refine them by setting some of their properties. During the remainder of the exercise, you'll set the primary key of the table and the Field Size property of the State field:
Set CompanyID as the primary key field.
To set the Field Size property of the State field to two characters, click anywhere in the field and then type 2 for the Field Size property.
Switch to Datasheet view. Access prompts you to save the table. Name it tblCustomers. When you try to enter data into the State field, notice that you can enter only two characters.
The Format Property: Determining How Access Displays Data
The Format property allows you to customize the way Access displays and prints numbers, dates, times, and text. You can select a predefined format or create a custom format.
To select a predefined display format (from Design view), follow these steps:
Select the desired field.
Click the Format property text box in the Field Properties pane.
Click the drop-down arrow that appears when you click in the Format property.
Select the desired format based on the type of field you are formatting.
You create a custom format by using a combination of the special characters, called placeholders, listed in Table 14.1.
Placeholder | Function |
|---|---|
0 | Displays a digit if one exists in the position; otherwise, displays a zero. You can use the 0 placeholder to display leading zeros for whole numbers and trailing zeros for decimals. |
# | Displays a digit if one exists in the position; otherwise, displays a blank space. |
$ | Displays a dollar sign in the position. |
. %, | Displays a decimal point, percent sign, or comma at the indicated position. |
/ | Separates the day, month, and year to format date values. |
M | Used as a month placeholder: m displays 1, mm displays 01, mmm displays Jan, mmmm displays January. |
D | Used as a day placeholder: d displays 1, dd displays 01, ddd displays Mon, dddd displays Monday. |
Y | Used as a year placeholder: yy displays 95, yyyy displays 1995. |
: | Separates hours and minutes. |
h, n, s | Used as time placeholders for h hours, n minutes, and s seconds. |
AM/PM | Displays time in 12-hour format, with AM or PM appended. |
@ | Indicates that a character is required in the position in a text or memo field. |
& | Indicates that a character is optional. |
> | Changes all the text characters to uppercase. |
< | Changes all the text characters to lowercase. |
To create a custom display format, follow these steps while in Design view of a form:
Select the desired field.
Click the Format text box in the Field Properties pane.
Type the desired format, using the placeholders listed in Table 14.1.
Field names, as a general rule, should be short and should not contain spaces. You can, however, assign to the field a Caption property that is descriptive of the field's contents. Access displays the Caption property as the field label on forms and reports. For example, you can assign "Fax Number" to the Caption property for a field named FaxNum. The Caption property is discussed in more detail later in this hour. |
Task: Working with the Format Property
The Format property affects the appearance of text. This task lets you practice working with the Format property: |
Set the Format property of the ContactDate field you created earlier in this hour to Medium Date.
Switch to Datasheet view and enter some dates in different formats, such as 07/08/05 and July 8, 2005.
Notice that no matter how you enter the dates, as soon as you tab away from the field, they appear in the format dd-mmm-yy, as 08-Jul-05.
The Caption Property: Providing Alternatives to the Field Name
The text you place in the Caption property becomes the caption for fields in Datasheet view. Access also uses the contents of the Caption property as the caption for the attached label it adds to data-bound controls when you add them to forms and reports. The Caption property becomes important whenever you name fields without spaces. Whatever is in the Caption property overrides the field name for use in Datasheet view, on forms, and on reports.
|
It's important to set the Caption property for fields before you build any forms or reports that use those fields. When you produce a form or report, Access looks at the current caption. Access doesn't modify captions for a field on existing forms and reports, so if you add or modify the caption at a later time, the change won't be made. |
To set the Caption property (from Design view), follow these steps:
Select the desired field name from the top pane of the Design view window.
Click the Caption text box in the Field Properties pane.
Type the desired caption.
The Default Value Property: Saving Data-Entry Time
Assigning a Default Value property to a field causes a specified value to be filled in for the field in new records. Setting a commonly used value as the Default Value property facilitates the data entry process. When you add data, you can accept the default entry or replace it with another value. For example, if most of your customers are in California, you can assign a default value of CA. When you're doing data entry, if the customer is in California, you do not need to change the value for the state. If the customer is in another state, you simply replace CA with the appropriate state value.
To set a Default Value property (from Design view), follow these steps:
Select the desired field from the top pane of the Design view window.
Click the Default Value property text box in the Field Properties pane.
Type the desired value.
A Default Value property can be constant, such as CA for California, or a function that returns a value, such as Date(), which displays the current date. |
The data users enter in tables must be accurate if the database is to be valuable to you or your organization. You can use the Validation Rule property to add data entry rules to the fields in tables. The Validation Rule property is covered in more detail later in the hour.
Task: Working with the Default Value Property
The Default Value property is a big time-saver. This task gives you practice working with the Default Value property: |
Enter the following default values for the State, ContactDate, and CreditLimit fields you created earlier:
State: CA

ContactDate: =Date()

CreditLimit: 1000
Switch to Datasheet view and add a new record.
Notice that default values appear for the State, ContactDate, and CreditLimit fields. You can override these defaults, if you want.
Date() is a built-in Visual Basic for Applications (VBA) function that returns the current date and time. When it is used as a default value for a field, Access enters the current date into the field when the user adds a new row to the table. |
The Validation Rule and Validation Text Properties: Controlling What the User Enters in a Field
The Default Value property suggests a value to the user, but the Validation Rule property actually limits what the user can place in the field. Validation rules can't be violated; the database engine strictly enforces them. As with the Default Value property, this property can contain either text or a valid Access expression, but you cannot include user-defined functions in the Validation Rule property. You also can't include references to forms, queries, or tables in the Validation Rule property.
You can use operators to compare two values; the less than (<) and greater than (>) symbols are examples of comparison operators. And, Or, Is, Not, Between, and Like are called logical operators. Table 14.2 provides a few examples of validation rules.
Validation Rule | Validation Text Examples |
|---|---|
>0 | Please enter a valid Employee ID Number. |
"H" or "S" or "Q" | Only H or S or Q codes will be accepted. |
Between Date()-365 and Date()+365 | Date cannot be later than one year ago today or more than one year from today. |
>0 or is Null | Enter a valid ID number or leave blank if not approved. |
Between 0 and 9 or is Null | Rating range is 0 through 9 or is blank. |
>Date() | Date must be after today. |
Whereas the Validation Rule property limits what the user can enter into the table, the Validation Text property provides the error message that appears when the user violates the validation rule.
If you set the Validation Rule property but do not set the Validation Text property, Access automatically displays a standard error message whenever the user violates the validation rule. To display a custom message, you must enter message text in the Validation Text property. |
To establish a field-level validation rule (from Design view), follow these steps:
Select the desired field name from the top pane of the Design view window.
Click the Validation Rule property text box in the Field Properties pane.
Type the desired validation rule (for example, Between 0 and 120).
To add validation text, follow these steps:
Click the Validation Text property text box in the Field Properties pane.
Type the desired text (for example, Age Must Be Between 0 and 120).
You can require users of a database to enter a valid value in selected fields when editing or adding records. For example, you can require a user to enter a date for each record in an Invoice table.
Task: Working with the Validation Rule Property
Add the following validation rules to the State, ContactDate, and CreditLimit fields in a table: |
State: In (CA, AZ, NY, MA, UT)

ContactDate: <= Date()

CreditLimit: Between 0 And 5000
Access will place quotation marks around the state abbreviations as soon as you tab away from the property.
Next you need to switch to Datasheet view and test the validation rules that you just created:
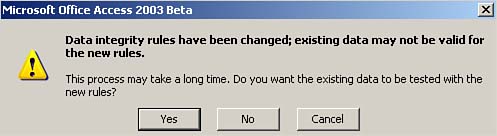
Switch to Datasheet view. If the table already contains data, when you save your changes, the message shown in Figure 14.2 appears.
Figure 14.2. A message box that asks whether you want to validate existing data.

In this example, the expression <= Date() is used to limit the value entered into the field to a date that is on or before the current date. Because the Date() expression always returns the current date, the validation rule applies whether the user is adding a new row or modifying an existing row.
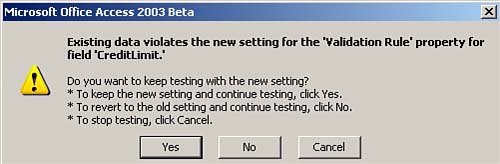
If you select Yes, Access tries to validate all existing data, using the new rules. If it finds any errors, Access notifies you that errors occurred, but it does not tell you which are the offending records (see Figure 14.3). You have to build a query to find all the records that violate the new rules. If you select No, Access doesn't try to validate your existing data and does not warn you of any problems.
Figure 14.3. A warning that all data did not validate successfully.
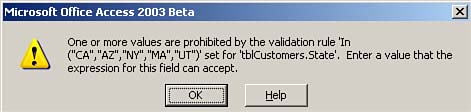
Try to enter an invalid state in the State field; you should see the message box displayed in Figure 14.4. As you can see, this isn't a user-friendly message, which is why you should create a custom message by using the Validation Text property.
Figure 14.4. The message displayed when a validation rule is violated and no validation text has been entered.
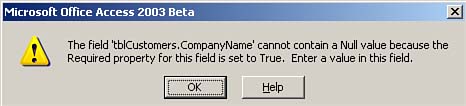
The Required Property: Making the User Enter a Value
The Required property is very important: It determines whether you require a user to enter a value in a field. This property is useful for foreign key fields, when you want to make sure the user enters data into the field. It's also useful for any field containing information that's needed for business reasons (company name, for example).
|
To designate a field as required (from Design view), follow these steps:
Select the desired field.
Click the Required property text box in the Field Properties pane.
Type Yes.
Task: Working with the Required Property
The best way to learn about the Required property is to practice using it. The steps that follow provide an example: |
Set the Required property of the CompanyName and PhoneNumber fields created earlier in this hour to Yes.
Switch to Datasheet view and try to add a new record, leaving the CompanyName and PhoneNumber fields blank. Make sure you enter a value for at least one of the other fields in the record. When you try to move off the record, the error message shown in Figure 14.5 appears.
Figure 14.5. A message that appears when you leave blank a field that has the Required property set to Yes.
The Allow Zero Length Property: Accommodating for Situations with Nonexistent Data
You can use the Allow Zero Length property to allow a string of no characters. You enter a zero-length string by typing a pair of quotation marks with no space between them (""). You use the Allow Zero Length property to indicate that you know there is no value for a field.
To allow a zero-length field (from Design view), follow these steps:
Select the desired field.
Click the Allow Zero Length property text box in the Field Properties pane.
Select Yes from the drop-down list box.
Task: Working with the Allow Zero Length Property
It's easiest to get to know the Allow Zero Length property by actually seeing it in action. Let's take a look: |
Add a new field called ContactName.
Set the ContactName field's Required property to Yes.
Try to add a new record and enter a pair of quotation marks ("") in the ContactName field. You should not get an error message because in Access 2003, the Allow Zero Length property defaults to Yes. The zero-length string should appear blank when you move off the field.
Return to the Design view of the table.
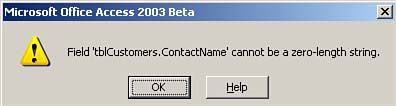
Change the setting for the Allow Zero Length property to No. Go back to Datasheet view and once again enter a pair of quotation marks in the ContactName field. This time you should not be successful?you should get the error message shown in Figure 14.6.
Figure 14.6. The result of entering "" when the Allow Zero Length property is set to No.
In versions of Access prior to Access 2002, the default setting for the Allow Zero Length property is No. In Access 2002 and Access 2003, Microsoft has changed this default setting to Yes. You need to pay close attention to this new default behavior, especially if you're accustomed to working with prior releases of Access or if you must import Access 2000 databases into Access 2003. |
If you want to cancel changes to the current field, you can press Esc once. To abandon all changes to a record, you press Esc twice. |
The Input Mask Property: Determining What Data Goes into a Field
An input mask controls data the user enters into a field. For instance, a short date input mask appears as --/--/---- when the field is active. You can then simply type 07042005 to display or print 7/4/2005. Based on the input mask, you can ensure that the user enters only valid characters into the field. |
Table 14.3 lists some of the placeholders that you can use in character strings for input masks in fields of the Text data type.
Placeholder | Description |
|---|---|
0 | A number (0?9) is required. |
9 | A number (0?9) is optional. |
# | A number (0?9), a space, or a plus or minus sign is optional; a space is used if no number is entered. |
L | A letter (A?Z) is required. |
? | A letter (A?Z) is not required; a space is used if no letter is entered. |
A | A letter (A?Z) or number (0?9) is required. |
a | A letter (A?Z) or number (0?9) is optional. |
& | Any character or space is required. |
C | Any character or space is optional. |
> | Any characters to the right are converted to uppercase. |
< | All the text characters to the right are changed to lowercase. |
To create an input mask (from Design view), follow these steps:
Select the desired field.
Click the Input Mask property text box.
Type the desired format, using the placeholders listed in Table 14.3.
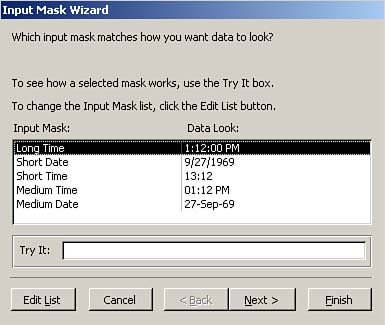
Access includes an Input Mask Wizard that appears when you place the cursor in the Input Mask text box and click the ellipsis (…) button to the right of the text box. The wizard, shown in Figure 14.7, provides common input mask formats from which to choose. To start the Input Mask Wizard, you click the button to the right of the Input Mask property.
Figure 14.7. Entering an input mask with the Input Mask Wizard.
The Input Mask Wizard is available only if you selected the Additional Wizards component during Access setup. If you did not select this component and then you try to open the Input Mask Wizard, Access prompts you to install the option on-the-fly the first time you use it. |
For example, the input mask 000-00-0000;;_ (converted to 000\-00\-0000;;_ as soon as you tab away from the property) forces the entry of a valid Social Security number. Everything that precedes the first semicolon designates the actual mask. The zeros force the entry of the digits 0 through 9. The dashes are literals that appear within the control as the user enters data. The character you enter between the first and second semicolon determines whether literal characters (the dashes, in this case) are stored in the field. If you enter a 0 in this position, literal characters are stored in the field; if you enter 1 or leave this position blank, the literal characters aren't stored. The final position (after the second semicolon) indicates what character is displayed to denote the space where the user types the next character (in this case, the underscore).
Here's a more detailed example: In the mask \(999") "000\-0000;;_, the first backslash causes the character that follows it (the open parenthesis) to be displayed as a literal. The three nines allow the user to enter optional numbers or spaces. Access displays the close parenthesis and space within the quotation marks as literals. The first three zeros require values 0 through 9. The dash that follows the next backslash is displayed as a literal. Four additional numbers are then required. The two semicolons have nothing between them, so the literal characters aren't stored in the field. The second semicolon is followed by an underscore, so an underscore is displayed to indicate the space where the user types the next character. This sounds pretty complicated, but here's how it works. The user types 8054857632. What appears is (805)485-7632. What is actually stored is 8054857632. Because the input mask contains three 9s for the area code, the area code is not required. The remaining characters are all required numbers.
Task: Working with the Input Mask Property
Use the Input Mask Wizard to add a mask for the PhoneNumber field, which should be set up as a Text field. This involves activating the Input Mask Wizard after you have selected the PhoneNumber field. |
Click anywhere in the PhoneNumber field and then click the Input Mask property.
Click the ellipsis (…) to the right of the Input Mask property.
Select Phone Number from the list of available masks and choose not to store the literal characters in the field when the wizard asks How Do You Want to Store the Data?
Switch to Datasheet view and enter a phone number. Notice how the cursor skips over the literal characters. Try leaving the area code blank; Access should allow you to do this.
Try to enter a letter in any position. Access should prohibit you from doing this.
Try to leave any character from the seven-digit phone number blank. Access shouldn't let you do this, either.
When you use an input mask, the user is always in Overtype mode. This behavior is a feature of the product and can't be altered. |
The Lookup Wizard
You can select Lookup Wizard as a field's data type. The Lookup Wizard guides you through the steps to create a list of values from which you can choose. You can select the values from a table or a query, or you can create a list of your own values.
To use the Lookup Wizard (from Design View), follow these steps:
Select the desired field.
Choose Lookup Wizard as the data type (see Figure 14.8).
Figure 14.8. Activating the Lookup Wizard.
Select the desired source of the values and then click Next.
Select the table or query to provide the values and then click Next.
Double-click the field(s) that contains the desired values and then click Next.
Drag the Lookup column to the desired width and then click Next.
Type a name for the Lookup column and then click Finish.
There are some things you should be aware of when working with the Lookup Wizard. When you create a form based on a table with a Lookup field, the form automatically displays a combo box (or another designated control) for that field. Also, as you add records to the table that is the source for the lookup values, the new information appears in the list. |


