Building Forms Based on More Than One Table
Many forms are based on more than one table; such forms are called one-to-many forms. For example, a form that shows a customer at the top and the orders associated with that customer at the bottom is considered a one-to-many form. Forms can also be based on a query that joins more than one table. Rather than see a one-to-many relationship in such a form, you see the two tables displayed as one, with each record on the "many" side of the relationship appearing with its parent's data. |
Creating One-to-Many Forms
There are several ways to create one-to-many forms. As with many other types of forms, you can use a wizard to help you or you can build the form from scratch. Because all the methods for creating a form are helpful to users and developers alike, the available options are covered in the following sections.
Building a One-to-Many Form by Using the Form Wizard
Building a one-to-many form by using the Form Wizard is a simple 10-step process:
Click Forms in the Objects list and double-click the Create Form by Using Wizard icon.
From the Tables/Queries drop-down list, select the table or query that will appear on the "one" side of the relationship.
Select the fields you want to include from the "one" side of the relationship.
Use the Tables/Queries drop-down list to select the table or query that will appear on the "many" side of the relationship.
Select the fields you want to include from the "many" side of the relationship.
Click Next.
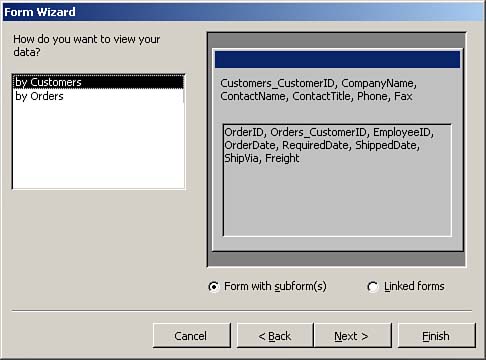
Select whether you want the parent form to appear with subforms or the child forms to appear as linked forms. In this example, I want the parent form to appear with subforms, so I clicked the Form with Subform(s) option (see Figure 16.16). Click Next.
Figure 16.16. The Form Wizard, creating a parent form with subforms.
Indicate whether you want the subform to appear in a tabular format, as a datasheet, as a PivotTable, or as a PivotChart. (This option is not available if you selected Linked Forms in step 7.) Click Next.
Select a style for the form and then click Next.
Name both the form and the subform and then click Finish.
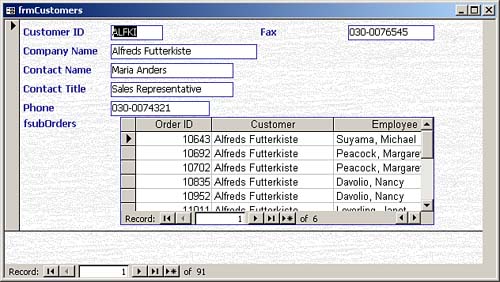
The result of this process is a main form that contains a subform. Figure 16.17 shows an example.
Figure 16.17. The result of creating a one-to-many form by using the Form Wizard.
Building a One-to-Many Form by Using the SubForm Wizard
You can create a one-to-many form by building the parent form and then adding a Subform/Subreport control from the toolbox. If you want to use the SubForm Wizard, you need to make sure that you select the Control Wizards tool before you add the Subform/Subreport control to the main form. Then you follow these steps:
Click to select the Subform/Subreport control.
Click and drag to place the Subform/Subreport control on the main form. The SubForm Wizard appears.
Indicate whether you want to use an existing form as the subform or build a new subform from an existing table or query.
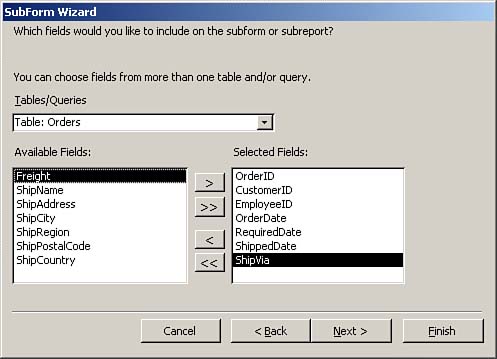
If you select Use Existing Tables and Queries, the next step of the SubForm Wizard prompts you to select a table or query and which fields you want to include (see Figure 16.18). Select the fields and then click Next.
Figure 16.18. Selecting fields to include in a subform.
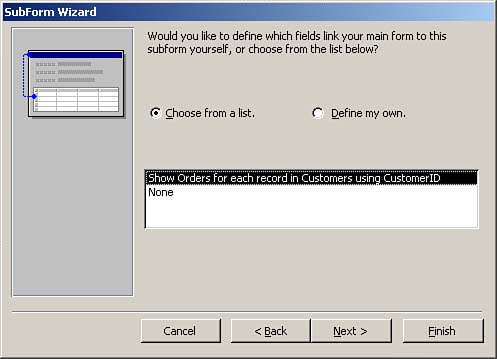
The next step of the SubForm Wizard allows you to define which fields in the main form link to which fields in the subform. You can select from the suggested relationships or define your own (see Figure 16.19). Select the appropriate relationship and click Next.
Figure 16.19. Defining the relationship between the main form and the subform.
Name the subform and click Finish.
The resulting form should look similar to the form created with the Form Wizard. Creating a one-to-many form this way is simply an alternative to using the Form Wizard.
Another way to add a subform to a main form is to click and drag a form from the Database window onto the main form. Access then tries to identify the relationship between the two forms. |
Working with Subforms
After you have added a subform to a form, you need to understand how to work with it. To begin, you need to familiarize yourself with a few properties of a Subform control:
Source Object? Specifies the name of the form that's being displayed in the control.
Link Child Fields? Specifies the fields from the child form that link the child form to the master form.
Link Master Fields? Specifies the fields from the master form that link the child form to the master form.
You should also understand how to make changes to a subform. One option is to open a subform in a separate window (as you would open any other form). After you close and save the form, all the changes automatically appear in the parent form. The other choice is to modify a subform from within the main form. With the main form open, the subform is visible. Any changes made to the design of the subform from within the main form are permanent.
The default view of the subform is Datasheet or Continuous Forms, depending on how you added the subform and what options you selected. If you want to modify the default view, you simply change the subform's Default View property.
When the subform is displayed in Datasheet view, the order of the fields in the subform has no bearing on the datasheet that appears in the main form. The order of the columns in the datasheet depends on the tab order of the fields in the subform. You must therefore modify the tab order of the fields in the subform to change the order of the fields in the resulting datasheet. |
Access 2002 and Access 2003 make it easier than ever before to work with subforms and subreports in Design view. Scrolling has been improved so that it's easier to design subforms and subreports. In addition, you can now open a subform in its own separate Design view window by right-clicking the subform and selecting Subform in New Window. Or, instead of right-clicking the subform, you can select the subform and then select View | Subform in New Window from the menu bar. |


