Installing from the Red Hat Linux CD-ROM
Installing from the Red Hat Linux CD-ROM
After you start the initial version of Linux following the procedures described in the section “Booting the Red Hat Installer,” Linux runs the Red Hat Linux installation program—called anaconda—from the CD-ROM. The rest of the installation occurs under the control of the installation program. The default Red Hat installation program uses a GUI. You can go through the installation steps by pointing and clicking with the mouse.
anaconda is the Red Hat Linux installation program. It runs after the initial Linux kernel boots and shows the text or GUI screens through which you perform the installation. anaconda is written in the Python programming language, and the anaconda source code is included in each Red Hat Linux in the anaconda RPM.
To learn more about anaconda, visit Red Hat’s website on anaconda at http:// rhlinux.redhat.com/anaconda/.
If for some reason anaconda fails to start the X Window System–based graphical interface, press Ctrl-Alt-Del to restart the installation and type linux text at the boot prompt to activate the text-mode installer. In text mode, the Red Hat installer uses a full-screen text-based interface. Each screen typically presents a dialog box with various elements, such as lists of items from which you select one or more buttons to indicate action. Typically, the buttons are labeled OK and Cancel. The bottom of the screen displays a help message that shows you how to navigate around the text screen.
If, for some reason, the installer fails to detect your IDE CD-ROM drive and prompts you for the type of CD-ROM drive, restart the installation by pressing Ctrl-Alt-Del. When you see the boot prompt, type linux hdx=cdrom where x is a single letter—a, b, c, or d—identifying the IDE interface to which the CD-ROM drive is connected. The letter a refers to the master or primary connector of the first IDE controller, b is the slave on the first IDE controller. The letters c and d refer to the master and slave of the second IDE controller. Thus, if your CD-ROM drive is connected as the master on the second IDE controller, you would type the following at the boot prompt:
linux hdc=cdrom
Monitoring the Installation Process
As the installation progresses, you respond primarily to various dialog boxes, entering information the installation program needs. The installation program displays useful information about a number of virtual consoles—these are screens of text in memory that you can view on the physical screen by pressing the key sequences shown in Table 2-1.
| Insider Insight |
You work mostly in the main console—virtual console 7 in GUI installation and 1 in text mode. To switch to another virtual console, press the appropriate keystroke shown in Table 2-1. For example, to view the install log on virtual console 3, press Ctrl-Alt-F3. After you are done viewing the log, press Ctrl-Alt-F7 to return to the GUI console so you can continue with the installation. Typically, you can get by without ever having to switch to the other screens, but if something goes wrong, you can switch to the install log screen by pressing Ctrl-Alt-F3, where you can get more information about the problem. |
|
Virtual |
Keystroke |
Description Console |
|---|---|---|
|
1 |
Ctrl-Alt-F1 |
This is the main console on which the installation program displays the text-based user interface through which you install Linux. |
|
2 |
Ctrl-Alt-F2 |
This console displays a shell prompt from which you can use Linux commands to monitor the progress of installation. The shell prompt appears only after you insert the CD-ROM and press Enter in response to a dialog box that the installation program displays. |
|
3 |
Ctrl-Alt-F3 |
This is the install log. Messages from the installation program appear here. |
|
4 |
Ctrl-Alt-F4 |
The Linux kernel displays its messages on this console. After Linux initially boots, you may want to switch to this console to see the kernel messages because they include information about hardware that Linux detects in your PC. |
|
5 |
Ctrl-Alt-F5 |
This console shows the output of any other programs run during the installation process. |
|
7 |
Ctrl-Alt-F7 |
This is where the anaconda installer displays the X Window System-based graphical user interface. |
Understanding the Red Hat Installation Phases
Installing Red Hat Linux is a fairly lengthy process that contains the following major phases:
-
Getting Ready to Install—Choose the language to be used during the installation process. Indicate the type of keyboard. If you haven’t already placed the first Red Hat CD-ROM into the CD-ROM drive, you also have to specify the media from which Red Hat Linux is to be loaded (for example, the CD-ROM). After the graphical installation screen appears, configure the mouse. Then specify whether you are installing or upgrading and, if you are installing, the type of installation: workstation, server, or custom. I show a custom system installation in this chapter.
-
Partitioning and Using the Hard Disk—This step is to prepare the hard disk space you plan to use for Red Hat Linux. Select the automatic partition option to let the installation program perform this step, or partition the disk manually using Disk Druid. At minimum, you need two partitions—one to be used as swap area and the other for the Linux root file system (represented by /). The partitions are also formatted before use. Appendix B discusses typical partitioning strategies in an operational Linux system.
-
Configuring Linux—In this phase, specify where the GRUB boot loader or Linux Loader (LILO) should be loaded. For GRUB, you can also specify a password that has to be entered to load Linux at system startup. You set up the TCP/IP network, the firewall, the language support, and the time zone, and you specify a password for the root—the super user. The final configuration step is to set up the authentication mechanism.
-
Selecting the Package Groups to Install—Select which package groups—such as X Window System, GNOME desktop, KDE Desktop, Editors, and Web server—you want to install. Up to this point, you can abort the installation without writing anything to the hard disk. After you select the package groups, the installation program prepares the hard disk and installs the selected packages on the hard disk. At the end of the installation, create a boot disk.
-
Completing the Installation—Configure the X Window System. This is the X configuration used when you reboot the system after the installation finishes. You have to identify your video card, monitor, select your GUI (GNOME or KDE), and indicate whether you want a graphical or text login screen.
If you have all configuration information handy (such as video card, monitor, network card details, IP addresses, and host names for the TCP/IP network configuration) and all goes well, installing Red Hat Linux from the companion CD-ROM on a fast Pentium PC should take approximately an hour (assuming that you select nearly all packages). For example, on 1 GHz Pentium PC with 128MB RAM and a 6GB-disk partition devoted to Linux, the entire installation took about an hour.
The Red Hat installer uses kudzu (a utility program) to probe—attempt to determine the presence of—specific hardware, and tailors the installation steps accordingly. For example, if the installation program detects a network card, the program automatically displays the screens on which you can configure the TCP/IP network. Therefore, you may see some variation in the sequence of steps, depending on your specific hardware configuration.
Kudzu is a configuration program as well as library of object code that can probe and determine what hardware is installed on your system. The anaconda installation program uses kudzu to detect hardware during installation.
To learn more about kudzu, visit Red Hat’s kudzu website at http://rhlinux. redhat.com/kudzu/.
The following sections describe each of the Red Hat Linux installation phases in detail.
Getting Ready to Install
In this phase, you perform the following steps before moving on to disk setup and the actual installation of Linux:
-
A text screen appears with a welcome message and a prompt. Press Enter to begin installing in GUI mode or type linux text to install in text mode. If you have a SCSI controller or network card that the Linux kernel may not automatically detect, you should type linux noprobe to manually install the hardware (in this case, you have to select the hardware from a list or provide a driver disk; see Appendix B for more information on setting up SCSI controllers). Typically, you press Enter to continue the installation in GUI mode.
-
The installation program starts the X Window System and displays a list of languages to be used during the installation. The list includes languages such as English, French, German, Icelandic, Italian, Norwegian, Romanian, Russian, Slovak, Spanish, and Ukrainian. Use your mouse to select the language you want to use for the installation screens, then click the Next button to continue.
In the graphical mode installation, each screen has online help available on the left side of the screen. You can read the help message to learn more about what you are supposed to select in a specific screen.
-
The installation program displays a list of keyboard layouts. Select a keyboard layout suitable for your language’s character set (for example, U.S. English in the United States).
Note that you can always reconfigure your keyboard after finishing the installation. Simply log in as root at a text console (you can get one by pressing, for example, Ctrl-Alt-F2) and type setup. This runs a text-mode setup utility that enables you to configure, among other things, the keyboard, the mouse, and the printer.
-
The installation program displays a screen from which you configure the mouse in your system. The various mouse types are listed in a tree structure organized alphabetically by manufacturer. You need to know your mouse type and whether or not it is connected to the PC’s serial port or the PS/2 port (this uses a small round connector). If your mouse type appears in the list, select it. Otherwise, select a generic mouse type. Most new PCs have a PS/2 mouse. Finally, for a two-button mouse, you should select the Emulate 3 Buttons option. Because many X applications assume that you are using a three-button mouse, go ahead and select this option. On a typical two-button mouse, you can simulate a middle-button click by pressing both buttons simultaneously. On a Microsoft Intellimouse, the wheel acts as the middle button.
If you select a mouse with a serial interface, you have to specify the serial port where the mouse is connected. For COM1, specify /dev/ttyS0 as the device; for COM2, the device name is /dev/ttyS1.
-
The installation program searches for any existing Red Hat Linux installation on your PC and then prompts you for the installation type—whether you want to install a new system or upgrade any older Red Hat installation. If you are performing a fresh installation, you have to select the installation type: Personal Desktop, Workstation, Server, or Custom. The Personal Desktop, Workstation, and Server installations simplify the installation process by partitioning the disk in a predefined manner. The Personal Desktop installation creates a Red Hat Linux system for home, laptop, or desktop use. A graphical environment is installed along with productivity applications.
A Workstation installation installs graphical environment as well as software development tools. This type of installation also deletes all currently existing Linux-related partitions and creates a set of new partitions for Linux. A Server installation deletes all existing disk partitions, including any existing Windows partitions, and creates a whole slew of Linux partitions. By default, the Server installation does not install the graphical environment, but you can always add the packages for the GUI desktops. For maximum flexibility, select the Custom installation, but note that the other installation types can be easier because many choices are already made for you.
Caution Do not select the Server installation if you want to retain any existing Windows partitions.
The next major phase of installation involves partitioning the hard disk for use in Linux.
Partitioning and Using the Hard Disk
Like Windows, Linux requires you to partition and prepare a hard disk before you can install Red Hat Linux. You usually do not perform this step; when you buy your PC from a vendor, the vendor takes care of preparing the hard disk and installing Windows and all other applications on the hard disk. Because you are installing Red Hat Linux from scratch, however, you have to perform this crucial step yourself. As you see in the following sections, this task is just a matter of following instructions.
When the Red Hat Linux installation program reaches the disk-partitioning phase, it displays a screen from which you can select a partitioning strategy. The screen gives you three options for partitioning and using the hard disk:
-
Automatically partition: This option causes the Red Hat installation program to create new partitions for installing Linux, based on your installation type, such as workstation or server. After the automatic partitioning, you get a chance to customize the partitions. This is the option most users choose.
-
Manually partition with Disk Druid: With this option, you can use the Disk Druid program that lets you partition the disk any way you want and, at the same time, specify which parts of the Linux file system are to be loaded on which partition.
From the disk-partitioning strategy screen, select the Automatically partition option to have the installer automatically partition the disk for you. The Red Hat Linux installation program, then displays another screen (see Figure 2-2) that asks you how you want the automatic partitioning to be done.
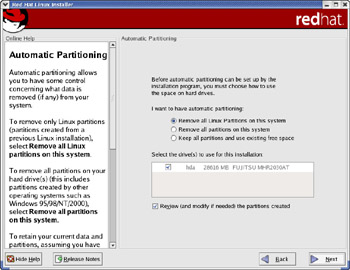
Figure 2-2: Selecting Automatic Partitioning Options during Red Hat Linux Installation.
As Figure 2-2 shows, you can select from three automatic partitioning options:
-
Remove all Linux partitions on this system—This option causes the Red Hat installation program to remove all existing Linux partitions and to create new partitions for installing Red Hat Linux. You can use this option if you already have Linux installed on your PC and want to wipe it out and install the latest version of Red Hat Linux.
-
Remove all partitions on this system—This option is similar to the first option, except that the installation program removes all partitions, including those used by other operating systems such as Microsoft Windows.
-
Keep all partitions and use existing free space—If you have created space for Linux by using PartitionMagic or the FIPS utility, select this option to create the Linux partitions using the free space on the hard disk. If you are installing Red Hat Linux on a new PC after resizing the partition, this is the option to choose.
Select the appropriate option, and click Next. For example, if you select the first option, the Red Hat Linux installation program displays a dialog to confirm your choice and to point out that all data in the existing Linux partitions will be lost. Click Yes to continue. In the next screen (see Figure 2-3) the installer shows the partitions it has prepared. The exact appearance of this screen depends on your hard disk’s capacity and its current partitions.
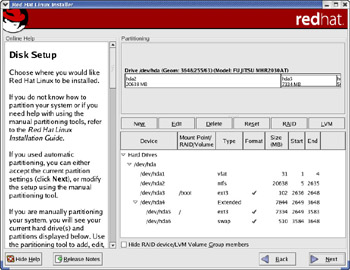
Figure 2-3: Partitions Automatically Created by the Red Hat Linux Installer.
The screen displays the disk drives and the current partition information for the drives. If you want to accept the partitions as is, click Next to proceed.
| Caution |
If your PC does not have enough memory (typically less than 128MB), the installer asks if it can write the partition table and activate the swap partition. Once you do this, your hard disk partitions will be changed. Click Yes only if you are committed to the new partitions and definitely want to install Red Hat Linux. |
You can also perform specific disk-setup tasks through the six buttons that run across the middle of the screen. Specifically, the buttons perform the following actions:
-
New lets you create a new partition, assuming there is enough free disk space available to create a partition. When you click this button, another dialog box appears, in which you can fill in information necessary to create a partition.
-
Edit lets you alter the attributes of the partition currently highlighted in the partitions list. You make changes to the current attribute in another dialog box that appears when you click the Edit button.
-
Delete is used to delete the partition currently highlighted in the partitions list.
-
Reset causes the installation program to ignore any changes you may have made.
-
RAID is used to set up a RAID (Redundant Array of Independent Disks) device—a technique that combines multiple disks to improve reliability and data transfer rates. There are several types of RAID configurations. You have to select at least two partitions to make a RAID device.
-
LVM creates a logical volume for Logical Volume Management (LVM).
For this discussion, I assume that the installer-created partitions are acceptable and that you click Next to continue with the installation.
Configuring Red Hat Linux
When the installation program finishes loading all of the selected packages, it moves on to some configuration steps. The typical configuration steps are as follows:
-
Install boot loader
-
Configure the network
-
Configure the firewall
-
Select languages to support
-
Set the time zone
-
Set the root password
-
Configure password authentication
The following sections describe each of these configuration steps.
Installing a Boot Loader
You can install one of two boot loaders—GRUB or LILO. GRUB stands for Grand Unified Bootloader, and LILO stands for Linux Loader—each of these boot loader programs can reside on your hard disk, and each can start Linux when you power up your PC. If you have Microsoft Windows on your hard disk, you can configure the boot loader to load Windows as well. You perform this step from the boot loader installation screen (see Figure 2-4).
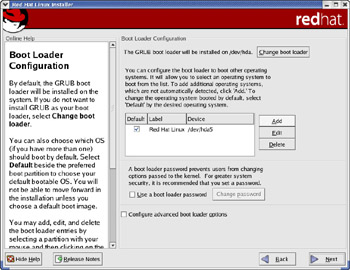
Figure 2-4: Selecting and Configuring a Boot Loader.
The boot loader installation screen (see Figure 2-4) shows you information about the boot loader to be installed and the partitions from which that the boot loader boots the PC. You also get a chance to change the boot loader or add other partitions that contain non-Linux operating systems.
GRUB is the default boot loader, and it’s installed by default in the master boot record (MBR) of the hard disk. If you want to change the boot loader from GRUB to LILO or not install it at all, click the “Change boot loader” button near the top of the window. From the dialog box that appears, either select the older LILO boot loader or skip the boot loader installation entirely. If you choose not to install any boot loader, you should definitely create a boot disk later on. Otherwise, you won’t be able to start Red Hat Linux when you reboot the PC. You get a chance to create the boot disk at the very end of the installation.
In the middle of the boot loader installation screen a table lists the disk partitions from which the boot loader can boot the PC. That table lists the Linux partition and any other partitions that may contain another operating system (such as Windows XP or 2000). Each entry in that table is an operating system that the boot loader can load and start. The default operating system is the one with a check mark in the Default column.
You must assign a label to the Windows XP partition that appears in the list of partitions—click that line and enter the label. If there is no label, GRUB will not display that partition as a choice in its boot screen, and you won’t be able to boot Windows XP after you finish installing Red Hat Linux.
If GRUB fails to detect and list an existing Windows XP partition in the list, you should click the Add button and fill in the information about the Windows XP partition, as shown in Figure 2-5. Typically, the Windows XP partition should be the /dev/hda2 device (the first partition—/dev/hda1—is usually a hidden partition that holds files used to install Windows XP).

Figure 2-5: Adding a Windows XP Partition to the List of Partitions to Boot.
If you forget to enter a label for the Windows XP partition or add the XP partition to the list, that does not mean that all is lost. The XP partition is still there on the hard disk. It’s just that GRUB does not show it as an option to boot from. To fix the problem, you have to manually edit the GRUB configuration file, /etc/grub.conf. See Appendix B for information on configuring bootloaders such as GRUB and LILO. After you fix the /etc/grub.conf file, you should get the option to boot XP from the initial GRUB screen the next time you reboot the PC.
If you decide to install the GRUB bootloader, consider adding a password for GRUB. Click the “Use a boot loader password” check box and make sure that a check mark appears there. The installer displays a dialog box where you can specify a password for GRUB. With a GRUB password, your system is more secure because no one can boot your system without a password given that GRUB will not load the operating system without the password.
If you select the “Configure advanced boot loader options” check box and click Next, the installer displays the Advanced Boot Loader Configuration screen, as shown in Figure 2-6.
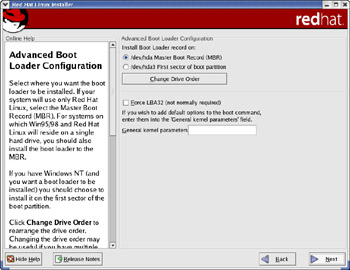
Figure 2-6: Selecting Where to Install Boot Loader and Providing Kernel Options.
The screen of Figure 2-6 gives you the option to install the boot loader in one of two locations:
-
Master Boot Record (MBR), which is located in the first sector of your PC’s hard disk (the C drive)
-
First sector of the Linux boot partition
You can also add any necessary boot options in the text field labeled “General kernel parameters.” These are options passed to the kernel as the system boots.
You should install the boot loader in the Master Boot Record unless you are using another operating system loader, such as BootMagic or Windows NT/2000/XP Boot Manager. After making your selections for the boot loader, click Next to continue.
Configuring the Network
Assuming that the Linux kernel has detected a network card, the Red Hat installation program displays the Network Configuration screen, which enables you to configure the local area network (LAN) parameters for your Linux system.
This step is not for configuring the dial-up networking. You need to perform this step if your Linux system is connected to a TCP/IP LAN through an Ethernet card.
| Cross Ref |
If the Red Hat installation program does not detect your network card, you should restart the installation and type linux noprobe at the boot prompt. Then, you will be to select your network card manually. See the “Troubleshooting the Installation” section for more information. |
The Network Configuration screen displays a list of the network devices (for example, Ethernet cards) installed in your PC. For each network device, you can indicate how the IP (Internet Protocol) address is set. Click the Edit button next to the list, and a dialog box appears from which you can specify the options.
You have two choices for specifying the IP address for the network card:
-
Configure using DHCP: Enable this option if your PC gets its IP address and other network information from a Dynamic Host Configuration Protocol (DHCP) server. This is often the case if your PC is connected to a DSL or cable modem router.
-
Activate on boot: Enable this option to turn on the network when your system boots.
You should select DHCP only if a DHCP server is running on your local area network. If you choose DHCP, your network configuration is set automatically, and you can skip the rest of this section.
If you do not select the “Configure using DHCP” option, you have to provide an IP address and a network mask that indicates which part of the IP address represents the network and which part the host address. After entering the requested parameters in the text input fields, click OK to close the dialog box.
| Cross Ref |
If you have a private LAN (one that is not directly connected to the Internet), you may use an IP address from a range that has been designated for private use. Common IP addresses for private LANs are in the range 192.168.0.1 through 192.168.0.254. You will learn more about TCP/IP networking and IP addresses in Chapter 6. |
In the rest of the Network Configuration screen, you have to specify how to set the host name. You have two options to set the host name:
-
Automatically via DHCP: Enable this option to assign a host name automatically using DHCP (the name is of the form dhcppc1, dhcppc2, and so on).
-
Manually: Use this option to manually specify a host name—type the name in the text field next to the radio button.
After you enter the requested parameters, click the Next button to proceed to the firewall configuration step.
Configuring the Firewall
In this step, you configure the built-in packet filter that comes with Red Hat Linux and that enables you to control how various types of IP packets are handled. You can select a predefined level of security from the Firewall Configuration screen (see Figure 2-7), and customize these security levels to suit your needs.

Figure 2-7: Setting up the Packet Filtering Firewall Built into Your System.
The installer offers the following predefined security levels:
-
High security means that your system does not accept any connections other than those that you explicitly enable. By default, a system with high security accepts only Domain Name Service (DNS) requests and DHCP requests.
-
Medium security means that the system does not accept any connection requests for ports numbered 1023 and lower, or connections to the NFS server at port 2049, remote connections to the X Window System, and the X Font Server port.
-
No firewall security means your system accepts connections at all ports and does not perform any security checking. Use this option only if your system runs in a trusted network, if it is already inside a firewall, or if you plan to set up a more elaborate firewall configuration later on.
Insider Insight Think about how you plan to use the Red Hat Linux system before selecting a predefined security level. For example, if you plan to use the system as a boot server on an internal network, you have to set the security level to No firewall security. Otherwise, the other PCs on the network cannot download the kernel using TFTP. If one of your system’s network interface such as eth0 is only connected to your trusted internal network, you can indicate eth0 as a trusted device. If you do not configure the firewall correctly here, you can do so late ron by following instructions outlined in Chapter 22.
After you select a predefined security level, you can click the Customize button and select other services that you might want to enable. When you’re done configuring the firewall, click the Next button to proceed to the next step.
Selecting Languages to Support
In this step, you select one or more languages that your Red Hat Linux system will support once the installation is complete. This step is similar to the language selection step you perform at the beginning of the installation when you select the language to be used during the installation. Now, you have to select the languages the system will support when you reboot the PC after completing the Red Hat Linux installation. From the Language Support Selection screen, select one or more languages to support. You must also select a default language. Then click the Next button to continue.
Setting the Time Zone
After completing the network configuration, you have to select the time zone—the difference between the local time and the current time in Greenwich, England, which is the standard reference time (also known as Greenwich Mean Time, or GMT, and UTC, or Universal Coordinated Time). The installation program shows you a screen with two tabs—Location and UTC Offset—from which you can select the time zone, either in terms of a geographic location or as an offset from the UTC. Initially, the screen shows the Location tab. This tab lets you pick a time zone by simply clicking your geographic location. As you move the mouse over the map, the currently selected location’s name appears in a text field. If you want, you can also select your location from a long list of countries and regions. If you live on the East Coast of the United States, for example, select USA/Eastern. Of course, the easiest way is to simply click the eastern United States on the map.
If the World view of the map is too large for you to select your location, click the View button on top of the map. A drop-down list of views appears with the following options: World, North America, South America, Pacific Rim, Europe, Africa, and Asia. You can then click the view appropriate for your location.
The other way to set a time zone is to specify the time difference between your local time and UTC. Click the UTC Offset tab to select the time zone this way. For example, if you are in the eastern part of the United States, select UTC-05:00 as the time zone. This tab also allows you to enable Daylight Saving Time, which applies to the United States only.
After you select your time zone, click the Next button to proceed to the next configuration step.
Setting the Root Password
After completing the time zone selection, the installation program displays a screen from which you can set the root password. Earlier versions of the Red Hat installer enabled you to add one or more user accounts at the step, but now you get a chance to add user accounts when the system boots for the first time. You can also use the useradd command or the User Manager tool to add more user accounts later on.
The root user is the super user in Linux. Because the super user can do anything in the system, you should assign a password that you can remember but that others cannot guess easily. Make the password at least eight characters long, include a mix of letters and numbers, and, for good measure, throw in some special characters, such as + or *.
Type the password on the first line, and reenter the password on the next line. Each character in the password appears as an asterisk (*) on the screen. You have to type the password twice, and both entries must match before the installation program accepts it. This ensures that you do not make any typing mistakes.
After you type the root password twice, click the Next button to continue with the installation.
Configuring Password Authentication
The installation program displays a screen from which you can enable or disable several password-authentication options.
The first two check boxes that are checked by default have the following purposes:
-
Enable MD5 passwords: Select this option to enable users to use long passwords of up to 256 characters instead of the standard password that can be, at most, eight characters. Note that MD5 refers to Message Digest 5, an algorithm developed by RSA, Inc., to compute the digest of the entire data of a message. Essentially, MD5 reduces a message to a digest consisting of four 32-bit numbers.
-
Enable shadow passwords: This option causes the password to be stored in the /etc/shadow file instead of the older /etc/passwd file (the /etc/passwd file is still used to store account information). The /etc/shadow file can only be read by the super user (root). This provides an added level of security against someone getting access to the encrypted passwords (crackers may use tools to break these password, so it’s critical to protect the password even though they are already encrypted).
The remaining authentication options on this screen are for different types of network-wide authentication protocols. The options appear in four tabs:
-
NIS: Click this tab and select the Enable NIS check box to authenticate users on multiple systems in the same Network Information Service (NIS) domain with a common password and group file. Select the NIS domain option to specify the domain to which your system belongs. Otherwise, select the NIS server option to use a specific NIS server for authentication. To enable NIS, your Linux system must be connected to a network with an NIS server. Chapter 18 has more information on NIS.
-
LDAP: Click this tab and select the Enable LDAP check box to use the Lightweight Directory Access Protocol (LDAP) as a unified authentication mechanism for logging into your Linux system, as well into other systems on the network. If you enable LDAP, you have to specify the LDAP Server and LDAP Base DN. For the LDAP Server, specify the full domain name of a server running LDAP. In the LDAP Base DN text field, enter the distinguished name (DN) to look up the authentication information. To learn more about using LDAP in Linux, consult the LDAP Linux HOWTO on the Web (http://www.ibiblio.org/pub/Linux/docs/HOWTO/LDAP-HOWTO).
-
Kerberos 5: Click this tab and select the Enable Kerberos check box to use Kerberos for secure, network-based authentication. If you enable Kerberos, you have to specify the Realm, KDC, and Admin Server. The Realm is the network that uses Kerberos. KDC is the Key Distribution Center, also known as the Ticket Granting Server, or TGS. Admin Server runs kadmind, through which the Kerberos realm is managed. To learn more about Kerberos, visit the Kerberos home page at the Massachusetts Institute of Technology’s (MIT) Website (http://web.mit.edu/kerberos/www/).
-
SMB: Click this tab and select the Enable SMB authentication to use an SMB server running on a Windows system to authenticate users. If you enable SMB authentication, you have to specify the name of an SMB server and the workgroup to which the SMB server belongs. Chapter 19 shows you how to set up a Samba server on your Red Hat Linux system.
By default, only the Enable Shadow Passwords and Enable MD5 Passwords options are selected. Unless your network is set up to use NIS, LDAP, Kerberos, or SMB for authentication, you should use these default settings for authentication; click the Next button to proceed to the next configuration step.
Selecting the Package Groups to Install
After you complete the key configuration steps, the installation program displays a message about reading package information and, after a short while, shows a screen (see Figure 2-8) from which you can select the Red Hat Linux package groups you want to install.
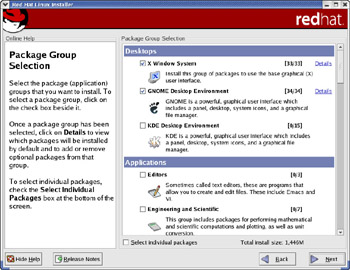
Figure 2-8: Selecting Package Groups to Install.
After you select the package groups, you can take a coffee break, and the Red Hat installation program can format the disk partitions and copy all selected files to those partitions.
| Cross Ref |
Red Hat uses special files called packages to bundle a number of files that make up specific software. For example, all configuration files, documentation, and binary files for the Perl programming language come in a Red Hat package. You use a special program called Red Hat Package Manager (RPM) to install, uninstall, and get information about packages. Chapter 21 shows you how to use RPM. For now, just remember that a package group is made up of several Red Hat packages. |
As Figure 2-8 shows, the package groups are organized into broad categories such as Desktops, Applications, Servers, and so on. Within each category, each package group is shown with a label, an icon, a brief description, and a check box. To select a package group, you should click on the check box so that a check mark appears in the box. As you select package groups, the installer shows the total disk space needed for the installation.
Some of the package groups are already selected, as indicated by the check marks in the check boxes. You can think of the selected package groups as the minimal set of packages recommended by Red Hat for installation for the type of installation (personal desktop, workstation, server, or custom) you have chosen. You can, however, choose to install any or all of the components. Use the mouse to move up and down in the scrolling list and click the mouse on a check box to select or deselect that package group.
In an actual production installation of Red Hat Linux, you should install exactly those package groups that you need. However, when you are trying to learn everything about Red Hat Linux, you need many different packages. If you have enough disk space (at least 6GB) for the Linux partition, go ahead and select the package group labeled Everything—this installs all the package groups. Being able to install everything makes it easy for you to try out everything. Note that Everything is much more than the package groups that you see listed during installation—everything includes nearly all the packages on the companion CD-ROMs.
I must repeat that you should install Everything only when you are trying to play with all the packages on a system that is specifically meant for experimenting with Red Hat Linux. Do not install Everything on a system that will be used for anything critical. Installing everything is likely to open up too many security holes in your system.
Table 2-2 shows the package groups organized by the categories as they appear on the Package Group Selection screen. In addition to these user-selectable package groups, the Red Hat installation program automatically installs a number of packages needed to run Linux and the applications you select. In other words, even if you do not select any of the package groups, the installation program installs a number of packages needed simply to run the core Linux operating system and a minimal set of utilities.
| Insider Insight |
Because each package group is a collection of many different Red Hat packages, the installation program also gives you the option to select individual packages. If you select the button labeled “Select Individual Packages” that appears below the list and click the Next button, the installation program takes you to another screen from which you can select individual packages. |
If you are installing Linux for the first time, you do not need to go down to this level of detail to install specific packages. Simply pick the package groups you think you need from Table 2-2. If you forget something, you can always install additional packages later with the RPM utility program or the graphical Red Hat Package Management utility, described in Chapter 21. After you have selected the package groups you want, click the Next button to continue with the rest of the installation.


