Running X
Running X
After you have a complete XF86Config file, your X server should be ready to run. Typically, you have already selected a graphical login option during installation, so that X starts automatically when you reboot your system.
If you are not already running X, you can start the X server from the text console by running the startx script, which is a file that contains Linux commands. This script is in the /usr/X11R6/bin directory, but that directory should already be in your PATH environment variable. Therefore, to run that script, type startx at the shell prompt.
The startx script looks for another script file, named .xinitrc, in your home directory. If startx does not find any .xinitrc file in your home directory, it runs the xinit command with the default script /etc/X11/xinit/xinitrc. Notice that unlike the .xinitrc file in your home directory, the default script file does not have a period as the first character of its name.
The result of running startx depends on the commands in .xinitrc in your home directory, if you have one. Otherwise, the result depends on the commands in the /etc/X11/xinit/xinitrc file. The net effect of running /etc/X11/xinit/ xinitrc is to execute the /etc/X11/xinit/Xclients script. That script, in turn, starts a GNOME or KDE session with a window manager and several other applications.
There are some special keystrokes you can use to control the X server. The following sections describe these methods of controlling X.
Aborting X Using Ctrl-Alt-Backspace
If you have created a new XF86Config file to try out some new video modes, you can press Ctrl-Alt-Backspace to kill the X server. (In Linux, the term kill refers to exiting a program abnormally. Linux even has a kill command that stops errant programs.)
If you have selected the graphical login option, the X server immediately restarts but this time with the configuration options in the new XF86Config file. If your system is not set up for a graphical login screen, you go back to the text display.
| Insider Insight |
If you have enabled the graphical login screen and X does not work properly because of erroneous configuration options in the XF86Config file, press Ctrl-Alt-F1 to get a text-mode login screen. Log in as root, and run redhat-config-xf86config to configure X, carefully selecting the options for monitor, video card, and video mode (resolution and depth). After preparing the new XF86Config file, press Ctrl-Alt-F7 to get back to the graphical login screen, and press Ctrl-Alt-Backspace to kill the X server and to force it to restart with the new configuration options. |
Trying Different Video Modes
In your XF86Config file, if you look at the Screen section that applies to your X server, you notice several Display subsections. Each Display subsection lists the video modes supported for a specific depth-the number of bits in each pixel's value. An X server typically supports a depth of 8, which means that each pixel has an 8-bit value and that the server can display up to 28 = 256 distinct colors. The Display subsection lists the video modes in terms of the display resolution, which in turn is expressed in terms of the number of pixels horizontally and vertically. For example, here is a partial listing of a Screen section of the X configuration file:
Section "Screen"
    Identifier   "Screen0"
    Device       "S3 ViRGE/DX (generic)"
    Monitor      "Monitor0"
    DefaultDepth    16

    Subsection "Display"
        Depth       8
        Modes       "640x480" "800x600" "1024x768"
        ViewPort  0 0
        Virtual   1024 768
    EndSubsection
    ... other Display subsections ...
EndSection
When the X server starts, it configures the video card at the first listed resolution (in this case, 640x480, or 640 pixels horizontally by 480 pixels vertically) that corresponds to the first mode shown in the Modes entry, as follows:
Modes "640x480" "800x600" "1024x768"
You can try the other video modes without having to exit the X server. Press Ctrl-Alt-Keypad+ (Keypad+ means the plus key in the numeric keypad). The X server switches to the next mode-in this case 800x600. Press Ctrl-Alt-Keypad+ again, and the X server switches to 1,024x768 mode. When you press Ctrl-Alt-Keypad+, the X server cycles forward to the next mode listed in the Modes entry.
Press Ctrl-Alt-Keypad+ several times to make sure that the X server works in all video modes.
To cycle backward to the preceding mode, press Ctrl-Alt-Keypad-. Therefore, if the X server is displaying in 800x600 mode and you press Ctrl-Alt-Keypad-, the server switches to 640x480 mode.
You can make the X server start in any of the supported modes. If you want the X server to start at the highest-resolution mode, simply change the Modes entry in the Screen section that corresponds to your X server (the Driver entry in the Screen section indicates the X server type) to the following:
Modes "1024x768" "800x600" "640x480"
This change makes X start in 1,024x768 mode, which gives you much more screen area than 640x480 mode.
The screen resolutions in the Modes entry determine several things:
-
The first resolution is the default (the resolution in which the X server starts).
-
When you alter screen resolutions, the X server scrolls through them in the order shown in the Modes entry. When you press Ctrl-Alt-Keypad+, the X server changes resolutions in the left-to-right order; the order is reversed when you press Ctrl-Alt-Keypad-.
Some applications, such as some office suites and graphics software, require you to run the X server in 16 bits per pixel mode (also referred to as a 16-bit color depth). To make the X server start with a 16-bit color depth, perform the following steps:
-
Open the /etc/X11/XF86Config file by using your favorite text editor.
-
Locate the Screen section corresponding to the X section that corresponds to your X server. For example, if you use the SVGA server, look for the Screen section that has svga as the Driver entry.
-
Just before the first Display subsection, insert the following line:
DefaultColorDepth 16
This forces the X server to use a 16-bit color depth. The server uses the information from the Display subsection that specifies Depth as 16.
-
Save the XF86Config file.
-
If X is running (and assuming you have enabled the graphical login screen), press Ctrl-Alt-Backspace to stop the X server and force it to restart. It should now use a 16-bit color depth.
Adjusting the Display Settings
After you get X running, you can adjust the display settings-the resolution, color depth, monitor type, and video card-by using the Display Settings utility from the GNOME or KDE desktops. Select Main Menu>Display and the Display Settings window appears, as shown in Figure 3-10. In fact, this is the same redhat-config-xfree86 utility that you use to configure X initially. That's why Figure 3-10 looks similar to Figure 3-2 (except that Figure 3-2 lacks the window frame).
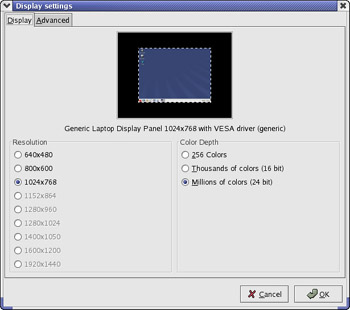
Figure 3-10: Adjusting Display Settings from GNOME or KDE.
The window has two tabs-Display and Advanced. From the Display tab you can adjust the resolution and the number of colors (also known as color depth or the bits per pixel).
To adjust the monitor type or video card, click the Advanced tab. On that tab, click the Configure button for whichever component-monitor or video card-you want to modify. When you click Configure, another window appears from which you can configure that component.


