Securing the Host
Securing the Host
A key aspect of computer security is to secure the host-your Red Hat Linux system. The next few sections describe a few key steps you should follow in securing your Red Hat Linux host. These steps include
-
Installing operating system updates
-
Protecting passwords
-
Protecting the files and directories
-
Using encryption if necessary
-
Monitoring the security of the system
You can monitor host security by examining log files for any suspicious activities and by using the Tripwire tool to see if anyone has messed with important files on your system.
Installing Operating System Updates
Red Hat Linux and related application updates come in RPM files. To manually download and install the updates, follow these steps:
-
Log in as root and create a directory for the updates:
mkdir /usr/local/updates
cd /usr/local/updates
-
Use the wget command to download the updates from Red Hat's FTP site. For example, to download the updates for the i386 version of Red Hat Linux version 8.0, type
wget ftp://updates.redhat.com/8.0/en/os/i386/\*.rpm
wget ftp://updates.redhat.com/8.0/en/os/noarch/\*.rpm
-
Install all updates with the following command:
rpm -F *
-
Delete the update files with the command:
rm -fr /usr/local/updates
Securing Passwords
Historically, UNIX passwords are stored in the /etc/passwd file, which any user can read. For example, a typical old-style /etc/passwd file entry for the root user looks like this:
root:t6Z7NWDK1K8sU:0:0:root:/root:/bin/bash
The fields are separated by colons (:), and the second field contains the password in encrypted form. To check if a password is valid, the login program encrypts the plaintext password the user enters and compares the password with the contents of the /etc/passwd file. If there is a match, the user is allowed to log in.
Password-cracking programs work just like the login program, except that these programs pick one word at a time from a dictionary, encrypt the word, and compare the encrypted word with the encrypted passwords in the /etc/passwd file for a match. Crackers often use multiple password-cracking programs, and some of these programs also try various manipulations of the words in the dictionary. For example, password-cracking programs try obvious manipulations of words such as:
-
A word with a single punctuation character at the end
-
A word with punctuation character at the beginning
-
A word with letters in a mix of uppercase and lowercase
-
A word written backwards
-
Two words with a number in between
To crack the passwords, the intruder needs the /etc/passwd file. Often, crackers use weaknesses of various Internet servers (such as mail and FTP) to get a copy of the /etc/passwd file.
Recently, several improvements have made passwords more secure in Red Hat Linux. These include shadow passwords and pluggable authentication modules, and you can install these easily as you install Red Hat Linux. During Red Hat Linux installation, one step involves making selections in an Authentication Configuration screen. If you accept the default selections-Enable MD5 passwords and Enable shadow passwords-you automatically enable more-secure passwords in Red Hat Linux.
Learning the Role of Shadow Passwords
Instead of storing them in the /etc/passwd file, which any user can read, passwords are now stored in a shadow password file. On Red Hat Linux, the shadow passwords are in /etc/shadow file. Only the super user (root) can read this file, which makes it harder for crackers to get their hands on the encrypted passwords. For example, here is the entry for root in the new-style /etc/passwd file:
root:x:0:0:root:/root:/bin/bash
In this case, the second field contains an x, instead of an encrypted password.
When you use shadow passwords, the encrypted passwords are stored in the /etc/ shadow file where the entry for root is like this:
root:$1$AAAni/yN$uESHbzUpy9Cgfoo1Bf0tS0:11077:0:99999:7:-1:-1:134540356
The format of the /etc/shadow entries with colon-separated fields resembles the entries in the /etc/passwd file, but the meanings of most fields differ. The first field, however, is still the user name, and the second one is the encrypted password.
In addition to improving the password file's security by storing it in the /etc/shadow file that only root can read, Red Hat Linux also improves the actual encryption of the passwords stored in the /etc/shadow file. Password encryption is now done using the MD5 message-digest algorithm that converts a plaintext password into a 128-bit fingerprint or digest. The MD5 algorithm, described in RFC 1321 (http://www.faqs.org/rfcs/rfc1321.html or http://www.cis.ohio-state.edu/cgi-bin/rfc/rfc1321.html), reduces a message of any length to a 128-bit message digest. MD5 is used to create message digests for documents so that you can digitally sign them through encryption with your private key. MD5 works quite well for password encryption, too.
Another advantage of MD5 over the older-style password encryption is that the older passwords were limited to a maximum of eight characters; new passwords (encrypted with MD5) can be much longer. Longer passwords are harder to guess, even if the /etc/shadow file falls into the wrong hands.
A clue to the use of MD5 encryption in the /etc/shadow file is the increased length of the encrypted password and the $1$ prefix, as in the second field of each entry.
The remaining fields in each /etc/shadow entry control when the password expires. You do not need to interpret or change these entries in the /etc/shadow file. Instead, use the chage command to change the password-expiration information. For starters, you can check a user's password-expiration information by using the chage command with the -l option, as follows (in this case, you have to be logged in as root):
chage -l root
This command displays various expiration information, including how long the password lasts and how often you can change the password.
If you want to ensure that the user is forced to change password every 90 days, you can use the -M option to set the maximum number of days the password stays valid. For example, to make sure that user naba is prompted to change the password in 90 days, I log in as root and type the following command:
chage -M 90 naba
You can do this for each user account to ensure that all passwords expire when appropriate and that all users must pick new passwords.
| Insider Insight |
Another password integrity check is to run the pwck command. The pwck command checks the entries in the /etc/passwd and /etc/shadow files for proper format and valid data in each field. To run pwck, type pwck. and follow any suggestions that the command makes. |
Understanding Pluggable Authentication Modules (PAMs)
A Pluggable Authentication Module (PAM) performs the actual MD5 encryption, described in the 'Learning the Role of Shadow Passwords' section. PAM provides a flexible method for authenticating users on Red Hat Linux systems. Through settings in configuration files, you can change the authentication method on the fly, without having to actually modify programs, such as login and passwd, which verify a user's identity.
Red Hat Linux uses PAM extensively, and the configuration files are in the /etc/pam.d directory of your system. Check out the contents of this directory on your system by typing the following command:
ls /etc/pam.d
Each configuration file in this directory specifies how users are authenticated for a specific utility. For example, there is a file for each of login, passwd, su, and a whole host of the GUI redhat-config utlities. Here's what I see when I type cat /etc/pam.d/passwd file on my system:
#%PAM-1.0
auth       required     pam_stack.so service=system-auth
account    required     pam_stack.so service=system-auth
password   required     pam_stack.so service=system-auth
These lines indicate that authentication, account management, and password checking should all be done by using the pam_stack module (/lib/security/pam_stack.so) with the argument service=system-auth. Essentially, the pam_stack module refers to another configuration file in the /etc/pam.d directory. In this case, the configuration file is /etc/pam.d/system-auth. Here's the content of the /etc/pam.d/system-auth file on my Red Hat Linux PC:
#%PAM-1.0
# This file is auto-generated.
# User changes will be destroyed the next time authconfig is run.
auth       required    /lib/security/$ISA/pam_env.so
auth       sufficient  /lib/security/$ISA/pam_unix.so likeauth nullok
auth       required    /lib/security/$ISA/pam_deny.so
account    required    /lib/security/$ISA/pam_unix.so
password   required    /lib/security/$ISA/pam_cracklib.so retry=3 type=
password   sufficient  /lib/security/$ISA/pam_unix.so nullok use_authtok md5 shadow
password   required    /lib/security/$ISA/pam_deny.so
session    required    /lib/security/$ISA/pam_limits.so
session    required    /lib/security/$ISA/pam_unix.so
Although I won't go over all the details, here's a brief explanation of PAM configuration files.
Each line in a PAM configuration file specifies the rules to be used for a specific type of authentication service. The general syntax of each line in a PAM configuration file is the following:
module-type control module-path module-arguments
The meaning of these four fields are as follows:
-
module-type denotes the type of service being controlled by this line. The acceptable module types are: account for verifying the account (for example, whether the user's password has expired or whether a user is permitted access to the requested service); auth for authenticating a user's claimed identity, typically by using some challenge-response method where the user is asked for a password; password for updating passwords; and session for performing tasks before he user is given access to a service and after the user is done with the service.
-
control determines the behavior of a PAM in case the module does not succeed in the authentication task. Typically, the control field is set to required or sufficient. If the control field is set to required, the module must be successful for the authentication to continue. If the control field is set to sufficient and the module is successful, no other checks are needed and the authentication is considered complete.
-
module-path specifies the pathname of a PAM module-a shared library object-that implements the service. In the pathname /lib/security/$ISA/, ISA refers to an environment variable that you can set to a subdirectory where you decide to organize the PAM modules for your system. Typically, ISA is not defined and the PAM modules are located in the /lib/security directory.
-
module-arguments lists any module-specific options that are then passed to the module. It is up to the module to parse and interpret these options. Everything after the first three fields is interpreted as module arguments.
In the /etc/pam.d/system-auth file, the first three lines are for auth service:
auth       required    /lib/security/$ISA/pam_env.so
auth       sufficient  /lib/security/$ISA/pam_unix.so likeauth nullok
auth       required    /lib/security/$ISA/pam_deny.so
Here the first auth line loads the PAM module pam_env.so that can set or unset environment variables. The second auth line specifies an authentication module that checks the user's identity by using the PAM module pam_unix.so with the arguments likeauth nullok. The options in the argument string have the following meanings:
-
likeauth-Returns same value whether the module is used to set new credentials or authenticate an existing user name
-
nullok-Allows blank password
The third auth line in the /etc/pam.d/system-auth file uses the pam_deny.so module to deny access to the requested service if the pam_unix.so module's authentication is unsuccessful.
Following the auth lines in the /etc/pam.d/system-auth file comes an account line:
account required /lib/security/$ISA/pam_unix.so
The account service uses pam_unix.so module to make sure that the user account has not expired, that the user is allowed to log in at a given time of day, and so on.
The next two password lines in the /etc/pam.d/system-auth file specify how passwords are set:
password   required    /lib/security/$ISA/pam_cracklib.so retry=3 type=
password   sufficient  /lib/security/$ISA/pam_unix.so nullok use_authtok md5 shadow
The first password line uses the pam_cracklib.so module to try to crack the new password (that's what the cracklib in the module's name indicates). The retry=3 argument indicates that the user can try to enter a new password three times at most. The second password line indicates that the MD5 encryption is used to store the password in the /etc/shadow file.
The /etc/pam.d/passwd configuration file applies when you use the passwd command to change passwords. Here's an example where I am trying to change my password (the text in italic is my comment):
passwd
Changing password for naba
(current) UNIX password:  I type my current password
New UNIX password: I type "xyzz"
BAD PASSWORD: it is too short
New UNIX password:  I type "transport" as password
BAD PASSWORD: it is based on a dictionary word
New UNIX password:  I type "naba12" as the new password
BAD PASSWORD: it is based on your username
passwd: Authentication token manipulation error
In this case, the passwd program is using the PAM module to check my identity (when I first type my current password) and making sure that each of the new passwords I try are strong. Finally, the PAM modules abort the passwd program after I fail to select a good password in three tries.
Protecting Files and Directories
One important aspect of securing the host is to protect important system files and the directories that contain these files. You can protect the files through the file ownership and through the permission settings that control who can read, write, or execute (in case of executable programs) the file.
Setting File Ownership and Permissions
The default Red Hat Linux file security is controlled through the following settings for each file or directory:
-
User ownership
-
Group ownership
-
Read, write, execute permissions for owner
-
Read, write, execute permissions for group
-
Read, write, execute permissions for others (everyone else)
Viewing Ownerships and Permissions
You can see these settings for a file when you look at the detailed listing with the ls -l command. For example, type the following command to see the detailed listing of the /etc/inittab file:
ls -l /etc/inittab
The resulting listing should look something like this:
-rw-r--r-- 1 root root 1698 Aug 16 17:00 /etc/inittab
The first set of characters describe the file permissions for user, group, and others. The third and fourth fields show the user and group that own this file. In this case, both user and group names are the same: root.
Changing File Ownerships
You can set the user and group ownerships with the chown command. For example if the file /dev/hda should be owned by the user root and the group disk, then you would type the following command as root to set up this ownership:
chown root.disk /dev/hda
To change the group ownership alone, use the chgrp command. For example, here's how you can change the group ownership of a file to the group named accounting:
chgrp accounting ledger.xls
Changing File Permissions
Use the chmod command to set the file permissions. To use chmod effectively, you have to learn how to specify the permission settings. One way is to concatenate one or more letters from each of the following tables in the order shown (Who/Action/Permission), as shown in Table 22-2:
|
Who |
Action |
Permission |
|---|---|---|
|
u user |
+ add |
r read |
|
g group |
- remove |
w write |
|
o others |
= assign |
x execute |
|
a all |
s set user ID |
To give everyone read and write access to all files in a directory, type chmod a+rw *. On the other hand, to permit everyone to execute a specific file, type chmod a+x filename.
Another way to specify a permission setting is to use a three-digit sequence of numbers. In a detailed listing, the read, write, and execute permission settings for the user, group, and others appear as the sequence
rwxrwxrwx
with hyphens (-) in place of letters for disallowed operations. Think of rwxrwxrwx as three occurrences of the string rwx. Now, assign the values r=4, w=2, and x=1. Assign zero to a hyphen. To get the value of the sequence rwx, simply add the values of r, w, and x. Thus, rwx = 7, rw-=6, and r-=4. Using this formula, you can assign a three-digit value to any permission setting. For example, if the user can read and write the file but everyone else can only read the file, the permission setting is rw-r-r- (that's how it appears in the listing), and the value is 644. Thus, if you want all files in a directory to be readable by everyone but writeable by only the user, use the command:
chmod 644 *
Setting Default File Permissions
What permission setting does a file get when you (or a program) create a new file? The answer is in what is known as the user file-creation mask that you can see and set using the umask command.
Type umask, and it prints out a number showing the current file-creation mask. The default setting is different for the root user and other normal users. For the root user the mask is set to 022 whereas the mask for normal users is 002. To see the effect of this file-creation mask and to interpret the meaning of the mask, follow these steps:
-
Log in as root and type the following command:
touch junkfile
This creates a file named junkfile with nothing in it.
-
Type ls -l junkfile to that file's permissions. You should see a line similar to the following:
-rw-r--r-- 1 root root 0 Apr 19 10:56 junkfile
Interpret the numerical value of the permission setting by converting each three-letter permissions in the first field (excluding the very first letter) into a number between 0 and 7. For each letter that's present, the first letter gets a value of 4, second letter is 2, and the third is 1. For example, rw- translates to 4+2+0 (because the third letter is missing) or 6. Similarly, r- is 4+0+0 = 4. Thus the permission string -rw-r-r- becomes 644.
-
Subtract the numerical permission setting from 666 and what you get is the umask setting. In this case, 666 - 644 gives us a umask of 022.
So, a umask of 022 results in a default permission setting of 666 - 022 = 644. When you rewrite 644 in terms of a permission string, it becomes rw-r-r-.
To set a new umask, type umask followed by the numerical value of the mask. Here is how you can select a umask and set it:
-
Figure out what permission settings you want for new files. For example, if you want new files that can be read and written by the owner only and nothing else, then the permission setting would look like
rw-------
-
Convert the permissions into a numerical value by using the conversion method that takes the permission setting in groups of three characters each and then assigns 4 to the first field, 2 to the second, and 1 to the third. Thus, for files that are readable and writable by owner only, the permission setting is 600.
-
Subtract the desired permission setting from 666 to get the value of the mask. For a permission setting of 600, the mask then becomes 666 - 600 = 066.
-
Use the umask command to set the file-creation mask, like this:
umask 066
A default umask of 022 is good for system security because it translates to files that have read and write permission for the owner and read permissions for everyone else. The bottom line is that you don't want a default umask that results in files that are writable by the whole wide world.
Checking for the Set User ID Permission
There is another permission setting that can be a security hazard. This permission setting, called the set user ID (or setuid for short), applies to executable files. When the setuid permission is enabled, the file is executed under the user ID of the file's owner. In other words, if an executable program is owned by root and the setuid permission is set, then no matter who executes that program, it runs as if being executed by root. This means that that program can do a lot more (for example, read all files, create new files, and delete files) than what a normal user program could do. Another risk is that if a setuid program file has some security hole, crackers can do a lot more damage through such programs than through other vulnerabilities.
You can find all setuid programs with a simple find command:
find / -type f -perm +4000 -print
You should see a list of files such as the following:
/usr/X11R6/bin/XFree86
/usr/bin/chage
/usr/bin/gpasswd
/usr/bin/at
/usr/bin/passwd
/usr/bin/chfn
/usr/bin/chsh
/usr/bin/newgrp
/usr/bin/crontab
/usr/bin/lppasswd
... lines deleted ...
Many of the programs have the setuid permission because they need it, but check the complete list and make sure that there are no strange setuid programs (for example, setuid programs in a user's home directory).
If you want to see how these permissions are listed by the ls command, type ls -l /usr/bin/passwd, and you should see the permission settings:
-r-s--x--x 1 root root 15104 Aug 16 20:44 /usr/bin/passwd
The s in the owner's permission setting (r-s) tells you that the setuid permission is set.
To remove the setuid bit from a program's permission, type
chmod ug-s progname
Encrypting and Signing Files with GnuPG
Red Hat Linux comes with the GNU Privacy Guard (GnuPG, or simply GPG) encryption and authentication utility. With GPG, you can create your public and private key pair, encrypt files using your key, and also digitally sign a message to authenticate that it's really from you. If you send a digitally signed message to someone who has your public key, the recipient can verify that it was you who signed the message.
Understanding Public-Key Encryption
The basic idea behind public-key encryption is to use a pair of keys-one private and the other public-that are related, but one cannot be guessed from the other. Anything encrypted with the private key can be decrypted with the corresponding public key, and vice versa. The public key is for distribution to other people, while you keep the private key in a safe place.
You can use public-key encryption for securely communicating with others. Figure 22-2 illustrates the basic idea. Suppose that Alice wants to send secure messages to Bob. Each of them generate public-private key pairs and exchange their public keys. When Alice wants to send a message to Bob, she simply encrypts the message using Bob's public key and sends the encrypted message to him. Now, the message is secure from any eavesdropping because only Bob's private key can decrypt the message, and only Bob has that key. When Bob receives the message, he uses his private key to decrypt the message and read it.
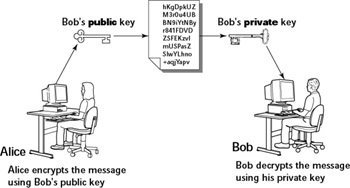
Figure 22-2: Bob and Alice Can Communicate Securely with Public-Key Encryption.
If you think about it, you'd realize a fundamental problem in using public key encryption. In the scenario of Figure 22-2, how does Bob know the message really came from Alice? What if someone else uses Bob's public key and sends a message as if it came from Alice? Also, how does Alice assure herself that she is indeed using Bob's public key and not some impostor's key. This is where digital signature, certificates, and certificate authority come in.
The following section describes digital signatures and then goes on to explain how to use gpg to digitally sign a message. I don't describe certificates, but a certificate is an electronic file that associates a public key with the identity of that public key's owner, which can be an individual, an organization, a computer, or an application running on a computer. The certificate is issued and digitally signed by a certificate authority (CA)-an organization whose public key we apparently trust. The whole purpose of a CA-issued certificate is to assure someone like Alice that before she encrypts a message for Bob's eyes only by using Bob's public key she (or a program that she uses) can verify the authenticity of Bob's public key.
Understanding Digital Signatures
The purpose of digital or electronic signatures is the same as pen-and-ink signatures, but how you sign digitally is completely different. Unlike pen-and-ink signatures, your digital signature depends on the message you are signing. The first step is to apply a mathematical function on the message and reduce it to a fixed-size message digest (also called hash). No matter how big your message is, the message digest is always around 128 or 160 bits, depending on the hashing function.
The next step is to apply public key encryption. Simply encrypt the message digest with your private key, and you get the digital signature for the message. Typically, the digital signature is appended to the end of the message and you've got an electronically signed message.
What good does the digital signature do? Well, anyone who wants to verify that the message is indeed signed by you takes your public key and decrypts the digital signature. What they get is the message digest of the message. Then, they apply the same hash function to the message and compare the computes hash with the decrypted the value. If the two match, no one has tampered with the message. Because your public key was used to verify the signature, the message must have been signed with the private key known only to you. So the message must be from you!
In the theoretical scenario of Alice sending private messages to Bob, Alice can digitally sign her message to make sure that Bob can tell that the message is really from her. Figure 22-3 illustrates the use of digital signature along with normal public-key encryption.
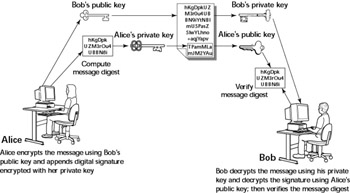
Figure 22-3: Alice Can Digitally Sign Her Message So That Bob Can Tell It's Really from Her.
Here's how Alice sends her private message to Bob with the assurance that Bob can really tell it's from her:
-
Alice uses some software to computer the message digest of the message and then encrypts the digest using her private key. This is her digital signature for the message.
-
Alice encrypts (again, using some convenient software) the message using Bob's public key.
-
She sends both the encrypted message and the digital signature to Bob.
-
Bob decrypts the messages using his private key.
-
Bob decrypts the digital signature using Alice's public key. This gives him the message digest.
-
Bob computes the message digest of the message and compares with what he got by decrypting the digital signature.
-
If the two message digests match, Bob can be sure that the message really came from Alice.
Using GPG
GPG includes the tools you need to use public-key encryption and digital signatures. What you'd use is the gpg command. You can learn to use GPG gradually as you begin using encryption. I show you some of the typical tasks you may perform with GPG.
Generating the Key Pair
The first thing you have to do is generate your own private-public key pair. Type the following command in a terminal window to generate the key pairs:
gpg --gen-key
If this is your first time with gpg, it creates a .gnupg directory in your home directory. The steps for generating the key pairs go like this:
-
Type the gpg -gen-key command again. You should see a message similar to the following:
Please select what kind of key you want:
   (1) DSA and ElGamal (default)
   (2) DSA (sign only)
   (5) RSA (sign only)
Your selection?
-
Press Enter for the default choice because it's good enough.
-
GPG then prompts you for the key size (the number of bits). Again, press Enter to accept the default value of 1,024 bits.
-
GPG asks you when the keys should expire. The default is to never expire. If that's what you want (and why not?), press Enter.
-
GPG asks if you really want the keys to never expire. Press y to confirm.
-
GPG prompts you for your name, then your email address, and finally a comment so that the key pair can be associated with your name. Type the requested information and press Enter.
-
GPG gives you a chance to change the information or confirm it as is. To confirm it, type o and then press Enter.
-
GPG prompts you for a passphrase that will be used to protect your private key. Type a long phrase that includes lowercase and uppercase letters, numbers, and punctuation marks-the longer the better. Careful though, pick a passphrase that you can easily remember as well. Type the passphrase, and press Enter.
-
GPG generates the keys. It may ask you to perform some work on the PC so that the random number generator can generate enough random numbers for the key-generation process.
Exchanging Keys
To communicate with others, you have to give them your public key. You also have to get public keys from those who may send you a message (or to verify the signature of someone who might sign a file). GPG keeps the public keys in your key ring. To list the keys in your key ring, type
gpg --list-keys
To send your public key to someone or place it on a website, you have to export the key to a file. The best way is to put the key in what GPG documentation calls a ASCII-armored format with a command like this:
gpg --armor --export naba@comcast.net > nabakey.asc
This command saves my public key in an ASCII-armored format (it basically looks like garbled text) in the file named nabakey.asc. Of course, you should replace the email address with your email address (the one you used when you created the keys) and the output filename to something different.
After you export the public key to a file, you can mail that file to others or place it on a website for use by others.
When you import a key from someone else, you typically get it in an ASCII-armored format as well. For example, if I have Red Hat's GPG public key in a file named redhatkey.asc, I would import it into my key ring with the following command:
gpg --import redhatkey.asc
Use the gpg -list-keys command to verify that the key is in your key ring.
The next step is to check the fingerprint of the new key. For example, to get the fingerprint of the Red Hat key, type the following command:
gpg --fingerprint security@redhat.com
This causes GPG to print the fingerprint:
pub  1024D/DB42A60E 1999-09-23 Red Hat, Inc <security@redhat.com>
     Key fingerprint = CA20 8686 2BD6 9DFC 65F6  ECC4 2191 80CD DB42 A60E
sub  2048g/961630A2 1999-09-23
At this point, you should verify the key fingerprint with someone at Red Hat. For a company like Red Hat, you can verify the fingerprint from a Web page (http://www.redhat.com/solutions/security/news/publickey.html). If you think the key fingerprint is good, you can sign the key and validate it. Here's the command you use to sign the key:
gpg --sign-key security@redhat.com
GPG displays a message and prompts you on the level of key verification you have performed:
gpg: Warning: using insecure memory!
gpg: please see http://www.gnupg.org/faq.html for more information

gpg: checking the trustdb
gpg: checking at depth 0 signed=0 ot(-/q/n/m/f/u)=0/0/0/0/0/1
pub  1024D/DB42A60E  created: 1999-09-23 expires: never      trust: -/-
sub  2048g/961630A2  created: 1999-09-23 expires: never
(1). Red Hat, Inc <security@redhat.com>


pub  1024D/DB42A60E  created: 1999-09-23 expires: never      trust: -/-
             Fingerprint: CA20 8686 2BD6 9DFC 65F6  ECC4 2191 80CD DB42 A60E

     Red Hat, Inc <security@redhat.com>

How carefully have you verified the key you are about to sign actually belongs
to the person named above?  If you don't know what to answer, enter "0".

   (0) I will not answer. (default)
   (1) I have not checked at all.
   (2) I have done casual checking.
   (3) I have done very careful checking.

Your selection?
After you answer and press Enter, GPG asks for confirmation and then prompts you for your passphrase. After that GPG signs the key.
| Caution |
Because the key verification and signing is a potential weak link in GPG, be careful about what keys you sign. By signing a key, you basically say that you trust the key to be from that person or organization. |
Signing a File
You'd find it useful to sign files if you send out a file to someone and want to assure the recipient that no one has tampered with the file and that it was you who sent the file. GPG makes it very easy to sign a file. You can compress and sign a file named message with the following command:
gpg -o message.sig -s message
To verify the signature, type
gpg --verify message.sig
To get back the original document, simply type
gpg -o message --decrypt message.sig
Sometimes you don't care about keeping a message secret, but simply want to sign it to indicate that the message is from you. In this case, you can generate and append a clear text signature with the following command:
gpg -o message.asc --clearsign message
This command basically appends a clear text signature to the text message. Here's a typical clear-text signature block:
-----BEGIN PGP SIGNATURE-----
Version: GnuPG v1.0.7 (GNU/Linux)

iD8DBQE9ZYUtjre6e89JIhURAmUzAKDAK8tdQMRrA2qSpaG8rKpY05dZuACeI9kT
26EaLE5s/zHDiapiW+geXdo=
=U26+
-----END PGP SIGNATURE-----
When a message has a clear-text signature appended, you can use GPG to verify the signature with the command like this:
gpg --verify message.asc
The last line of the output should say that it's a good signature.
Encrypting and Decrypting Documents
To encrypt a message meant for a recipient, you can use the -encrypt (or -e) GPG command. Here's how you might encrypt a message for me if you had my public GPG key:
gpg -o message.gpg -e -r naba@comcast.net message
The message would be encrypted using my public key (without any signature, but you can add the signature with an -s command).
When I receive the message.gpg file, I have to decrypt it using my private key. Here's the command I would use:
gpg -o message --decrypt message.gpg
GPG then prompts me for the passphrase to unlock my private key and then decrypts the message and saves the output in the file named message.
If you simply want to encrypt a file and no one else has to decrypt the file, you can use GPG to perform what is called symmetric encryption. In this case, you provide a passphrase to encrypt the file with the following GPG command:
gpg -o secret.gpg -c somefile
GPG prompts you for the passphrase and asks you to repeat the passphrase (to make sure that you didn't mistype anything). Then, GPG encrypts the file using a key generated from the passphrase.
To decrypt a file encrypted with a symmetric key, type
gpg -o myfile --decrypt secret.gpg
GPG prompts you for the passphrase. If you enter the correct passphrase, GPG decrypts the file and saves the output (in this example) in the file named myfile.
Monitoring System Security
Even if you have secured your system, you have to monitor the log files periodically for signs of intrusion. You should also install the Tripwire software to monitor the integrity of critical system files and directories.
I will briefly describe how to use Tripwire and what log files to check periodically.
Using Tripwire to Monitor the Integrity of System Files
The worst security breaches are the ones that go undetected. A savvy cracker may manage to get access to a system, replace critical system programs with Trojan horses, and hide his or her tracks by modifying the log files (the Trojan horse programs are often called root kits because they allow the cracker to get root access to your system). Later on, the cracker may use the Trojan horse programs to access the system at will. The problem is that the system administrator may never even suspect that anything is out of the ordinary. Using software such as Tripwire to monitor file integrity can help avoid this type of problem.
Red Hat Linux comes with the Tripwire package. It is not installed by default, but you can easily install it and configure it to monitor any changes to specified system files and directories.
Installing Tripwire
To install the Tripwire package, place each CD-ROM in the CD-ROM drive and mount it with the mount /mnt/cdrom command (or, if you are running the GNOME desktop, wait until the magicdev device automatically mounts the CD-ROM). Then, look for the Tripwire package with the following commands:
cd /mnt/cdrom/RedHat/RPMS
ls tripwire*
| Note |
This book comes with the Publisher's Edition version of Red Hat Linux that was provided by Red Hat. Unfortunately, these CD-ROMs do not include all the software that comes with the full Red Hat Linux distribution. If you cannot find the tripwire RPM file in this book's CD-ROMs, you have to download that file from one of the mirror sites listed at http://www.redhat.com/download/mirror.html. Click on the Distribution link next to one of the listed FTP sites and then look in the directory corresponding to the Red Hat Linux version number. For example, the RPM files for Red Hat Linux 9 should be in the 9/en/os/i386/RedHat/RPMS directory. Use a Web browser to download the tripwire RPM file and install it by following the steps outlined next. |
If the file exists, then type the following command to install the Tripwire package:
rpm -ivh tripwire*
The Tripwire installation does the following:
-
Installs the programs siggen, tripwire, twadmin, and twprint in the /usr/sbin directory
-
Creates the /etc/tripwire directory and places some files in it, including the shell script /etc/tripwire/twinstall.sh, which you have to run after installing the package
-
Installs the tripwire-check script in the /etc/cron.daily directory. This causes the tripwire-check script to be executed daily.
-
Installs the man pages for twconfig, twpolicy, twfiles, siggen, tripwire, twadmin, twintro, and twprint. You can read these man pages with commands, such as man tripwire.
-
Installs some Tripwire documentation in the /usr/share/doc directory. To change to the Tripwire documentation directory, type cd /usr/share/doc/ tripwire*.
-
Creates the /var/lib/tripwire/report directory in which to store Tripwire reports.
After installing the Tripwire package, you have to run the /etc/tripwire/twinstall.sh script to generate cryptographic keys. Type the following command:
/etc/tripwire/twinstall.sh
You have to enter a site passphrase and a local passphrase. The necessary keys are then generated, the policy file is signed, and the Tripwire installation ends with the following message:
A clear-text version of the Tripwire policy file
/etc/tripwire/twpol.txt
has been preserved for your inspection.  This implements
a minimal policy, intended only to test essential
Tripwire functionality.  You should edit the policy file
to describe your system, and then use twadmin to generate
a new signed copy of the Tripwire policy.
You can examine the /etc/tripwire/twpol.txt file to see how Tripwire policy is specified. The policy file identifies the program and configuration files that are critical to system security. Tripwire then periodically checks the integrity of these files.
Initializing the Tripwire Database
After installing Tripwire, you have to initialize the Tripwire database with the following command:
/usr/sbin/tripwire --init
Tripwire prompts you for the local passphrase and then works for a while as it creates a database file. This can take a while to complete.
You may get a few error messages for files that are not in your system but are referred to in the Tripwire policy file /etc/tripwire/twpol.txt. At the end of all the processing, Tripwire writes a database file named after your system's hostname and saves that file in the /var/lib/tripwire directory. The database file is digitally signed with the key generated during the step when you ran the /etc/tripwire/twinstall.sh script (remember that a digital signature is a hash of a file's contents, encrypted with the local private key-the hash is a fixed-length binary number computed with a mathematical function such as the MD5 or SHA-1).
Checking File Integrity
After the Tripwire database is initialized, you should periodically run Tripwire in integrity-checking mode with the command /usr/sbin/tripwire -check. In this mode, Tripwire uses the policy file, /etc/tripwire/tw.pol, and compares the state of the current files against what's stored in the initial database. Tripwire prints a report on the standard output and saves the report in the /var/lib/tripwire/report directory.
For example, when I log in as root and type the following command:
/usr/sbin/tripwire --check
Tripwire displays some error messages about missing files (the same ones I get when I initialize the Tripwire database with the /usr/sbin/tripwire -init command). After that, Tripwire prints the report to the standard output and writes it to a file.
The name of the Tripwire report file depends on your system's hostname and the date and time when you run the /usr/sbin/tripwire -check command. You can see the report files in the /var/lib/tripwire/report directory.
Each report file's name is created by appending the date and time to the hostname, with dashes as separators, and then appending a .twr as file extension. The report is in binary format. To print the report, follow these steps:
-
Change directory to the Tripwire report directory by typing
cd /var/lib/tripwire/report
-
Use the ls command to look at the list of report files in that directory.
-
Print the report using the /usr/sbin/twprint<


