TCP/IP Setup in Linux
TCP/IP Setup in Linux
Like almost everything else in Linux, TCP/IP setup is a matter of preparing numerous configuration files (text files you can edit with any text editor). Most of these configuration files are in the /etc directory. The Red Hat installation program helps by hiding the details of the TCP/IP configuration files. Nevertheless, it’s better if you know the names of the files and their purposes so that you can edit the files manually, if necessary.
| Cross Ref |
The next few sections show you how to set up TCP/IP for an Ethernet LAN. Chapter 13 covers dial-up networking under Linux, including topics such as PPP. Appendix D discusses physical set up of Ethernet networks and types of Ehternet cards supported by Linux. |
Before you look at TCP/IP setup, make sure your system’s Ethernet card is properly installed and detected by the Linux kernel. Also, you need to know the device names for the network devices.
Learning Network-Device Names
For most devices, Linux uses files in the /dev directory. The networking devices, however, have names defined internally in the kernel; no files for these devices exist in the /dev directory. Following are the common network-device names in Linux:
-
lo—The loopback device. This device is used for efficient handling of network packets sent from your system to itself (when, for example, an X client communicates with the X server on the same system).
-
eth0—The first Ethernet card or 802.11b wireless network card. If you have more Ethernet cards, they get device names eth1, eth2, and so on.
-
ppp0—The first serial port configured for a point-to-point link to another computer, using Point-to-Point Protocol (PPP). If you have more serial ports configured for PPP networking, they are assigned device names ppp1, ppp2, and so on.
-
sl0—The first serial port configured for Serial Line Internet Protocol (SLIP) networking. SLIP is used for establishing a point-to-point link to a TCP/IP network. If you use a second serial port for SLIP, it gets the device name sl1. SLIP is not used much anymore; it has been superseded by PPP.
Insider Insight You always have a loopback device (lo), whether or not you have a network. The loopback device passes data from one process to another without having to go out to a network. In fact, the whole point of the loopback device is to allow network applications to work, as long as the communicating processes are on the same system.
Cross Ref PPP is popular in dial-up networks, in which you use a modem to dial in to an Internet host (typically, a system at your work or your ISP) and establish a connection to the Internet. Chapter 13 covers this subject in detail.
If you want to see the names of installed network devices on your system, try the following command:
cat /proc/net/dev
This command shows the network-device names, as well as statistics on the number of packets sent and received for a specific device.
Using Red Hat’s Network Configuration Tool
After you ensure that the Linux kernel is properly configured for TCP/IP, you have to make sure that the appropriate configuration files exist. Red Hat Linux includes a network configuration tool that enables you to configure various network interfaces on your system for TCP/IP networking. You can run the network configuration tool to add a new network interface or to alter information such as name servers and hostnames (you can also directly edit the configuration files listed in the “Using TCP/IP Configuration Files” section).
Log in as root and from the GNOME desktop, select Main Menu>Programs>System>Network Configuration to run the Network Configuration tool. The Network Configuration tool displays a tabbed dialog box, as shown in Figure 6-6.
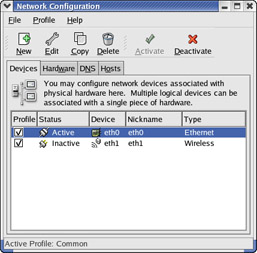
Figure 6-6: Configuring a TCP/IP Network with the Red Hat Network Configuration Tool.
You can configure various aspects of your network through the four tabs that appear along the top of the dialog box. Specifically, the tabs enable you to do the following:
-
Devices—Lets you add a new network interface, specify the IP address of the interface, and activate the interface. This information is stored in various files in the /etc/sysconfig directory.
-
Hardware— Lets you add a new hardware device such as an Ethernet card, modem, or an ISDN device. You can then provide information such as interrupt request (IRQ) and I/O port numbers, and DMA channels for the device.
-
DNS—Lets you enter the hostname for your system and the IP addresses of name servers. The name server addresses are stored in the /etc/resolv.conf file. The host name is stored in the HOSTNAME variable in the /etc/sysconfig/ network file.
-
Hosts—Shows you the current contents of the /etc/hosts file and lets you add, remove, or edit entries.
To configure the network interfaces, you need to assign IP addresses to each interface. If you are running a private network, you may use IP addresses in the range 192.168.0.0 to 192.168.255.255. (There are other ranges of addresses reserved for private networks, but this range should suffice for most needs.) For example, I use the 192.168.0.0 address for a small private network.
Testing the Network
After you run the Network Configuration tool, you may want to check whether or not the network is up and running. If you have not rebooted your system yet, you have to run /sbin/ifconfig to configure the Ethernet interface for your IP address. On a system whose IP address is 192.168.0.4, you would type the following command (you have to be logged in as root to do this):
/sbin/ifconfig eth0 192.168.0 netmask 255.255.255.0 broadcast 192.168.0.255
Now, you should use the ping utility program to verify whether or not another system on your network is accessible. You need the IP address of another system on the network to use ping. On my PC, I might try the following:
ping 192.168.0.1
PING 192.168.0.1 (192.168.0.1) from 192.168.0.2 : 56(84) bytes of data.
64 bytes from 192.168.0.1: icmp_seq=1 ttl=254 time=1.45 ms
64 bytes from 192.168.0.1: icmp_seq=2 ttl=254 time=1.35 ms
64 bytes from 192.168.0.1: icmp_seq=3 ttl=254 time=1.34 ms
64 bytes from 192.168.0.1: icmp_seq=4 ttl=254 time=1.35 ms
          (press Ctrl-C here)

--- 192.168.0.1 ping statistics ---
4 packets transmitted, 4 received, 0% loss, time 3006ms
rtt min/avg/max/mdev = 1.347/1.378/1.457/0.058 ms
If the ping command shows that other systems on your network are reachable, you can proceed to use other network programs, such as FTP and Telnet.
Using TCP/IP Configuration Files
Running the Red Hat network configuration tool may be enough to get TCP/IP configured on your system. You may want to be familiar with the configuration files, however, so that you can edit the files if necessary. For example, you can specify the name servers through the network configuration tool, but you may want to add an alternate name servers directly to the configuration file. To do so, you need to know about the /etc/resolv.conf file, which stores the IP addresses of name servers.
The following sections describe the basic TCP/IP configuration files.
/etc/hosts
The /etc/hosts text file contains a list of IP addresses and hostnames for your local network. In the absence of a name server, any network program on your system consults this file to determine the IP address that corresponds to a hostname.
Following is the /etc/hosts file from my system, showing the IP addresses and names of other hosts on my LAN:
# Lines like these are comments.
# You must have the localhost line in the /etc/hosts file.
127.0.0.1       localhost.localdomain localhost
192.168.0.100   lnbp933  lnbp933.local.net
192.168.0.60    lnbp600
192.168.0.200   lnbp200  lnbp200.local.net
192.168.0.40    lnbp400  lnbp400.local.net
192.168.0.25    mac      lnbmac  lnbmac.local.net
As the example shows, each line in the file starts with an IP address, followed by the hostname for that IP address. You can have more than one hostname for a given IP address.
/etc/networks
/etc/networks is another text file that contains the names and IP addresses of networks. These network names are commonly used in the routing command (/sbin/route) to specify a network by name instead of by its IP address.
Don’t be alarmed if your Linux PC does not have the /etc/networks file. Your TCP/IP network works fine without this file. In fact, the Red Hat Linux installation program does not create a /etc/networks file.
/etc/host.conf
Linux uses a resolver library to obtain the IP address that corresponds to a hostname. The /etc/host.conf file specifies how names are resolved. A typical /etc/host.conf file might contain the following lines:
order hosts, bind
multi on
The entries in the /etc/host.conf file tell the resolver library what services to use (and in which order) to resolve names.
The order option indicates the order of services. The sample entry specifies that the resolver library should first consult the /etc/hosts file, then check the name server to resolve a name. In other words, this host.conf file says: “use static resolution prior to dynamic resolution.”
| Insider Insight |
The multi option determines whether or not a host in the /etc/hosts file can have multiple IP addresses. Hosts that have more than one IP address are called multihomed because the presence of multiple IP addresses implies that the host has several network interfaces (the host “lives” in several networks simultaneously). |
/etc/resolv.conf
The /etc/resolv.conf file is another text file used by the resolver—a library that determines the IP address for a hostname. Following is a sample /etc/resolv.conf file:
domain local.net
nameserver 164.109.1.3
nameserver 164.109.10.23
The first line specifies your system’s domain name. The nameserver line provides the IP addresses of name servers for your domain. If you have multiple name servers, you should list them on separate lines. They are queried in the order in which they appear in the file.
If you do not have a name server for your network, you can safely ignore this file. TCP/IP should still work, even though you may not be able to refer to hosts by name. You do, however, have to make sure that you have a /etc/host.conf file that is set up to use the /etc/hosts file.
| Insider Insight |
If your system gets its IP address from a DHCP server, the DHCP client also receives the IP addresses of name servers as well as the domain name from the DHCP service. In this case, the DHCP client automatically creates a /etc/resolv.conf file with the name server information it obtains from the DHCP server. |
/etc/hosts.allow
This file specifies which hosts are allowed to use the Internet services such as Telnet running on your system. As explained in the section “Understanding the xinetd Configuration Files,” the TCP wrapper consults the /etc/hosts.allow file before starting Internet services. It starts the service only if the entries in the hosts.allow file imply that the requesting host is allowed to use the services.
The entries in /etc/hosts.allow are in the form of a server:IP address format, where server refers to the name of the program providing a specific Internet service, and IP address identifies the host allowed to use that service. For example, if you want all hosts in your local network (which has the class C address 192.168.0.0) to access the Telnet service (which is provided by the in.telnetd program), add the following line in the /etc/hosts.allow file:
in.telnetd:192.168.0.
If you want to let all local hosts have access to all Internet services, you can use the ALL keyword and rewrite the line as follows:
ALL:192.168.0.
Finally, to open all Internet services to all hosts, you can replace the IP address with ALL, as follows:
ALL:ALL
You can also use host names in place of IP addresses.
| Insider Insight |
To learn the detailed syntax of the entries in the /etc/hosts.allow file, type man hosts.allow at the Linux shell prompt. |
/etc/hosts.deny
This file is just the opposite of /etc/hosts.allow—whereas hosts.allow specifies which hosts may access Internet services (such as TELNET and FTP) on your system, the hosts.deny file identifies the hosts that must be denied services. As explained in the section “Understanding the xinetd Configuration Files,” the TCP wrapper consults the /etc/hosts.deny file if it does not find any rules in the /etc/hosts.allow file that apply to the requesting host. The TCP wrapper denies service if it finds in the hosts.deny file a rule that applies to the host.
The entries in /etc/hosts.deny file follow the same format as those in the /etc/hosts.allow file—they are in the form of a server:IP address format, where server refers to the name of the program providing a specific Internet service and IP address identifies the host allowed to use that service.
If you have already set up entries in the /etc/hosts.allow file to allow access to specific hosts, you can place the following line in /etc/hosts.deny to deny all other hosts access to any service on your system:
ALL:ALL
| Insider Insight |
To learn the detailed syntax of the entries in the /etc/hosts.deny file, type man hosts.deny at the Linux shell prompt. |
/etc/nsswitch.conf
This file, known as the name service switch (NSS) file, specifies how services, such as the name resolver library, NIS, NIS+, and local configuration files such as /etc/hosts and /etc/shadow, interact. Newer versions of Linux that use GNU C Library version 2 (glibc 2) or later rely on the /etc/nsswitch.conf file to determine what takes precedence: a local configuration file or a service such as DNS or NIS (see Chapter 18 to learn more about DNS and NIS).
As an example, the following hosts entry in the /etc/nsswitch.conf file specifies that the resolver library should first try the /etc/hosts file, then try NIS+, and finally try DNS:
hosts: files nisplus dns
| Insider Insight |
You can learn more about the /etc/nsswitch.conf file by typing info libc "Name Service Switch" in a terminal window. |
Configuring Networks at Boot Time
You want to start your network automatically every time you boot the system. For this to happen, you have to put the appropriate commands in one or more startup scripts. The init process runs immediately after Linux boots. The process consults the /etc/inittab file and executes various commands (typically, shell scripts), depending on the current run level. For example, in run level 3—the multiuser level—/etc/inittab specifies that init should run the script file /etc/rc.d/rc with the argument 3.
In run levels 3 and 5, the startup script ends up executing the /etc/rc.d/init.d/ network script to activate all networking interfaces. If you consult the /etc/rc.d/ init.d/network file, you will notice that network initialization is done by using another set of files in the /etc/sysconfig directory. The network activation script checks the variables defined in the /etc/sysconfig/network file to decide whether or not to activate the network. In /etc/sysconfig/network, you should see a line with the NETWORKING variable as follows:
NETWORKING=yes
The network is activated only if the NETWORKING variable is set to yes.
The /etc/rc.d/init.d/network script, in turn, executes a number of scripts in the /etc/sysconfig/network-scripts directory to activate specific net- work interfaces. For example, to activate the Ethernet interface eth0, the /etc/ sysconfig/network-scripts/ifup script is executed with /etc/sysconfig/ network-scripts/ifcfg-eth0 as the configuration file. Here is what a typical /etc/sysconfig/network-scripts/ifcfg-eth0 file contains:
DEVICE=eth0
IPADDR=192.168.0.200
NETMASK=255.255.255.0
BROADCAST=192.168.0.255
ONBOOT=yes
BOOTPROTO=none
As you can see, this file contains the network device name, as well as the IP address of the interface and several other TCP/IP parameters. The ONBOOT variable indicates whether this network interface should be activated when Linux boots. If your PC has an Ethernet card, you want to activate the interface at boot time; therefore, ONBOOT is set to yes.
The files in the /etc/sysconfig directory are created by the Red Hat Linux installation program as you install Linux and also by the Red Hat network configuration tool when you configure the network later on.
The /etc/sysconfig/network-scripts/ifup script essentially runs the following commands:
-
/sbin/ifconfig, to configure the specified network interface; in this case, the Ethernet card (eth0)
-
/sbin/route, to set up the routing table for the activated network interface
If you have PCMCIA network cards, those network interfaces are configured and activated by the /etc/init.d/pcmcia script, which, in turn, calls the /etc/ pcmcia/network script. The /etc/pcmcia/network script then runs the /etc/ sysconfig/network-scripts/ifup script to bring the interface up and /etc/sysconfig/network-scripts/ifdown script to bring the interface down.


