Preparing Documentation with DocBook
Preparing Documentation with DocBook
The tradition of preparing formatted documentation using markup languages lives on. For example, the documentation for many open source software packages come in DocBook format. The remainder of this chapter briefly introduces you to DocBook and points you to sources where you can learn more about preparing documentation in DocBook.
DocBook is a vocubulary—a set of tags, kind of like HTML tags—for writing structured documents such as books and articles (anything that has chapters, sections, subsections, apendixes, and so forth). The DocBook vocabulary is defined in both Standard Generalized Markup Language (SGML) and the newer Extensible Markup Language (XML). Such vocabularies are formally known as Document Type Definition (DTD). Thus, DocBook is available as an SGML or XML DTD. You don’t need to understand SGML or XML to use DocBook.
DocBok is gaining popularity as a markup language for documentation of open source projects such as GNOME and KDE. The publishing firm, O’Reilly & Associates, has also used DocBook to produce books. DocBook is edging out other markup languages such as Troff and LaTeX because the DocBook syntax is well-defined and easy to parse, which means that there are automated tools available to convert from DocBook format to many different types of presentation formats such as HTML for displaying on the Web browser and PostScript for printing. Another key property of DocBook is that it only lays out the structure of a document, the final formatting and presentation of the document depends on stylesheets. This enables you to generate different output formats from the same logical DocBook document.
DocBook was created in 1991 by HaL Computer Systems and O’Reilly & Associates. The DocBook DTD is now maintained by Organization for the Advancement of Structured Information Standards (OASIS). You can find more information about DocBook at http://www.oasis-open.org/committees/docbook/.
For a good book on DocBook, consult DocBook: The Definitive Guide by Norman Walsh and Leonard Muellner (O’Reilly & Associates).
Getting Started with DocBook
To start using DocBook, all you need are the following:
-
Text editor to edit the DocBook file. Although automated tools can ease the burden of preparing DocBook files, you can create a DocBook using a plain text editor.
-
DocBook DTD that defines the XML or SGML tags used to write the DocBook.
-
DocBook stylesheets, such as the ones written in Extensible Stylesheet Language (XSL), that enable translation of DocBook from SGML or XML into other formats such as HTML, RTF, PDF, and so on.
-
Stylesheet processor such as xsltproc that uses the stylesheets to convert the DocBook SGML or XML into other formats such as HTML.
Red Hat Linux comes with everything you need to get started with DocBook. In particular, you find both the SGML and XML DTDs for DocBook. The /usr/share/sgml/docbook directory contains the SGML and XML DTDs for different versions of DocBook as well as DocBook stylesheets.
Trying out a Sample DocBook
The best way to understand DocBook is to simply try out a sample file. You can see how the same DocBook file can be used to generate different output formats.
Use a text editor and prepare the file sample.xml with the following lines in it:
<?xml version="1.0"?>
<!DOCTYPE article PUBLIC "-//OASIS//DTD DocBook XML V4.2//EN"
"http://www.oasis-open.org/docbook/xml/4.2/docbookx.dtd">
<article>
  <articleinfo>
    <title>Sample DocBook</title>
  </articleinfo>
  <para>This is a sample DocBook article that illustrates
        some simple DocBook XML tags.
  </para>
  <sect1>
    <title>Section 1</title>
    <para>Paragraph 1 of section 1</para>
    <sect2>
      <title>Section 1.1</title>
      <para>Paragraph 1 of section 1.1</para>
      <para>Paragraph 2 of section 1.1</para>
    </sect2>
    <sect2>
      <title>Section 1.2</title>
      <para>Paragraph 1 of section 1.2</para>
    </sect2>
  </sect1>
  <sect1>
    <title>Section 2</title>
    <para>Second high-level section in this article
    </para>
  </sect1>
</article>
After you save the sample.xml file, you can use the xmllint utility to check if all the XML tags in the file are correct. Type the following command to check the syntax of the sample.xml file:
xmllint --valid --noout sample.xml
If everything is okay, the utility should print nothing.
Now, you can convert the sample.xml file into HTML and view it in a Web browser. To perform this task, type the following commands:
export DBS="/usr/share/sgml/docbook/xsl-stylesheets-1.58.1-1"
xsltproc -o sample.html $DBS/html/docbook.xsl sample.xml
The first command defines the DBS environment variable as the directory where the XSL stylesheets for DocBook are located in Red Hat Linux. The second command runs xsltproc with appropriate options to convert the sample.xml file into sample.html.
Now, you can open the sample.html file in Mozilla and see how the document looks. Figure 11-7 shows the sample.html file in Mozilla.
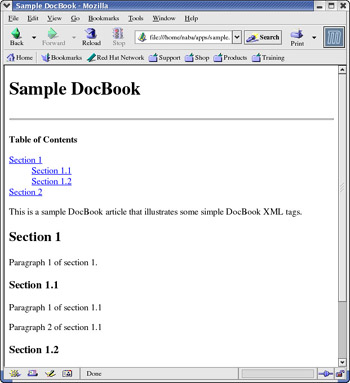
Figure 11-7: Displaying HTML Version of Sample DocBook in a Web Browser.
As Figure 11-7 shows, the DocBook is converted into a single HTML file with a table of contents at the beginning of the document. The table of contents includes links for each section and subsection.
You can also create a set of linked HTML files, one for each section. This is called chunked HTML because each section becomes a chunk. To create chunked HTML files from the sample.xml DocBook, type the following command (I assume that you still have the DBS environment variable defined as shown earlier in this section):
xsltproc $DBS/html/chunk.xsl sample.xml
This generates an index.html file and separate HTML files for the other chunks (sections). Figure 11-8 shows the HTML chunk for section 2 of the sample DocBook.
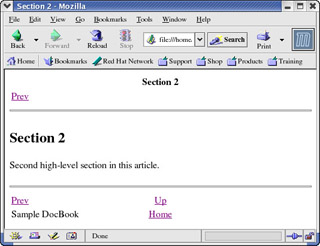
Figure 11-8: Chunked HTML Version of DocBook.
The chunked HTML output is widely used for many open source documentation, so Figure 11-8 should look familiar to you. Note that each HTML chunk contains Next, Prev, and Up links to go from section to section and go back to the first page.
Examining the Sample DocBook File
If you examine the sample.xml file, shown in the “Trying out a Sample DocBook” section, you should note the following points:
-
All XML DocBook tags are in lowercase. Because XML is case sensitive, you must type all tags in lowercase.
-
A DocBook begins with a standard header that identifies the XML version and information about the DTD. Here is a typical header:
<?xml version="1.0"?>
<!DOCTYPE article PUBLIC "-//OASIS//DTD DocBook XML V4.1.2//EN"
"http://www.oasis-open.org/docbook/xml/4.1.2/docbookx.dtd">
-
Usually the entire DocBook is a <book> or an <article>. The sample.xml file uses a <article> structure.
-
An <article> is composed of nested section elements such as <sect1>, <sect2>, and so on.
-
A <book> is composed of multiple <chapter> elements, each with section elements inside.
-
As with other markup languages, all indentations and white spaces are ignored, except for some elements such as <programlisting> and <literallayout> that are meant to show verbatim text.
Using Stylesheets
DocBook documents only contain the logical layout of the document. Stylesheets define how to convert a DocBook document into various formatted output. There are two sets of stylesheets:
-
XSLT—Stands for Extensible Stylesheet Language (XSL) Transformations, which is a language used to convert XML documents into other XML documents. XSLT can convert DocBook XML into HTML, HTML Help, Java Help, XHTML, and XSL formatting objects.
-
DSSSL—Stands for Document Style Semantics and Specification Language. The DSSSL stylesheets can convert DocBook SGML and XML into HTML, MIF, RTF, and TeX files.
Other tools can convert some of these formats such as XSL formatting objects or TeX into other formats such as PDF and PostScript.
Red Hat Linux comes with both XSL and DSSL stylesheets. These stylesheets are located in subdirectories of the /usr/share/sgml/docbook directory.
You can use the following stylesheet utilities to convert DocBook files into formatted output files:
-
xmllint—Checks for correct syntax of document. Typically, you can check the correctness of an XML file with the following command:
xmllint --valid --noout xmlfilename
-
xsltproc—Applies XSLT stylesheets to XML documents. A typical command-line is of the following form:
xsltproc stylesheetname xmlfilename
Thus, if you want to apply the stylesheet mystyles.xls to the mydoc.xml file, you would use the following command:
xsltproc mystyles.xsl sample.xml
Learning Some DocBook Elements
There are close to 400 DocBook elements in version 4.2. This chapter does not have enough space to cover them in detail. This section briefly touches upon some of the commonly used elements, especially those that you may want to use when writing documentation that you intend to convert to HTML.
| Insider Insight |
For a detailed, online reference to DocBook elements, point your Web browser to http://www.docbook.org/tdg/en/html/ref-elements.html. |
Sections
Sections are a key organizing element in a DocBook. You can define sections either through specific numbered tags <sect1> through <sect5>, or through generic <section> tags nested inside one another.
When you use the specific section tags <setc1> through <sect5>, the higher numbered sections are subsections of the lower numbered ones. With these tags, a complex layout of sections would be similar to the following:
<sect1>
    <sect2>
        <sect3>...</sect3>
        <sect3>
            <sect4>
                <sect5>...</sect5>
                <sect5>...</sect5>
            </sect4>
            <sect4>...</sect4>
        </sect3>
    </sect2>
    <sect2>...</sect2>
</sect1>
<sect1>...</sect1>
On the other hand, when you use generic <section> tags, the layout is written in the following form:
<section>
    <section>
        <section> ... </section>
        <section> ... </section>
    </section>
    <section> ... </section>
</section>
Itemized List
Use the <itemizedlist> element to create a bulleted list. Such lists map to the ones created with the <ul> tag in HTML. Inside the list, use <listitem> elements to define entries in the list. Here is an example:
<itemizedlist mark='opencircle'>
  <listitem><para>SGML</para></listitem>
  <listitem><para>HTML B</para></listitem>
  <listitem><para>XML C</para></listitem>
</itemizedlist>
Use the <itemizedlist> element’s mark attribute to specify the appearance of the bullets. You can also have other DocBook elements inside the <listitem> elements.
Ordered List
Use the <orderedlist> element to define a numbered list that maps to the lists displayed by the <ol> tag in HTML. Use the <listitem> element to specify each entry in the ordered list, as shown in this example:
<orderedlist>
  <listitem><para>Step 1</para></listitem>
  <listitem><para>Step 2</para></listitem>
  <listitem><para>Step 3</para></listitem>
</orderedlist>
Variable List
Use the <variablelist> element to create a list of terms and their definitions. The <variablelist> maps to a list displayed by the <dl> tag in HTML. Inside the variable list, the <varlistentry> element contains the term, identified by the <term> element and the definition, idenfied by a <listitem>. Here is an example:
<variablelist>
  <title>File Name Extensions</title>
  <varlistentry>
    <term>txt</term>
    <listitem><para>Text file.</para></listitem>
  </varlistentry>
  <varlistentry>
    <term>xml</term>
    <listitem><para>XML file</para></listitem>
  </varlistentry>
</variablelist>
Image and Multimedia Elements
You might want to insert screen shots or other images into the documentation. You can do so with the <mediaobject> and <imageobject> elements. You have to place the <imageobject> element inside a <mediaobject>. A simple example is as follows:
<mediaobject>
  <imageobject>
    <imagedata fileref="imagefile.jpg" format="JPG"/>
  </imageobject>
  <textobject>
    <phrase>Description of image</phrase>
  </textobject>
</mediaobject>
Use the <imagedata> element to specify the image file and format. You can associate an alternate text description of the image by adding a <textobject> element, as shown in this example.
Tables
Use the <table> element, along with <thead>, <row>, and <entry> elements to define tables in DocBook. The following example illustrates how all these elements fit together:
<table>
  <title>Sample Table</title>
  <tgroup cols="2">
    <thead>
      <row>
        <entry>Fruit</entry>
        <entry>Color</entry>
      </row>
    </thead>
    <tbody>
      <row>
        <entry>Apple</entry>
        <entry>Red</entry>
      </row>
      <row>
        <entry>Banana</entry>
        <entry>Yellow</entry>
      </row>
    </tbody>
  </tgroup>
</table>
As you can see, the table’s content is inside a <tgroup> element that specifies the number of columns. Each row is defined by a <row> element that contains as many <entry> elements as there are columns.
DocBook also includes an <informaltable> element that defines a table without any title.
Figures
Use the <figure> element to add figures to documents. The figure will be numbered and have a title. You can use the <informalfigure> element for a figure that does not need a number and a title. Here is an example of a figure:
<figure>
  <title>AWIPS Software Architecture</title>
  <mediaobject>
    <imageobject>
      <imagedata fileref="awips-swarch.jpg" format="JPG"/>
    </imageobject>
  </mediaobject>
</figure>
Inside the <figure> element, you can embed the figure using a <mediaobject> and an <imageobject>, as shown in the example.
Examples
Software documentation often requires the inclusion of sample code. Use the <example> tag to show such samples. Such examples have a title and are numbered. Use the <informalexample> element for examples that do not need titles and do not have to be numbered. Here is an <example> element:
<example>
  <title>Sample Java Code</title>
  <programlisting>
public class HelloWorld {
    public static void main(String [] args) {
        System.out.println("Hello, World!");
    }
}
  </programlisting>
</example>
Enclose the program listing in a <programlisting> element, as shown in this example.
Notes, Tips, and Warnings
You may also want to include notes, tips, and warnings in documentation (just as this and many other books do). DocBook includes several elements for this purpose. Here are the relevant DocBook elements:
-
Note—Use the <note> element for notes, as shown below:
<note><para>This is a note.</para></note>
-
Tip—Use the <tip> element to add a tip in the text, like this:
<tip><para>This is a tip.</para></tip>
-
Warning—Use the <warning> element to add a warning message, like this:
<warning><para>This is a warning.</para></warning>
-
Caution—Use the <caution> element to add cautionary messages, like this:
<caution><para>This is a caution.</para></caution>
-
Important—Use the <important> element to set aside any important message, like this:
<important><para>This is important.</para></important>
Character Formatting
Within the running text in a paragraph, you may want to emphasize some text. You can do so with the <emphasis> element. For example, here’s how you can set apart a word in a paragraph:
<para>
  This is the <emphasis>most important</emphasis> part of this sentence.
</para>
You can use the <filename> element to set apart filenames that occur in the text. Here is an example:
<para>
The XSL stylesheets for DocBook are located in the
<filename class='directory'>
  /usr/share/sgml/docbook/xsl-stylesheets-1.58.1-1
</filename> directory.
</para>
Software documentation also mention commands—names of executable files—in text. To set such commands apart from the rest of the text, use the <command> element, as shown in the following example:
<para>
Type the
<command>ls -l</command> get a detailed directory listing.
</para>
Links
You can embed links to internal DocBook elements in a document as well as external websites and other resources. Use the <link> element to point to an internal link identified by the id attribute added to other elements. For example, suppose that you have an Introduction section, defined as follows:
<sect1 id="intro">
<title>Introduction</title>
<para> ... </para>
</sect1>
Elsewhere in the document, you can then use the <link> element to set up a link to this Introduction section, like this:
<para>See the <link linkend="intro">Introduction section</link>
for more information </para>
Use the <link> element’s linkend attribute to identify the target of this link. That target should be identified by the id attribute of another element in the document.
To define an external link, use the <ulink> element. For example, here is how you can show a link to the DocBook home page:
<para>
To learn more about DocBook, visit the
<ulink url="http://www.docbook.org/">Docbook home page</ulink>
</para>
Use the <ulink> element’s url attribute to specify the URL of the external link.


