Learning the Basics of Dial-Up Networking
Learning the Basics of Dial-Up Networking
Dial-up networking refers to connecting a PC to a remote network through a dial-up modem. If you are ancient enough to remember the days of dialing up with Procomm or some serial communications software, there is a significant difference between dial-up networking and the old days of serial communication. Both approaches use a modem to dial up a remote computer and to establish a communication path, but the serial communication software makes your computer behave like a dumb terminal connected to the remote computer. The serial-communication software exclusively uses dial-up connection. You cannot run another copy of the communication software and use the same modem connection, for example.
In dial-up networking, both your PC and the remote system run a network-protocol (called TCP/IP) software. When your PC dials up and sets up a communication path, the network protocols exchange data packets over that dial-up connection. The neat part is that any number of applications can use the same dial-up connection to send and receive data packets. So your PC becomes a part of the network to which the remote computer belongs. (If the remote computer is not on a network, dial-up networking creates a network that consists of the remote computer and your PC.)
Chapter 6 describes TCP/IP protocol some more, but I have to use the term as well as a few concepts such as Internet Protocol (IP) address and Domain Name Service (DNS) when describing how to set up dial-up networking.
Here's what you have to do to set up dial-up networking in Red Hat Linux:
-
Install an internal or external modem in your PC. If your PC did not already come with an internal modem, you can buy an external modem and connect it to the PC's serial port.
-
Connect the modem to the phone line. Figure 13-8 illustrates how a modem enables the PC to send digital data over the analog phone lines.

Figure 13-8: Sending Digital Data over a Modem. -
Get an account with an ISP. Every ISP provides you a phone number to dial, a user name, and a password. Additionally, the ISP should give you the domain names of servers for email and news. Typically, your system automatically gets an IP address from the ISP's server.
-
Test your modem and make sure it's working. You can do this testing with a serial communication package called minicom that comes with Red Hat Linux.
-
Run the Internet Configuration Wizard or edit appropriate configuration files to set up a PPP connection.
-
Activate the PPP connection to connect to the Internet from a GUI tool or by typing a command.
Cross Ref Appendix E describes how to set up and use modems to dial out from your Red Hat Linux system. The following sections provide an overview of PPP and show how to set up and use a PPP connection.
Understanding SLIP and PPP
Like TCP/IP networking over Ethernet, TCP/IP networking over a dial-up link involves specifying the protocol-the convention-for packaging a network packet over the communication link. There are two popular protocols for TCP/IP networking over point-to-point serial communication links:
-
Serial Line Internet Protocol (SLIP)-This is a simple protocol that specifies how to frame an IP packet on a serial line. RFC 1055 describes SLIP.
-
Point-to-Point Protocol (PPP)-This is a more advanced protocol for establishing a TCP/IP connection over any point-to-point link, including dial-up serial links. RFC 1661 describes PPP.
I first provide an overview of SLIP and PPP; then I show you how to use PPP to set up a network connection to a remote system. SLIP is not widely used anymore, but a brief overview is useful as a context for how PPP improves upon SLIP.
Serial Line Internet Protocol (SLIP)
SLIP originated as a simple protocol for framing an IP packet-an Internet Protocol packet that consists of an IP header (which includes the source and destination IP addresses), followed by data (the data sent from source to destination). RFC 1055, 'A Nonstandard for Transmission of IP Datagrams over Serial Lines: SLIP,' J. L. Romkey, June 1988, describes SLIP. As the title of RFC 1055 suggests, SLIP is not an official Internet standard; it's a de facto standard.
SLIP defines two special characters for framing-marking the beginning and ending-IP packets:
-
SLIP-END is octal 300 (decimal 192); it marks the end of an IP packet.
-
SLIP-ESC is octal 333 (decimal 219); it 'escapes' any SLIP-END or SLIP-ESC characters that are embedded in the packet (for example, to ensure that a packet does not end prematurely because the IP packet happens to include a byte with decimal 192).
The protocol involves sending out the bytes of the IP packet one by one and marking the end of the packet with a SLIP-END character. The following convention handles any SLIP-END and SLIP-ESC characters that happen to appear in the IP packet:
-
Replace a SLIP-END character with SLIP-ESC, followed by octal 334 (decimal 220).
-
Replace a SLIP-ESC character with SLIP-ESC, followed by octal 335 (decimal 221).
That's it! Based on the most popular implementation of SLIP from Berkeley UNIX, SLIP also uses these conventions:
-
Packets start and end with the SLIP-END character to ensure that each IP packet starts anew.
-
The total size of the IP packet (including the IP header and data, but without the SLIP framing characters) is 1,006 bytes.
SLIP's simplicity led to its popularity (although PPP is used more widely nowadays). SLIP has several shortcomings, however:
-
Each end of the SLIP connection has to know its and the other end's IP addresses. Although some schemes permit dynamic assignment of IP addresses, the protocol does not have any provisions for address negotiation.
-
Both ends of SLIP must use the same packet size because the protocol does not permit the two ends to negotiate the packet size.
-
SLIP has no support for data compression. (As you learn later in this section, Compressed SLIP (CSLIP) introduces compression in SLIP.)
-
There is no way to identify the packet type in SLIP. Accordingly, SLIP can carry only one protocol-the one that both ends of SLIP are hard-wired to use. A transport mechanism such as SLIP should be capable of carrying packets of any protocol type.
Insider Insight CSLIP addresses the lack of data compression in SLIP, as described in RFC 1144, 'Compressing TCP/IP Headers for Low-Speed Serial Links,' V. Jacobson, February 1990. CSLIP compresses TCP/IP header information, which tends to be repetitive in packets exchanged between the two ends of a SLIP connection. CSLIP does not compress the packet's data. CSLIP often is referred to as the Van Jacobson compression in recognition of CSLIP's author. Van Jacobson compression is also used in PPP.
Point-to-Point Protocol (PPP)
PPP fixes the shortcomings of SLIP and defines a more complex protocol. Unlike SLIP, PPP is an official Internet standard. It is documented in RFC 1661, 'The Point-to-Point Protocol,' W. Simpson, July 1994 (updated in RFC 2153, 'PPP Vendor Extensions,' W. Simpson, May 1997).
PPP includes the following main components:
-
A packet-framing mechanism that uses a modified version of the well-known High-Level Data Link Control (HDLC) protocol
-
A Link Control Protocol (LCP) to establish, configure, and test the data link
-
A family of Network Control Protocols (NCP) that enables PPP to carry more than one type of network packet-such as IP, IPX, or NetBEUI (Network BIOS Extended User Interface)-over the same connection
PPP has replaced SLIP as the protocol of choice for transporting packets over point-to-point links. In addition to the ubiquitous serial link, some versions of PPP work over several other types of point-to-point links. Some of these point-to-point links include Frame Relay, SONET/SDH (Synchronous Optical Network/Synchronous Digital Hierarchy), X.25, and ISDN (Integrated Services Digital Network).
The PPP frame has a more complex structure than SLIP has. The PPP frame structure is based on ISO (International Organization for Standardization) standard 3309, 'Data Communications-High-Level Data Link Control Procedures-Frame Structure,' 1979. The HDLC protocol uses a special flag character to mark the beginning and the end of a frame. Figure 13-9 shows the structure of a complete PPP frame.

Figure 13-9: The Format of a PPP Frame.
As Figure 13-9 shows, the PPP frames begin and end with a flag character whose value is always 0x7E (7E in hexadecimal notation). The Address and Control fields come from HDLC; they have the fixed values of 0xFF and 0x03, respectively. The PPP data consists of a 2-byte protocol field. (Actually, this field can be only 1 byte; the Link Control Protocol negotiates the length of the protocol field.)
Within the encapsulated network packet, PPP uses 0x7D as the escape character. To send a byte that has a special meaning (such as 0x7E, which marks the beginning and end of a frame), PPP follows these steps:
-
Embeds 0x7D in the data
-
Places the data byte being escaped
-
Toggles the sixth bit of that data byte
Thus, if the PPP data includes 0x7E, that byte is replaced by the 2-byte sequence 0x7D, followed by 0x5E. (If you toggle the sixth bit of 0x7E, or 0111 1110 in binary, you get 0x5E, or 0101 1110 in binary.)
When you use PPP to set up a link between your Red Hat Linux PC and a remote computer, your PC first sends LCP packets to set up the data link. After the physical data link is established and any optional parameters are negotiated, your PC sends NCP packets to select one or more network protocols for use over that link. Thereafter, any of those network protocols can send packets over the PPP link.
You don't need to know the complete details of PPP to use it effectively. Later in this chapter, I describe how you can use PPP to establish a TCP/IP network connection to another computer.
Connecting to a Remote Network Using PPP
To set up a PPP networking connection between two systems, you must have PPP software running at both ends. Typically, your ISP provides you with an account already set up, so that the PPP software runs automatically upon login. In that case, simply start the PPP software on your system after you log in to the remote system. In some cases, the ISP might use another authentication protocol PAP or CHAP. Those require some additional configuration on your Red Hat Linux system.
The pppd program takes care of communicating with its peer-a remote PPP server-over a dial-up line. The pppd program's name stands for Point-to-Point Protocol daemon. (In UNIX, daemon refers to a program that runs in the background and performs some useful task.) The pppd program provides an option through which you can invoke another program, such as wvdial, that actually establishes the serial communication and completes the remote login process.
You can set up and activate a PPP connection through Red Hat's graphical Internet Configuration Wizard or by editing appropriate configuration files and then running pppd from the command line. One good way to learn about pppd and wvdial is to use the Internet Configuration Wizard to set up and activate the connection and then examine the configuration files that the graphical configuration tool creates.
Gathering Information for a PPP Connection
Most ISPs provide PPP access to the Internet through one or more systems that the ISP maintains. If you sign up for such a service, the ISP should provide you the information you need to make a PPP connection to the ISP's system. Typically, this information includes the following:
-
The phone number to dial to connect to the remote system
-
The user name and password you must use to log in to the remote system
-
The names of the ISP's mail and news servers
-
The IP address for your side of the PPP connection. (This IP address is associated with your PC's PPP interface-the serial port.) The ISP does not provide this address if the IP address is assigned dynamically (this means the IP address may change every time your system establishes a connection).
-
IP addresses of the ISP's Domain Name Servers (DNS). The ISP does not provide these addresses if it assigns the IP address dynamically.
Of this information, the first two items are what you need to set up a PPP connection.
Using Red Hat's Internet Configuration Wizard
Follow these steps to set up a PPP connection using Red Hat's Internet Configuration Wizard:
-
Log in as root and select Main Menu>System Tools>Internet Configuration Wizard from the GNOME or KDE desktop (if you are not logged in as root, you'll be prompted for the root password). The Select Device Type dialog box appears (see Figure 13-10). Click the Modem connection, and then click Forward.
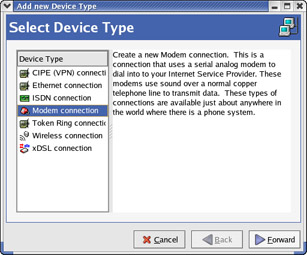
Figure 13-10: Configuring a New Modem Connection. -
The Select Modem dialog box shows information about your modem. Click Forward to continue.
-
The Select Provider dialog box appears. Fill in the connection information-the ISP's phone number, your login name, and password-in the text boxes. Click Forward to continue.
-
The IP Settings dialog appears. Fill in the requested IP settings. Typically, you would set it to automatically obtain IP settings from the provider. However, if you have static IP address, you can enter that information in this dialog box.
-
Click Apply to save the dial-up configuration information and close the Internet Configuration Wizard.
-
The Network Configuration dialog appears with the name of the new dial-up connection in a list (see Figure 13-11). In this case, I have configured a PPP connection with the nickname MyISP. Click the connection name and click Activate. You can verify the PPP connection by typing the /sbin/ifconfig command (and looking for the ppp0 interface in the output) or by running a Web browser such as Mozilla to access websites on the Internet.
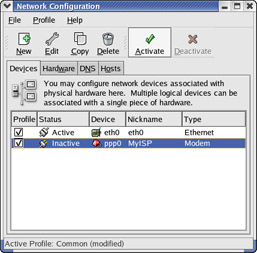
Figure 13-11: Click Activate in the Network Configuration Dialog Box to Establish the PPP Connection. -
When you're done, click Deactivate to turn the PPP connection off.
Understanding the PPP Configuration Files
The Internet Configuration Wizard and the Network Configuration tool save configuration information in the /etc/sysconfig/network-scripts/ifcfg-ppp0 and /etc/wvdial .conf files. In this case, I configured a PPP connection with the nickname MyISP. For the MyISP account, the contents of the /etc/sysconfig/network-scripts/ifcfg-ppp0 file contains the following:
USERCTL=yes
PEERDNS=yes
TYPE=Modem
DEVICE=ppp0
BOOTPROTO=dialup
ONBOOT=no
NAME=MyISP
CCP=off
PC=off
AC=off
BSDCOMP=off
VJ=off
VJCCOMP=off
LINESPEED=57600
MODEMPORT=/dev/ttyS1
DEMAND=no
PROVIDER=MyISP
DEFROUTE=yes
PERSIST=no
PAPNAME=naba
WVDIALSECT=MyISP
MODEMNAME=Modem0
Table 13-3 explains the meaning of these settings.
|
Parameter |
Description |
|---|---|
|
AC |
Set to on to enable address compression; otherwise, set to off |
|
BOOTPROTO |
The name of the protocol to use to get the IP address for the interface. Set to dialup for PPP interface. |
|
BSDCOMP |
Set to on if the BSD (Berkeley Software Distribution) UNIX compression protocol is to be used for compressing PPP encapsulated packets. Otherwise, set this to off. |
|
CCP |
Set to on to enable the Compression Control Protocol (CCP), which is responsible for configuring, enabling, and disabling data compression algorithms at both ends of the point-to-point link. Set to off if CCP is not being used. |
|
DEFROUTE |
Set to yes if you want the PPP connection to be the default route for your system (this is true if the PPP connection is how you connect to the Internet). Otherwise, set this option to no. |
|
DEMAND |
Set to yes if you want pppd to dial out on demand (whenever there is some application attempting a connection to the Internet). Otherwise, set to no. |
|
DEVICE |
The device name for the PPP interface (ppp0 for the first interface, ppp1 for second, and so on) |
|
LINESPEED |
Causes pppd to set the modem's data rate (often called the baud rate) to the specified number of bits per second. This is not the same as the data-transfer rate between the local and the remote modem; this simply sets the highest data rate for the UART. (See Appendix E for a discussion of UART.) |
|
MODEMNAME |
Identifies the section in /etc/wvdial.conf file that defines the characteristics of the modem (for example, Modem0) |
|
MODEMPORT |
The name of the device where the modem is connected (for example, /dev/ttyS0 for first serial port, /dev/ttyS1 for the second serial port, and so on) |
|
NAME |
The nickname for the interface (for example, MyISP) |
|
ONBOOT |
Set to yes to establish the PPP connection at boot time. Set to no if you want to manually activate the PPP connection when you need it. |
|
PAPNAME |
The user name to be used to log in to the remote system (this is the user name your ISP gives you) |
|
PC |
Set to on to enable protocol field compression. Otherwise, set this to off. |
|
PEERDNS |
Set to yes if you want the interface to modify your system's /etc/resolv .conf file to use the ISP's DNS servers. Set to no, if you want the /etc/ resolv.conf file unchanged. |
|
PERSIST |
Set to yes if you want the PPP link to be restarted every time it goes down. Otherwise, set it to no. |
|
PROVIDER |
Name of the ISP |
|
TYPE |
Set to Modem for dial-up PPP interface |
|
USERCTL |
Set to yes if you want any user to control the PPP interface. Set it to no if you want only root to control the interface. |
|
VJ |
Set to on to enable Van Jacobson style TCP/IP header compression. Otherwise, set this to off. |
|
VJCCOMP |
Set to on to enable the connection-ID compression option in Van Jacobson style TCP/IP header compression. With this option enabled, pppd will omit the connection-ID byte from Van Jacobson compressed TCP/IP headers and ask the other end of the PPP connection to do the same. Set the option to off if you do not want to use this compression. |
|
WVDIALSECT |
The name of the section in /etc/wvdial.conf file that should be used with /usr/sbin/wvdial to dial out (for example, MyISP refers to the [Dialer MyISP] section in /etc/wvdial.conf) |
When you establish a PPP connection by clicking Activate in the Network Configuration tool, that GUI tool uses two programs-/usr/sbin/pppd and /usr/ bin/wvdial-with appropriate options to dial out and set up the PPP connection. For the connection named MyISP PPP, the Network Configuration tool starts pppd with the following command:
/usr/sbin/pppd -detach lock modem crtscts asyncmap 00000000 defaultroute usepeerdns user naba remotename ppp0 /dev/ttyS1 57600 ipparam ppp0 linkname ppp0 call ppp0 noauth
You can look up the meanings of the pppd options by reading the pppd man page with the man pppd command. A key option here is call ppp0. That options tells pppd to dial out using the command stored in the file /etc/ppp/peers/ppp0. For the MyISP connection, the /etc/ppp/peers/ppp0 contains the following line:
connect "/usr/bin/wvdial --remotename ppp0 --chat 'MyISP'"
That line instructs pppd to connect by executing the command within double quotes following the connect option. In this example, pppd runs the /usr/bin/wvdial program with the following command line:
/usr/bin/wvdial --remotename ppp0 --chat MyISP
The -chat option causes /usr/bin/wvdial to run just like the chat program, under control of pppd. Like chat, wvdial dials the modem, connects to the remote system, looks for login prompt, and sends the appropriate user name and password.
The wvdial program looks for the phone number and other details for the MyISP connection in the /etc/wvdial.conf file-in a section named MyISP. Here's what the /etc/wvdial.conf file contains:
[Modem0]
Modem = /dev/ttyS1
Baud = 57600
SetVolume = 0
Dial Command = ATDT
Init1 = ATZ
FlowControl = Hardware (CRTSCTS)
[Dialer MyISP]
Area Code = 301
Username = naba
Password = mypassword
Phone = 555-1212
Stupid Mode = 1
Inherits = Modem0
The [Modem0] section lists information about the modem named Modem0, including any modem initialization commands (ATZ, in this example). This modem name also appears in the MODEMNAME field of the PPP configuration file such as /etc/sysconfig/network-scripts/ifcfg-ppp0.
| Caution |
The [Dialer MyISP] section contains the information needed to dial and log in to the ISP. Notice that the password is stored in plaintext form in /etc/wvdial.conf. To protect your ISP user name and password, you should make sure that only root has read and write access to the /etc/wvdial.conf file. |
Configuring CHAP and PAP Authentication
The pppd on your system has to authenticate itself to the ISP's PPP server before the PPP connection is up and running. Authentication requires proving that you have a valid account with the ISP and essentially involves providing a user name and a secret (password). PPP specifies two ways of exchanging the authentication information between the two ends of the connection:
-
CHAP-Challenge Handshake Authentication Protocol (CHAP) requires the remote end to send a randomly generated challenge string along with the remote server's name. The local system looks up the secret using the server's name and sends back a response that includes its name and a value that combines the secret and the challenge by using a one-way hash function. The remote system then checks that value against its own calculation of the expected hash value. If the values match, the authentication succeeds; otherwise, the remote system terminates the connection. In this case, the name and secret are stored in the /etc/ppp/chap-secrets file. Note that the remote system can repeat the CHAP authentication any time while the PPP link is up.
-
PAP-Password Authentication Protocol (PAP) is like the normal login process. When using PAP, the local system repeatedly sends a user name (name) and password (secret) until the remote system acknowledges the authentication or ends the connection. The name and secret are stored in the /etc/ppp/pap-secrets file. Note that the user name and password are sent in the clear.
The Linux pppd server supports both types of authentication. For both PAP and CHAP, the information that the pppd server needs is a name and a secret-a user-name-password pair. This authentication information is stored in the following configuration files:
-
/etc/ppp/chap-secrets stores the information for CHAP. Here's what a typical chap-secrets file looks like:
# Secrets for authentication using CHAP
# client        server  secret                  IP addresses
"naba"  *       "mypassword"
-
/etc/ppp/pap-secrets stores the information for PAP. Here's a typical pap-secrets file:
# Secrets for authentication using PAP
# client        server  secret                  IP addresses
"naba"  *       "mypassword"
As you can see, the format of entries are the same for both chap-secrets and pap-secrets. There are four fields in each line, in the following order:
-
client-This field contains the name to be used during authentication. This is the user name that you get from the ISP.
-
server-This field contains the name of the remote system to which you are authenticating the local system. If you don't know the server's name, put an asterisk to indicate any server.
-
secret-This field is the secret that your system's pppd has to send to the remote system to authenticate itself. This is the password you received from the ISP.
-
IP addresses-This optional field can contain a list of the IP addresses that the local system may use when connecting to the specified server. Typically, this field is left blank because the local system usually gets a dynamic IP address from the server and, therefore, does not know what IP address it would use.
Testing the PPP Connection
If you have PPP access to another system (such as an ISP or a system at your employer's organization), you can set up a script as described in the preceding section and enjoy the benefits of full TCP/IP network access to another system. After you run the script, and after pppd completes the initial protocol exchanges to set up the connection, you can verify that the connection is up by typing the ifconfig command. You should see the ppp0 device listed in the output. The ifconfig output also shows the IP addresses of the local and remote ends of the PPP connection. This output confirms that the PPP device is up and running.
To verify that the routing table is set up correctly, use the /sbin/route command without any arguments, as follows:
/sbin/route
Kernel IP routing table
Destination   Gateway       Genmask         Flags Metric Ref Use Iface
209.100.18.4  *             255.255.255.255 UH    0      0     0 ppp0
192.168.1.200 *             255.255.255.255 UH    0      0     0 eth0
192.168.1.0   *             255.255.255.0   U     0      0     0 eth0
127.0.0.0     *             255.0.0.0       U     0      0     0 lo
default       209.100.18.4  0.0.0.0         UG    0      0     0 ppp0
In the routing table, the first line shows a route to the remote end of the PPP connection; this one should be set to the ppp0 device. Also, the default route should be set up so that the remote end of the PPP connection serves as the gateway for your system (as the last line of the routing table shows).
After checking the interface configuration (with the ifconfig command) and the routing table (with the route command), verify that you can reach some well-known host. If your ISP gives you the IP address of a name server or a mail server, you can try to ping those addresses. Otherwise, try to ping the IP address of a system at your workplace or university.
The following example displays the results of the ping command:
ping 140.90.23.100
PING 140.90.23.100 (140.90.23.100): 56 data bytes
64 bytes from 140.90.23.100: icmp_seq=0 ttl=241 time=244.3 ms
64 bytes from 140.90.23.100: icmp_seq=1 ttl=241 time=200.0 ms
64 bytes from 140.90.23.100: icmp_seq=2 ttl=241 time=220.0 ms
64 bytes from 140.90.23.100: icmp_seq=3 ttl=241 time=190.0 ms

--- 140.90.23.100 ping statistics ---
4 packets transmitted, 4 packets received, 0% packet loss
round-trip min/avg/max = 190.0/213.5/244.3 ms
The end of each line shows the round-trip time for a packet originating at your system to reach the designated IP address (140.90.23.100, in this case) and to return to your system. For a PPP connection over dial-up lines, you can see times in hundreds of milliseconds.
Incidentally, you do not have to have an account on a system to ping its IP address. Although a system may disable the automatic response to ping messages (ping uses Internet Control Message Protocol or ICMP messages), most systems respond to ping.


