Working with the Red Hat Package Manager
Working with the Red Hat Package Manager
A significant innovation from the people at Red Hat is the Red Hat Package Manager (RPM)-a system for packaging all the necessary files for a software product in a single file (referred to as an RPM file or simply an RPM). Red Hat Linux is distributed in the form of a lot of RPMs. In the following sections, you will learn to install, remove, and query RPMs by using Red Hat's Package Management graphical tool and the rpm commands.
| Insider Insight |
The rpm commands are a must when you have to work from a text-mode command line. The graphical package management utility, however, is better than using rpm commands when it comes to installing or uninstalling entire package groups (a package group is a collection of related RPMs). |
Using the Package Management Utility
Red Hat's Package Management utility is a graphical tool for installing and uninstalling RPMs. With this utility you can check what's installed on your system and also add or remove packages-as a group or individually.
To start the Package Management utility, choose Main Menu>System Settings>Add Remove Applications. If you are not logged in as root, a dialog box prompts you for the root password. Enter that password, and press Enter. The Package Management utility starts and gathers information about the status of packages installed on your system. After it sorts through the information about all the installed packages, the Package Management utility displays a list of all the packages (see Figure 21-1).
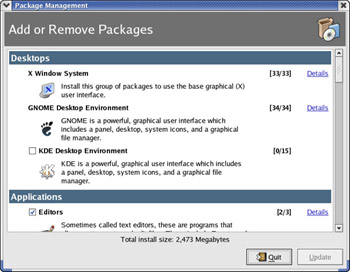
Figure 21-1: The Main Window of the Package Management Utility.
The Package Management window displays information about the packages organized into package groups such as Desktops and Applications. Each package group has a graphical icon, a label such as X Window System or GNOME Desktop Environment, and a brief description as well. A check box precedes each package group's name. If the package is already installed, a check mark appears in the check box. For example, in Figure 21-1, the X Window System and GNOME Desktop Environment package groups are installed, but the KDE Desktop Environment is not yet installed.
For the installed package groups (the ones with check marks), notice the hypertext link labeled Details on the right side of the package's name and description. If you click on Details, the Package Management utility brings up a new window in which it displays further details about the contents of that package group. For example, Figure 21-2 displays the detailed contents of the GNOME Desktop Environment package group. Click Close after you finish examining the details of a package group.
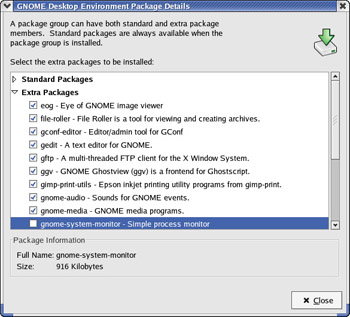
Figure 21-2: Viewing a Package Group's Detailed Contents.
To install an uninstalled package group, simply click the check box so that a check mark appears there. Then, click the Update button to proceed with the installation. The Package Management utility figures out what specific files have to be installed for that pack- age group. (Because of interdependencies among package groups, installing one package group may require installing quite a few other package groups.) After it finishes gathering information, a dialog box informs you what will be installed and how much disk space will be needed For example, Figure 21-3 shows the information about package and space requirements for the KDE Desktop Environment (12 packages and about 161MB of disk space).
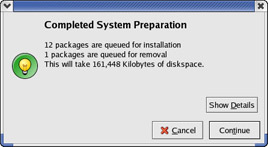
Figure 21-3: Information about Disk Space Required to Install a Package Group.
Click Continue to proceed. The Package Management utility then updates the system and displays the progress as it installs files. If a new CD-ROM is needed, the Package Management utility prompts you for the next CD-ROM. Insert the requested CD-ROM, and click OK.
To remove one or more package groups, uncheck the check marks for those package groups in the Package Management window, and then click the Update button. A dialog box shows you the details of what will be removed. Click Continue, and the packages will be removed.
Using the RPM Commands
When you install Red Hat Linux from the companion CD-ROMs, the installation program uses the rpm command to unpack the packages (RPM files) and to copy the contents to appropriate locations on the disk.
Although you do not need to understand the internal structure of an RPM file, you should know how to use the rpm command to work with RPM files. Specifically, you may want to perform one or more of the following tasks with RPMs:
-
Find out the version numbers and other information about RPMs installed on your system
-
Install a new software package from an RPM. For example, you might install a package you have skipped during the initial installation. In particular, you have to install the source files for the Linux kernel before you can rebuild the kernel.
-
Remove (uninstall) unneeded software you have previously installed from an RPM. You might uninstall a package to reclaim the disk space, if you find that you rarely (or never) use the package.
-
Upgrade an older version of an RPM with a new one. You might upgrade after you download a new version of a package from Red Hat's FTP server. Often, you must upgrade an RPM to benefit from the fixes in the new version.
-
Verify that an RPM is in working order. You can verify a package to ensure that all necessary files are in the correct locations.
You can perform all of these tasks with the rpm command-it's just a matter of using different options. The next few subsections briefly introduce you to the rpm command.
| Insider Insight |
If you ever forget the rpm options, type the following command to see a list: rpm --help | more The number of options rpm has will amaze you! |
Understanding RPM Filenames
An RPM contains a number of files, but it appears as a single file on your Red Hat Linux system. By convention, the RPM filenames have a specific structure. To see the names of RPM files available on the companion CD-ROMs, use the following steps:
-
Place the first CD-ROM in the CD-ROM drive. If you are using GNOME or KDE graphical desktops, the CD should be mounted automatically. Otherwise, mount it by typing the following command in a terminal window:
mount /mnt/cdrom
-
Go to the directory in which the RPMs are located, and view the listing using the ls command. For example to see RPMs with names that start with cups, type:
cd /mnt/cdrom/RedHat/RPMS
ls cups*.rpm | more
Here is a typical output from my system:
cups-1.1.17-13.i386.rpm
cups-libs-1.1.17-13.i386.rpm
As you might guess from the listing, all RPM files end with an .rpm extension. To understand the various parts of the filename, consider the following RPM:
cups-1.1.17-13.i386.rpm
This filename has the following parts, separated by dashes (-):
-
Package name-cups
-
Version number-1.1.17
-
Release number-13 (this is a Red Hat-assigned release number)
-
Architecture-i386 (this package is for Intel 80386-compatible processors)
Usually, the package name is descriptive enough for you to guess what the RPM might contain. The version number is the same as that of the software package's current version number (even when it is distributed in some other form, such as a tar file). Red Hat assigns the release number to keep track of changes. The architecture should be i386 or noarch for the RPMs you want to install on a PC with an Intel x86-compatible processor.
Finding Information about RPMs
As it installs packages, the rpm command builds a database of installed RPMs. You can use the rpm -q command to query this database to find out information about packages installed on your system.
For example, to find out the version number of the Linux kernel installed on your system, type the following rpm -q command:
rpm -q kernel
kernel-2.4.20-6
The response is the name of the RPM for the kernel (this is the executable version of the kernel, not the source files). The name is the same as the RPM filename, except that the last part-.i386.rpm-is not shown. In this case, the version part of the RPM tells you that the kernel is 2.4.20.
You can see a list of all installed RPMs by using the following command:
rpm -qa
You will see a long list of RPMs scroll by your screen. To view the list one screen at a time, type:
rpm -qa | more
If you want to search for a specific package, feed the output of rpm -qa to the grep command. For example, to see all packages with kernel in their names, type:
rpm -qa | grep kernel
kernel-pcmcia-cs-3.1.31-13
kernel-source-2.4.20-6
kernel-2.4.20-6
kernel-utils-2.4-8.29
You can query much more than a package's version number with the rpm -q command. By adding single-letter options, you can find out other useful information. For example, try the following command to see the files in the kernel package:
rpm -ql kernel | more
/boot/System.map-2.4.20-6
/boot/config-2.4.20-6
/boot/module-info-2.4.20-6
/boot/vmlinux-2.4.20-6
/boot/vmlinuz-2.4.20-6
/dev/shm
/lib/modules
/lib/modules/2.4.20-6
/lib/modules/2.4.20-6/build
/lib/modules/2.4.20-6/kernel
/lib/modules/2.4.20-6/kernel/arch
/lib/modules/2.4.20-6/kernel/arch/i386
/lib/modules/2.4.20-6/kernel/arch/i386/kernel
/lib/modules/2.4.20-6/kernel/arch/i386/kernel/cpuid.o
/lib/modules/2.4.20-6/kernel/arch/i386/kernel/edd.o
/lib/modules/2.4.20-6/kernel/arch/i386/kernel/microcode.o
/lib/modules/2.4.20-6/kernel/arch/i386/kernel/msr.o
(rest of the listing deleted)
Following are several useful forms of rpm -q commands to query information about a package (to use any of these rpm -q commands, type the command, followed by the package name):
-
rpm -qc-Lists all configuration files in a package
-
rpm -qd-Lists all documentation files in a package. These are usually the online manual pages (also known as man pages).
-
rpm -qf-Lists the package that owns a specified file. This is a good way to find out which package installed a specific file.
-
rpm -qi-Displays detailed information about a package, including version number, size, installation date, and a brief description
-
rpm -ql-Lists all the files in a package. For some packages, this can be a very long list.
-
rpm -qs-Lists the state of all files in a package
These rpm -q commands provide information about installed packages only. If you want to find information about an uninstalled RPM file, add the letter p to the command-ine option of each command. For example, to view the list of files in the RPM file named cups-1.1.17-13.i386.rpm, use the following command:
rpm -qpl cups-*.rpm
Of course, this works only if the current directory contains that RPM file.
If you are curious which package installed a specific file, use the rpm -qf command. For example, if you notice the file /etc/foomatic and wonder which package installed it, you can type rpm -qf /etc/foomatic. The resulting display is not much of a surprise:
foomatic-2.0.2-15
Installing an RPM
To install an RPM, use the rpm -i command. You have to provide the name of the RPM file as the argument. A typical example is installing an RPM from this book's companion CD-ROMs containing the Red Hat Linux RPMs. As usual, you have to mount the CD-ROM and change to the directory in which the RPMs are located. Then use the rpm -i command to install the RPM. If you want to view the progress of the RPM installation, use rpm -ivh. A series of hash marks (#) are displayed as the package is unpacked.
For example, to install the kernel-source RPM (which contains the source files for the Linux operating system) from the first companion CD-ROM, I type the following commands:
mount /mnt/cdrom
cd /mnt/cdrom/RedHat/RPMS
rpm -ivh kernel-source*
| Insider Insight |
You do not have to type the full RPM filename-you can use a few characters from the beginning of the name followed by an asterisk (*). Make sure you type enough of the name to identify the RPM file uniquely. |
If you try to install an RPM already installed, the rpm command displays an error message. For example, here is what happens when I try to install the man package on my system:
rpm -i man-*
package man-1.5k-6 is already installed
To force the rpm command to install a package even if errors are present, just add -force to the rpm -i command, as follows:
rpm -i --force man-*
Removing an RPM
You might want to remove-uninstall-a package if you realize you don't really need the software. For example, if you have installed the X Window System development package but discover you are not interested in writing X applications, you can easily remove the package by using the rpm -e command.
You need to know the name of the package before you can remove it. One good way to find the name is to use rpm -qa in conjunction with grep to search for the appropriate RPM file. For example, to locate the X Window System development RPM, you might try the following command:
rpm -qa | grep XFree86
XFree86-truetype-fonts-4.3.0-2
XFree86-devel-4.3.0-2
XFree86-ISO8859-14-75dpi-fonts-4.3.0-2
XFree86-xfs-4.3.0-2
XFree86-base-fonts-4.3.0-2
XFree86-4.3.0-2
XFree86-xdm-4.3.0-2
XFree86-ISO8859-2-100dpi-fonts-4.3.0-2
XFree86-libs-data-4.3.0-2
XFree86-Mesa-libGLU-4.3.0-2
XFree86-cyrillic-fonts-4.3.0-2
XFree86-ISO8859-15-75dpi-fonts-4.3.0-2
XFree86-ISO8859-9-75dpi-fonts-4.3.0-2
XFree86-Mesa-libGL-4.3.0-2
XFree86-100dpi-fonts-4.3.0-2
XFree86-xauth-4.3.0-2
XFree86-tools-4.3.0-2
XFree86-ISO8859-15-100dpi-fonts-4.3.0-2
XFree86-ISO8859-9-100dpi-fonts-4.3.0-2
XFree86-font-utils-4.3.0-2
XFree86-75dpi-fonts-4.3.0-2
XFree86-twm-4.3.0-2
In this case, XFree86-devel happens to be the name of the package you need. To remove the package, type:
rpm -e XFree86-devel
Note that you do not need the full RPM filename; all you need is the package name-the first part of the filename up to the dash (-) before the version number.
The rpm -e command does not remove a package other packages need. For example, when I try to remove the vim-common package, I get the following error messages:
rpm -e vim-common
error: Failed dependencies:
        vim-common is needed by (installed) vim-minimal-6.1-29
        vim-common is needed by (installed) vim-enhanced-6.1-29
Upgrading an RPM
Use the rpm -U command to upgrade an RPM. You must provide the name of the RPM file that contains the new software. For example, if I have version 2.0.36 of Apache httpd (Web server) installed on my system but I want to upgrade to version 2.0.40, I download the RPM file httpd-2.0.40-20.i386.rpm from one of Red Hat update sites listed at http://www.redhat.com/download/mirror.html and use the following command:
rpm -U httpd-2.0.40-20.i386.rpm
The rpm -U command performs the upgrade by removing the old version of the netscape-communicator package and installing the new RPM.
| Insider Insight |
You should upgrade, whenever possible, rather than remove the old package; then you should install the new version. Upgrading automatically saves the old configuration files, which saves you the hassle of configuring the software after a fresh installation. |
| Caution |
When you are upgrading the kernel and the kernel module packages that contain a ready-to-run Linux kernel, you should install it by using the rpm -i command (instead of the rpm -U command). That way you won't overwrite the current kernel. |
Verifying an RPM
You may not do this often, but if you suspect that a software package is not properly installed, use the rpm -V command to verify it. For example, to verify the kernel package, type the following:
rpm -V kernel
The rpm -V causes rpm to compare the size and other attributes of each file in the package against those of the original files. If everything verifies correctly, the rpm -V command does not print anything. If there are any discrepancies, you will see a report of them. For example, I have modified the configuration files for the Apache httpd (Web) server. Here is what I see when I verify the httpd package:
rpm -V httpd
S.5....T c /etc/httpd/conf/httpd.conf
In this case, the output from rpm -V shows that a configuration file has changed. Each line of this command's output consists of three parts:
-
The line starts with eight characters: each character indicates the type of discrepancy found. For example, S means the size is different, and T means the time of last modification is different. Table 21-1 shows each character and its meaning. A period (.) means that that specific attribute matches the original.
-
For configuration files, a c appears next; otherwise, this field is blank. That's how you can tell whether or not a file is a configuration file. Typically, you shouldn't worry if a configuration file has changed; you have probably made the changes yourself.
-
The last part of the line is the full pathname of the file. From this part, you can tell exactly where the file is located.
Table 21-1: Characters Used in RPM Verification Reports Character
Meaning
S
Size has changed
M
Permissions and file type are different
5
Checksum computed with the MD5 algorithm is different
D
Device type is different
L
Symbolic link is different
U
File's user is different
G
File's group is different
T
File's modification time is different


