Writing Man Pages with groff
Writing Man Pages with groff
Before the days of graphical interfaces, typesetting with the computer meant preparing a text file containing embedded typesetting commands and then processing that marked-up text file with a computer program that generated commands for the output device: a printer or some other typesetter.
As you know, such markup languages still exist. A prime example is HyperText Markup Language (HTML), which you use to prepare World Wide Web pages.
In the late 1970s and early 1980s, I prepared all my correspondence and reports on a DEC VAX/VMS system, using a program named RUNOFF. That program formatted output for a line printer or a daisy-wheel printer. That VAX/VMS RUNOFF program accepted embedded commands such as the following:
.page size 58,80
.spacing 2
.no autojustify
As you may guess, the first command sets the number of lines per page and the number of characters on each line. The second command generates double-spaced output. The last command turns off justification. Essentially, I’d pepper a text file with these commands, run it through RUNOFF, and send RUNOFF’s output to the line printer. The resulting output looked as good as a typewritten document, which was good enough for most work in those days.
UNIX came with a more advanced typesetting program called troff (which stands for typesetting runoff) that could send output to a special device called a typesetter. A typesetter could produce much better output than a line printer. troff enables you to choose different fonts and to print text in bold and italic.
To handle output on simpler printers, UNIX also included nroff (which stands for nontypesetting runoff) to process troff files and generate output, to ignore fancy output commands, and to generate output on a line printer. troff typesetting is versatile enough that many computer books were typeset by using troff.
Now that nearly every computer offers some sort of graphical interface (Microsoft Windows, Apple Macintosh, or GNOME and KDE in Linux), most word-processing programs work in WYSIWYG (what you see is what you get) mode, in which you get to work directly with the formatted document. You probably don’t have any reason, therefore, to use troff for typesetting. You still use nroff for one important task, however: preparing man pages. The remainder of this chapter focuses on that aspect of using nroff.
| Insider Insight |
The groff program is the GNU version of troff and nroff. By using appropriate flags, you can use groff to typeset for several output devices, including any typewriter-like device. |
Even if you don’t use groff to prepare formatted documents (because using a PC-based word processor is more convenient), you may end up using groff to write the man page for any program that you write.
Man pages are the files that contain the information that users can view by typing the command man progname. This command shows online Help information on progname. The subject of a man page can be anything from an overview of a software package to the programming information for a specific C function. (Try typing man fopen, for example, on your Linux system.)
After you go through an example, you realize that writing man pages in groff is quite simple.
| Note |
Before reading about the man page preparation process, understand that you don’t really use the groff program to prepare the man page. The man page is just a text file containing embedded commands that groff recognizes. You may use groff to view a man page during preparation, but you can prepare a man page without ever running groff. |
Trying an Existing man Page
Before you write a man page, look at an existing man page. A brief example is the man page for zless. Figure 11-5 shows the man page for zless in a terminal window.
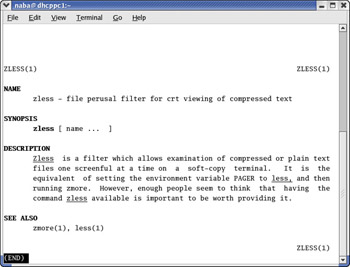
Figure 11-5: Output of the man zless Command in a Terminal Window.
The output of the man zless command may appear garbled if the LANG environment variable is set to use UTF-8 encoding for characters and the terminal window is unable to handle the UTF-8 encoding for characters such as the hyphen. To check the setting of LANG, type locale and look at the setting for LANG. For example, on my system (in the United States), the value of LANG is as follows:
LANG=en_US.UTF-8
In this case, the language is U.S. English with UTF-8 encoding. To fix the problem, I redefine LANG as plain U.S. English (represented by the code en_US):
export LANG=en_US
To reset LANG for the entire system, I edit the /etc/sysconfig/i18n file such that it contains the line:
LANG="en_US"
If the output of the man command is garbled on your system, try making similar changes to the LANG variable to correct the problem (the exact setting of LANG depends on your language—the garbling problem should disappear if you select a language name that does not end with .UTF-8).
Returning to the example of the man page for the zless command, you don’t really need to pay attention to the exact content of the man page; all you care about is the layout. Take a moment to look at the layout and notice the following points:
-
The name of the command appears at the top of the man page. The number 1 that appears in parentheses next to the command’s name denotes the section of the UNIX manual where this command belongs.
-
The man page contains several sections, each of which appears in boldface. The text within the section is indented.
-
In this example, the sections are NAME, SYNOPSIS, DESCRIPTION, and SEE ALSO. If you try a few more man pages, you see that some man pages have many more sections. Almost all man pages, however, have these four sections.
-
Some text appears in boldface.
Looking at a man Page Source
After you view a man page by using the man command, you should look at the original source file from which the man command generates the output. In your Linux system, the man page source files are in several directories. The /etc/man.config file defines these directory names.
The source file for the zless man page is /usr/share/man/man1/zless.1.gz. Look at this file to see how the man page appears in its final form, which is shown in Figure 11-5. Here is how to look at the source file for the zless man page:
zless /usr/share/man/man1/zless.1
.TH ZLESS 1
.SH NAME
zless \- file perusal filter for crt viewing of compressed text
.SH SYNOPSIS
.B zless
[ name ...  ]
.SH DESCRIPTION
.I  Zless
is a filter which allows examination of compressed or plain text files
one screenful at a time on a soft-copy terminal.  It is the equivalent of
setting the environment variable PAGER to
.I less,
and then running zmore.  However, enough people seem to think that having the
command
.I zless
available is important to be worth providing it.
.SH "SEE ALSO"
zmore(1), less(1)
One interesting feature of the marked-up text file for the man page is the haphazard manner in which lines break. The formatting program groff (the man command uses groff to process the marked-up text file) fills up the lines of text and makes everything presentable.
Most groff commands must appear on a line by themselves, and each such command starts with a period or a dot. You can, however, embed some groff font-control commands in the text; these embedded commands start with a backslash (\).
Following is a summary of the commands that you see in the zless man page source file:
-
.B turns on boldface.
-
.I turns on italic.
-
.SH is the start of a new section.
-
.TH indicates the document title.
If you use these dot commands (meaning commands that begin with a period or dot) to change the font, the man page source file tends to display many short lines, because each dot command must appear on a separate line. As the following section shows, you can use embedded font-change commands to produce a more readable source file.
Writing a Sample man Page
This section shows you how to write a man page for a sample application by the name of satview. Assume that the satview program displays a satellite image in a window. The program includes some options for specifying the map projection, the zoom level, and the name of the file that contains the satellite image data.
Use a text editor to type the man page source code shown in the following listing and save it in a file named satview.1:
.TH SATVIEW 1 "April 19, 2003" "Satview Version 10.1"
.SH NAME
satview \- View satellite images.
.SH SYNOPSIS
\fBsatview\fP [-p \fIprojection\fP] [-m] [-z \fIzoomlevel\fP]
\fIfilename\fP
.SH DESCRIPTION
\fBsatview\fP displays the satellite image from \fIfilename\fP.
.SS Options
.TP
\fB-p \fIprojection\fR
Set the map projection (can be \fBL\fR for Lambert Conformal or
\fBP\fR for Polar Stereographic). The default is Lambert Conformal.
.TP
\fB-m\fP
Include a map in the satellite image.
.TP
\fB-z \fIzoomlevel\fR
Set the zoom level (can be one of: 2, 4, or 8). The default
zoomlevel is 1.
.TP
\fIfilename\fR
File containing satellite data.
.SH FILES
.TP
\fC/etc/awips/satview.rc\fR
Initialization commands for \fBsatview\fR
.SH SEE ALSO
nexrad(1), contour(1)
.SH Bugs
At zoom levels greater than 2, map is not properly
aligned with image.
The source file of a man page contains the following significant features:
-
The .TH tag indicates the man page title as well as the date and a version- number string. In the formatted man page, the version and date strings appear at the bottom of each page.
-
This man page has six sections—NAME, SYNOPSIS, DESCRIPTION, FILES, SEE ALSO, and Bugs—each of which starts with the .SH tag.
-
The DESCRIPTION section has an Options subsection. The .SS tag indicates the beginning of a subsection.
-
In the Options subsection, each item is listed with the .TP tag.
-
The \fB command changes the font to boldface.
-
\fI changes the font to italic.
-
\fR changes the font to Roman.
-
\fP changes the font to its preceding setting.
With this information in hand, you should understand the man page source listing.
Testing and Installing the man Page
As you prepare the man page file, you want to make sure that it’s formatted correctly. To view the formatted output, use the following command:
groff -Tascii -man satview.1 | more
This command runs the groff command with the ascii typesetting device (which means that it produces plain ASCII output) and with the man page macro set (that’s what the -man option does).
If you find any formatting discrepancies, check the dot commands and any embedded font-change commands, and make sure that everything looks right.
After you’re satisfied with the man page format, you can make the man page available to everyone by copying the file to one of the directories in which all man pages reside. Log in as root and install the man page by using the following copy command:
cp satview.1 /usr/share/man/man1
After that, try the man page by using this command:
man satview
Figure 11-6 shows the resulting output. Compare the output with the source file listing shown in the preceding section, “Writing a Sample man Page,” to see the effects of the commands on the final output. The italic command generates underlined output, because the terminal window can’t display an italic font.
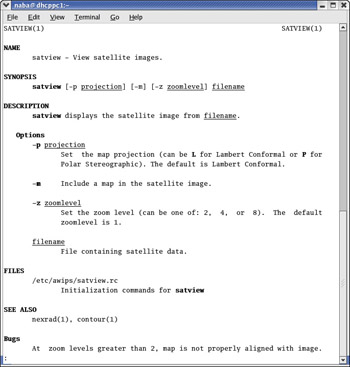
Figure 11-6: Output of the man satview Command in a Terminal Window.
Using the listing in this section as a guide, you can now write your own man pages.


