Setting up X on Red Hat Linux
Setting up X on Red Hat Linux
You want to get X set up and going quickly; without it, Red Hat Linux has no GUI. If you are used to other graphical environments (perhaps on another UNIX workstation or on a PC running Microsoft Windows), you probably want a similar graphical environment on Red Hat Linux.
If you plan to develop software on your Red Hat Linux system, chances are good that your software has a graphical component that must be implemented and tested under X. You have to set up and run X to perform this implementation and testing.
No matter what your purpose, if you want to set up XFree86, you have to prepare a special configuration file named XF86Config (which must be present in the /etc/X11 directory) that contains information about your hardware. You can use the redhat-config-xfree86 utility to create the XF86Config file. The next few sections guide you through the process of configuring XFree86 and starting X on your Red Hat Linux PC.
| Cross Ref |
You do not have to configure XFree86 if you have already successfully installed X during the Red Hat Linux installation, as explained in Chapter 2. |
Knowing Your Video Hardware before Configuring XFree86
To configure XFree86, you must know the hardware that X must access and use. From this chapter's brief introduction to X, you know that the X server controls the following hardware:
-
The video card
-
The monitor
-
The keyboard
-
The mouse
The X server needs information about these components to work properly.
The Monitor
XFree86 controls the monitor through the video card. This means that an XFree86 server can cause a video card to send a wide range of signals to the monitor (to control how fast a raster line is drawn, for example, or how often the entire screen is redrawn). If a video card causes the monitor to perform some task beyond its capabilities (drawing each raster line much faster than it was designed to do, for example), the monitor may actually be damaged. To ensure that the signals from the video card are within the acceptable range for a monitor, XFree86 needs information about some key characteristics of the monitor.
At minimum, you have to provide the following information about the monitor:
-
The range of acceptable horizontal synchronization frequencies. A typical range might be 30-64 kHz.
-
The range of allowable vertical synchronization rates (also known as vertical refresh rates), such as 50-90 Hz
-
If available, the bandwidth in megahertz, such as 75 MHz
Typically, the monitor's documentation includes all this information. If you bought your PC recently, you may still have the documentation. If you have lost your monitor's documentation, one way to find the information might be to check your Microsoft Windows setup. If your system came with a Windows driver for the display, that driver may display information about the monitor. Another possibility is to visit your computer vendor's website and look for the technical specification of the monitor. I found useful information about my system's monitor on the vendor's website. You can also try searching on a search engine such as Google (http://www.google.com/).
The Video Card
XFree86 already provides X servers designed to work with a particular video chipset (the integrated circuit chips that generate the signals needed to control the monitor). To select the correct X server, you have to indicate the video chipset your video card uses.
Even within a family of video cards based on a specific chipset, many configurable parameters may vary from one card to another. Therefore, you also must specify the vendor name and the model of your video card.
At a minimum, you have to provide the following information about the video card:
-
Video chipset, such as S3, NVidia RIVA TNT, or ATI Mach64
-
Vendor name and model, such as Diamond Stealth 64 VRAM, Diamond Viper V550, Number Nine GXE64, or ATI Graphics Xpression
-
Amount of video RAM (random access memory), such as 16MB or 32MB.
Most PC vendors indicate only the make and model of the video card in advertisements; ads rarely mention the video chipset. You should ask explicitly about the video chipset and for as much information as the vendor can provide about the video card's model.
| Insider Insight |
If you are going to use an old PC to run Linux, you can try to find the video chipset information by opening your computer's case and looking at the video card. The vendor name and model number may be inscribed on the card. For the video chipset, you have to look at the markings on the different chips on the video card and try to guess. For example, if you find a chip with the following markings (only part of the markings are shown here): S3 Trio 64 (GACC 2) 86C764 - P You might then guess that this card uses the S3 chipset. In fact, markings on the chip show the 86C764 number as well (either in the full form or as the number 764). Now, if you can locate the vendor name and model of this card, you may be all set to configure the X server to run properly on your PC. |
To find out if your video card or chipset is supported by XFree86 4.2.0, visit http:// www.xfree86.org/4.2.0/Status.html. This Web page provides links to information on XFree86 support for specific video cards or chipsets from the following vendors (I briefly summarize the information here):
-
3Dfx-Voodoo Graphics and Voodoo2 supported by glide driver. Voodoo Banshee, Voodoo3, Voodoo4, and Voodoo5 chipsets supported by tdfx driver.
-
3Dlabs-Permedia series (including 1, 2, 2a, 2v, 3, and 4) and GLINT series (including 300SX, 500TX, MX, R3 and R4) with the Gamma, Gamma2, or Delta coprocessor are supported by the glint driver.
-
Alliance-AT24, AT25, and AT3D are supported by the apm driver. AP6422 is partially supported.
-
ARK Logic-ARK1000PV, ARK2000PV, and ARK2000MT are supported by the ark driver.
-
ATI-All hardware except for Mach8 and some old Mach32 chips are supported by the ati driver. Accelerated support provided for Mach64, Rage, Rage 128, and Radeon chipsets only.
-
Avance Logic-These chipsets are not supported.
-
Chips and Technologies-All chipsets (65520, 65525, 65530, 65535, 65540, 65545, 65546, 65548, 65550, 65554, 65555, 68554, 69000, 64200, and 64300) are supported by the chips driver.
-
Cirrus Logic-The Alpine (5430, 5434, 5436, 5446, 5480, 7548) and Laguna (5462, 5464, 5465) chipsets are supported by the cirrus driver. Other Cirrus Logic chipsets are not supported.
-
Compaq/Digital-DEC 21030 TGA 8 plane and 24 plane chipsets are supported by the tga driver.
-
Cyrix-The Cyrix MediaGX chipset is supported by the cyrix driver.
-
Epson-These chipsets are not supported.
-
Genoa-These chipsets are not supported.
-
IBM-VGA chipsets (and compatibles) are supported by the vga driver. IBM 8514/A and XGA-2 are not supported.
-
IIT-These chipsets are not supported.
-
Integrated Micro Solutions (IMS)-IMS Twin Turbo 128 and Twin Turbo 3D are supported by the imstt driver.
-
Intel-The i740 is supported by the i740 driver. Intel i810 (including i810-dc100 and i810e), i815, and i830 are supported by the i810 driver.
-
Matrox-MGA2064W (Millennium I), MGA1064SG (Mystique), MGA2164W (Millennium II, both PCI and AGP), G100, G200, G400, G450, and G550 are supported by the mga driver
-
Micronix, Inc. (MX)-These chipsets are not supported.
-
NCR-These chipsets are not supported.
-
NeoMagic-NeoMagic NM2070, NM2090, NM2093, NM2097, NM2160, NM2200, NM2230, NM2360, and NM2380 chipsets are supported by the neomagic driver.
-
NVIDIA-Riva 128, 128ZX, TNT, TNT2 (Ultra, Vanta, M64), GeForce (DDR, 256), Quadro, GeForce2 (GTS, Ultra, MX, Go), GeForce3, and Quadro2 are supported by the nv driver.
-
Number Nine-Imagine 128, Ticket 2 Ride, Revolution 3D, and Revolution IV are supported by the i128 driver.
-
Oak Technologies, Inc.-These chipsets are not supported.
-
Paradise/Western Digital-These chipsets are not supported.
-
RealTek-These chipsets are not supported.
-
Rendition/Micron-Verite 1000, 2100, and 2200 are supported by the rendition driver.
-
S3-The 964 (revisions 0 and 1), 968, Trio32, Trio64, Trio64, Trio64V+, Trio64UV+, Aurora64V+, Trio64V2, and PLATO/PX chipsets are supported by the s3 driver when they are used with the IBM RGB 524, Texas Instruments 3025, or an internal TrioDAC RAMDAC chip. The ViRGE, ViRGE/VX, ViRGE/DX, ViRGE/GX, ViRGE/GX2, ViRGE/MX, ViRGE/MX+, Trio3D, and Trio3D/2X are supported by the s3virge driver. Savage3D, Savage3D/MV, Savage4, Savage2000, and SuperSavage are supported by the savage driver. Other S3 chipsets are not yet supported.
-
Silicon Graphics, Inc. (SGI)-SGI Indy's Newport cards (also known as XL) are supported by the newport driver.
-
Silicon Integrated Systems (SiS)-SiS 530, 620, 6326 are supported by the sis driver. SiS 630, 300, and 540 are also supported, but there are some problems with the support for these chipsets.
-
Silicon Motion, Inc-Lynx, LynxE, Lynx3D, LynxEM, LynxEM+, and Lynx3DM chipsets are supported by the siliconmotion driver.
-
Sun Microsystems-Sun BW2 framebuffers are supported by the sunbw2 driver. Sun CG3 framebuffers are supported by the suncg3 driver. Sun CG6 framebuffers are supported by the suncg6 driver. Sun CG14 framebuffers are supported by the suncg14 driver. Sun FFB framebuffers are supported by the sunffb driver. Sun LEO framebuffers are supported by the sunleo driver. Sun TCX framebuffers are supported by the suntcx driver.
-
Trident Microsystems-TVGA8900B, TVGA8900C, TVGA8900CL, TVGA9000, TVGA9000i, TVGA9100B, TVGA9200CXr, TVGA8900D, TGUI9440AGi, TGUI9660, TGUI9680, ProVidia 9682, ProVidia 9685, 3DImage975, 3DImage985, Blade3D, Cyber9320, Cyber9382, Cyber9385, Cyber9388, Cyber9397, Cyber9397/DVD, Cyber9520, Cyber9525/DVD CyberBlade/Ai1, CyberBlade/i7, CyberBlade/i1, CyberBlade/DSTN/Ai1, CyberBlade/DSTN/i7, CyberBlade/ DSTN/i1, CyberBlade/e4, CyberBladeXP, and BladeXP are supported by the trident driver. The old TVGA ISA/VLB card has not been fully tested.
-
Tseng Labs-ET4000AX, ET4000/W32, ET4000/W32i, ET4000/W32p, ET6000, and ET6100 are supported by the tseng driver.
-
Video 7-This chipset is not supported.
-
Weitek-These chipsets are not supported.
The Mouse
The mouse is an integral part of a GUI because users indicate choices and perform tasks by pointing and clicking. The X server moves an onscreen pointer as you move the mouse. The X server monitors all mouse clicks and sends these mouse-click events to the appropriate X client application-the one whose window contains the mouse pointer.
Although you may have set up the mouse during Linux installation, you still have to provide information about the mouse to the X server. The XFree86 X server needs a mouse to start; if the X server cannot access and control the mouse, it won't start.
To specify the mouse, you need to know the following things:
-
The mouse type, such as Microsoft, Logitech, BusMouse, or PS/2-style mouse
-
The type of connection between your mouse and the system (serial or bus)
-
The mouse's device name. You can leave this as the generic name /dev/mouse because the Red Hat installation program sets up a link between /dev/mouse and the actual mouse device; the actual device name depends on the type of mouse and where it is connected-the exact serial port for a serial mouse, for example.
You should not have any problem with the mouse as long as the mouse type and device names are correct.
Configuring XFree86 Using redhat-config-xfree86
Up until version 8.0, Red Hat Linux came with xf86config-a text-mode utility to configure X. Now Red Hat provides a GUI utility called redhat-config-xfree86, written in the Python programming language.
The redhat-config-xfree86 utility provides a convenient way to configure X through a GUI that itself uses X. The utility probes the monitor and video card. Then it starts X and displays a window from which you can further configure the settings such as resolution and color.
To probe the monitor, redhat-config-xfree86 uses the Display Data Channel (DDC)-a command interface developed by the Video Electronics Standards Association (VESA) to support plug-and-play setup of monitors. The DDC interface enables bidirectional communication between the computer and the monitor. Older monitors are not fully DDC compliant, and they may not return information needed by display configuration programs such as redhat-config-xfree86. If it does not get the needed information, redhat-config-xfree86 makes some assumptions about the monitor and shows it as a unknown monitor.
If there is an existing X configuration file-/etc/X11/XF86Config-redhat-config-xfree86 reads and uses the existing configuration information to start X. If there is no XF86Config file, redhat-config-xfree86 creates a new file based on information it gathers and your input.
The only problem occurs when the initial probing by redhat-config-xfree86 does not result in good information and you get a blank screen. When this happens, try pressing Ctrl-Alt-Keypad- and then waiting for a few moments. This causes the X server (which redhat-config-xfree86 has started) to switch to a lower screen resolution (for example, 800x600 instead of 1024x768). Sometimes that's all it takes to get X going. You'll know when X is working because you should see the main window of redhat-config-xfree86, as shown in Figure 3-2.
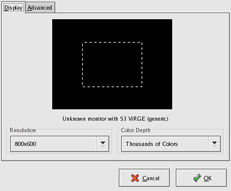
Figure 3-2: Main Window from redhat-config-xfree86.
The window has two tabs-Display and Advanced. Initially redhat-config-xfree86 shows the Display tab. On that tab, the utility shows a summary line about the monitor and the video card. For example, in Figure 3-2, the monitor appears as unknown monitor because DDC probing of the monitor did not return the information needed by redhat-config-xfree86. When that happens, you can configure the monitor from the Advanced tab.
Two drop-down lists enable you to change the resolution and colors. The initial settings show what redhat-config-xfree86 has been able to determine through its own probing. You can change these to different values after changing the monitor type from the Advanced tab.
Clicking the Advanced tab causes redhat-config-xfree86 to display that tab, as shown in Figure 3-3. The Advanced tab enables you to configure the monitor and the vide card. Initially, redhat-config-xfree86 shows the current settings for the monitor and the video card.
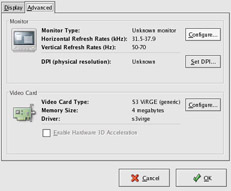
Figure 3-3: You Can Configure the Monitor and the Video Card from the Advanced Tab.
In this example, the monitor is shown as unknown and the video card type is a generic S3 ViRGE chipset. To configure the monitor, click the Configure button in the Monitor section of the tab. This causes a new window to appear, as shown in Figure 3-4.
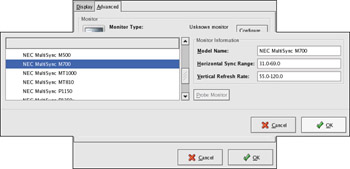
Figure 3-4: Configuring the Monitor in redhat-config-xfree86.
If you know your monitor's make and model, select it from the list. Otherwise, you can specify the ranges of values for the horizontal and the vertical synchronization rates (or frequencies) of your monitor. These two critical parameters of your monitor have the following meanings:
-
Horizontal synchronization frequency-the number of times per second that the monitor can display a horizontal raster line, in kilohertz (kHz).
-
Vertical synchronization rate or vertical refresh rate-how many times a second the monitor can display the entire screen.
You can enter the numbers in the text-entry fields on the right-hand side of the window.
| Caution |
Do not specify a horizontal synchronization range beyond the capabilities of your monitor. An incorrect value can damage the monitor. |
Click OK after entering the information about the monitor. The window closes, and you get back to the Advanced tab in the redhat-config-xfree86 utility's main window.
Check the video card information-the video card type, the amount of video memory, and the driver. Typically, redhat-config-xfree86 does a good job of detecting the video card. If you need to change the video card information, click the Configure button next to the video card information (refer to Figure 3-3). This causes redhat-config-xfree86 to display a new window, as shown in Figure 3-5.
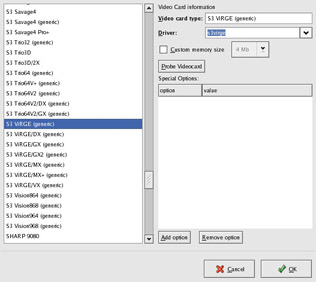
Figure 3-5: Configuring the Video Card in redhat-config-xfree86.
Initially redhat-config-xfree86 shows the detected video card type and the driver it has selected for that card (that driver is an XFree86 driver, used by the XFree86 server to control the video card). If you want to change the video card type, scroll through the list on the left and pick your video card from the list. The driver for the selected card should appear in the Driver field.
Sometimes you may know that a certain XFree86 driver would work for your video card (perhaps you have read that on a newsgroup or found from an Internet search). To select a specific driver, click the arrow button for the drop-down list of drivers, as shown in Figure 3-6.
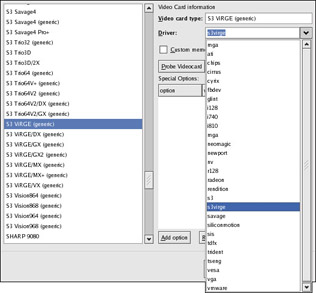
Figure 3-6: Selecting a Specific XFree86 Driver for Your Video Card.
After configuring the video card, click OK to return to the main window of redhat-config-xfree86. Then, click OK to complete the X configuration. The redhat-config-xfree86 writes the configuration to the /etc/X11/XF86Config file and displays a dialog box informing you what has been done, as shown in Figure 3-7.
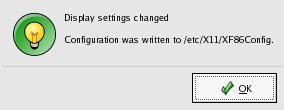
Figure 3-7: Completing X Configuration with redhat-config-xfree86.
Click OK to close the dialog box. That completes the X configuration. You can now restart your PC and get the graphical login screen (assuming that the default run level is 5).
Examining the XF86Config File
The XF86Config file describes your video card, monitor, and mouse to the X server. By default, the X server first looks for the configuration file in the /etc/X11 directory (/etc/X11/XF86Config), which is where you should save the configuration file.
If you study the /etc/X11/XF86Config file (I refer to this file generically as XF86Config), you see that the configuration file consists of several sections. Each section has the following format:
# This a comment
Section "SectionName"
    EntryName  EntryValue
    ...
    ...
    Subsection "SubsectionName"
        EntryName EntryValue
        ...
        ...
    EndSubsection
EndSection
Sections consist of a sequence of entries; each entry has a name and a value. A section may contain one or more subsections. A hash mark (#) at the beginning of a line marks a comment line.
In XFree86 4.x, the XF86Config file contains one or more of the following sections:
-
ServerFlags-This section lists various X server options, such as DontZap (which means 'do not allow the Ctrl-Alt-Backspace keystroke to terminate the X server') and DontZoom (which means 'do not accept special keystrokes to change screen resolution').
-
Files-This section lists the pathnames (full directory names) of font files and the file that contains the color database, called the RGB file. RGB stands for red, green, and blue-the three primary components of color. The font pathname typically specifies the port number where the X font server provides font information.
-
Module-This section specifies which X server extension modules and font modules should be loaded. The modules are object code and libraries that add specific functionality to the X server.
-
InputDevice-This section lists information about the keyboard and the mouse or pointer. (In the X Window System's terminology, the mouse is known as the pointer.)
-
Device-This section describes the characteristics of a video card (or graphics device). The configuration file may have more than one Device section. The Driver entry in the Device section specifies the XFree86 4.2.0 driver for the video card.
-
Monitor-This section includes the specifications of a monitor (such as horizontal and vertical synchronization rates) and a list of video modes that the monitor supports. In XFree86 4.2.0, a set of VESA modes is defined internally in the server, so for most monitors it isn't necessary to specify any modes explicitly in the Monitor section.
-
Screen-This section describes a combination of a video card and monitor to be used by the X server. This section includes a Display subsection that the depth (number of colors) and the modes (supported screen resolutions) in terms of the numbers of horizontal and vertical pixels (for example, 1,024x768).
-
ServerLayout-This section combines one or more Screen sections and one or more InputDevice sections to specify the complete layout of the display screens and input devices.
-
DRI-This optional section provides information for the Direct Rendering Infrastructure that enables the X server to use the hardware acceleration capabilities of modern video cards. (To learn more about DRI, read the DRI User Guide online at http://www.xfree86.org/current/DRI.html.)
You should not have to learn all the details of these sections, and you need not change the configuration file manually. If you need to edit the configuration file, start with an XF86Config file generated by the redhat-config-xfree86 utility.
Three sections in XF86Config deal with the video card and monitor:
-
The Screen section combines a video card and monitor with the video modes to be used by the X server for that screen. Each Screen section typically contains several Display subsections-one for each depth and display mode. The configuration can have multiple Screen sections, one for each display screen, if the system has multiple displays.
-
The Device section describes the characteristics of a video card (also known as a graphics device) as well as the driver that XFree86 needs to use that video card. The configuration file can have several Device sections, one for each video card, if the system has multiple video cards.
-
The Monitor section lists the technical specifications of a monitor, specifically the horizontal and vertical synchronization rates.
As you learned earlier in this chapter, you can create the XF86Config file by running the redhat-config-xfree86 utility program. If redhat-config-xfree86 correctly detects your video card and monitor, the generated XF86Config file may work as is. Typically, you run into problems only when you attempt to use the full capabilities of advanced video cards.
Understanding the Screen Section
The X server determines the settings of the video card and the monitor from the Screen section meant for that server. The Screen section specifies the names of a Device (video card) and a Monitor that make up this screen. Following is a Screen section from a typical XFree86 4.2.0 configuration file:
Section "Screen"
    Identifier   "Screen0"
    Device       "S3 ViRGE/DX (generic)"
    Monitor      "Monitor0"
    DefaultDepth    16

    Subsection "Display"
        Depth       8
        Modes       "1024x768" "800x600" "640x480"
        ViewPort  0 0
        Virtual   1024 768
    EndSubsection

    Subsection "Display"
        Depth       16
        Modes       "1024x768" "800x600" "640x480"
    EndSubsection
    ... other Display subsections ...
EndSection
Comment lines start with the hash mark (#). The section's definition is enclosed in the Section . . . EndSection block.
The Identifier line gives a name to this screen. This name is used to refer to the screen in the ServerLayout section. Following the Device and Monitor names are several Display subsections. Each Display subsection applies to a specific Depth (the number of bits of storage per pixel, which also determines the number of colors that can be displayed at a time).
The X server automatically uses the first Display subsection in the Screen definition, but you can start the server with command-line options that specify a different Depth. If you have set up your Red Hat Linux system for a graphical login screen, you can start the X server with a Depth of 24 by having the following line in the [servers] section of the /etc/X11/gdm/gdm.conf file:
0=/usr/bin/X11/X -bpp 24
The -bpp option for the X server program stands for bits per pixel, which is the same as Depth. Selecting a value for the Depth works, provided that the video card and the monitor are capable of supporting that Depth. You can also specify a default depth through the DefaultDepth entry in the Screen section.
The Modes line in the Display subsection lists the names of video modes that the monitor and video card can support. The names of these modes appear in the Monitor section of the XF86Config file.
For some video cards, if the card has more memory than is needed to hold the information for all visible pixels in a specific mode, the X server can use the leftover memory to give the appearance of a much larger array of pixels than the 640x480 or 1,024x768 that a video mode may specify. In other words, you get a large virtual screen from which you can select a smaller area to view. The Virtual line indicates the size of this virtual screen, whereas ViewPort specifies which part of the virtual screen is mapped to the physical display.
Understanding the Device Section
The Device section of the XF86Config file provides information about the video card. For a video card based on the S3 ViRGE/DX chipset, XF86Config has a Device section that looks like this:
Section "Device"
    Identifier   "S3 ViRGE/DX (generic)"
    Driver       "s3virge"
    VendorName   "S3 ViRGE/DX (generic)"
    BoardName    "S3 ViRGE/DX (generic)"
EndSection
Each line in the section provides some information about the video card. In this case, the Identifier indicates the name assigned to this video card; this identifier is used in the Screen section to refer to this specific video card. If the information is available, the VendorName and BoardName further identify the video card.
For older video cards that do not have a programmable dot clock, an important line in the Device section is the Clocks line. The values in this line indicate the dot clocks that the video card supports. A typical Clocks line looks like this:
Clocks 25.2 28.3
Nowadays, most video cards do not require the Clocks line because the cards have programmable dot clocks. In addition to the Clocks line, you can specify one or more flags meant for the X server for the type of video card that you are specifying in the Device section.
If your PC has more than one video card, you also need in the Device section of the XF86Config file a BusID line identifying the location of this particular video card on the bus. For PCI bus video cards, type the lspci command to find this information. For example, here's the output from lspci on a PC:
00:00.0 Host bridge: Intel Corp. 82845 845 (Brookdale) Chipset Host Bridge (rev 05)
00:01.0 PCI bridge: Intel Corp. 82845 845 (Brookdale) Chipset AGP Bridge (rev 05)
00:1d.0 USB Controller: Intel Corp. 82801CA/CAM USB (Hub #1) (rev 02)
00:1d.1 USB Controller: Intel Corp. 82801CA/CAM USB (Hub #2) (rev 02)
00:1e.0 PCI bridge: Intel Corp. 82801BAM/CAM PCI Bridge (rev 42)
00:1f.0 ISA bridge: Intel Corp. 82801CAM ISA Bridge (LPC) (rev 02)
00:1f.1 IDE interface: Intel Corp. 82801CAM IDE U100 (rev 02)
00:1f.3 SMBus: Intel Corp. 82801CA/CAM SMBus (rev 02)
00:1f.5 Multimedia audio controller: Intel Corp. 82801CA/CAM AC'97 Audio (rev 02)
00:1f.6 Modem: Intel Corp. 82801CA/CAM AC'97 Modem (rev 02)
01:00.0 VGA compatible controller: nVidia Corporation NV11 [GeForce2 Go] (rev b2)
02:01.0 Ethernet controller: 3Com Corporation 3c905C-TX/TX-M [Tornado] (rev 78)
02:04.0 CardBus bridge: O2 Micro, Inc. OZ6912 Cardbus Controller
The first part of the output shows the bus ID of PCi devices. In this case, the ID 01:00.0 refers to the video card. Therefore, the BusID line should look like this:
BusID "PCI:01:00:0"
Understanding the Monitor Section
The Monitor section lists the technical specifications of the monitor: the horizontal synchronization (or horizontal sync) frequency and vertical refresh rate. You can get these two values from your monitor's manual.
The horizontal-sync signal occurs at the end of each raster line; this signal moves the electron beam from the end of one line to the beginning of the next raster line. The horizontal-sync frequency is essentially the number of times per second that the monitor can trace a raster line on the display screen. If the monitor can display 480 lines (at 640x480 resolution, for example) and repaint the screen 72 times per second (a vertical refresh rate of 72 Hz), the horizontal-sync frequency is at least 480x72 = 34,560 times per second = 34,560 Hz = 34.56 kHz. The actual value is higher because the monitor always has to trace more lines than are displayed.
You have to be careful when specifying the values of horizontal sync and vertical refresh rates because the X server uses these values to select the signals sent from the video card. A monitor may be physically damaged if the video card sends signals that are beyond the monitor's specifications.
Most new monitors are multisync and support a range of horizontal-synchronization frequencies (as opposed to a fixed set of values). If you have the monitor's manual, you can specify the range of frequencies for the horizontal sync that the monitor supports.
The Monitor section may also include ModeLine lines that define video modes suitable for use with the monitor. Typically, a set of VESA standard video modes is defined internally in the X server, so there is no need to define any video modes explicitly in the Monitor section, for most monitors.
Following is a typical Monitor section (comments show the format of video-mode specification):
Section "Monitor"
    Identifier   "Monitor0"
    VendorName   "Monitor Vendor"
    ModelName    "Monitor Model"
    HorizSync   30.0-69.0
    VertRefresh 55.0-120.0
# Modes can be specified in two formats. A compact one-line format, or
# a multiline format.

# The following two are equivalent

#ModeLine "1024x768i" 45 1024 1048 1208 1264 768 776 784 817 Interlace

#  Mode "1024x768i"
#    DotClock  45
#    HTimings  1024 1048 1208 1264
#    VTimings  768 776 784 817
#    Flags    "Interlace"
#  EndMode

EndSection
The Monitor section's Identifier field gives a name to this monitor; this name is used in the Screen section to refer to this monitor. You should fill in the HorizSync and VertRefresh lines with information from the monitor's manual.
Computing a ModeLine
Although you can live with the VESA standard video modes defined in the XFree86 4.2.0 server, you may sometimes have to add a ModeLine manually to get a video mode to work for a specific video card/monitor combination.
You specify a ModeLine on a single line with the following syntax:
ModeLine "name" CLK HRES HSS HSE HTOT VRES VSS VSE VTOT flags
You must fill in all arguments, except the last argument, which is an optional keyword that indicates the type of the mode. The flags field, for example, can be Interlace for an interlaced mode (alternateraster lines are drawn through the image each time) or DoubleScan (each scan line is doubled). Other flags indicate the polarity of the sync signal. The values can be +HSync, -HSync, +VSync, or -VSync, depending on the polarities you are specifying.
The arguments on the ModeLine have the following meanings:
-
'name': The name of this mode, in double quotes. Usually, the resolution of the mode is used as its name. Thus, you'll see mode names such as '640x480' and '1024x768'. These mode names are used in the Display subsection of the Screen section.
-
CLK: The dot clock to be used for this mode. For a video card with a fixed set of dot clocks, the dot clock should be one of the values on the Clocks line in the Device section of the XF86Config file.
-
HRES HSS HSE HTOT: The horizontal timing parameters. HRES is the horizontal resolution in terms of the number of pixels visible on a raster line. As Figure 3-1 shows, the actual number of pixels on a raster line exceeds the number of visible pixels. HTOT is the total pixels on the line. HSS is where the horizontal-sync signal begins, and HSE is the pixel number where the horizontal-sync signal ends. The horizontal-sync signal moves the electron beam from one line to the next. For a 640 x480 video mode, these four parameters might be 640 680 720 864. That sequence of numbers expresses that 864 pixels are on the raster lines but that only 640 are visible. The horizontal-sync signal begins at pixel 680 and ends at pixel 864.
-
VRES VSS VSE VTOT: The vertical timing parameters. VRES is the vertical resolution in terms of the number of visible raster lines on the display screen. As Figure 3-1 shows, the actual number of raster lines exceeds the number of visible raster lines. VTOT is the total raster lines. VSS is the line number where the vertical-sync signal begins, and VSE is the line number where the vertical-sync signal ends. The vertical-sync signal moves the electron beam from the bottom of the screen to the beginning of the first line. For a 640x480 video mode, these four parameters might be 480 488 491 521.
From a monitor's manual, you can get two key parameters: the vertical refresh rate (in Hz) and the horizontal synchronization frequency (in kHz). The monitor's manual provides these two values as ranges of valid values. The vertical refresh rate is typically between 50 Hz and 90 Hz; the horizontal sync frequency can be anywhere from 30 kHz to 135 kHz. Following are two equations that define the relationship between the dot clock and some of the horizontal and vertical timing parameters on the ModeLine:
CLK = RR * HTOT * VTOT
CLK = HSF * HTOT
In these equations, RR is a screen refresh rate within the range of the vertical refresh rate of the monitor, and HSF is a horizontal-scan frequency the monitor supports. Remember to convert everything to a common unit (for example, make sure that all values are in Hz) when you apply these formulas.
To define a mode, you can start with a desired refresh rate (RR) such as 72 Hz. For a given dot clock, you then can compute the product HTOT * VTOT from the first equation. Next, plug in a value for HSF within the range of supported horizontal-scan frequencies for the monitor. Because the dot clock is already known, you can compute HTOT from the second equation. After you know HTOT, you can determine VTOT because you have already computed the product of HTOT * VTOT.
At this point, you know HTOT and VTOT. You have to select the arguments HSS, HSE, VSS, and VSE, which you need for the ModeLine. Unfortunately, figuring out these four parameters requires some trial and error. You can pick the HRES and VRES values first (HRES and VRES determine the resolution of the mode). Then, you have to select HSS and HSE to lie between HRES and HTOT and ensure that HSE > HSS. Similarly, VSS, and VSE should be between VRES and VTOT; make sure that VSE > VSS.
If the display area looks small or not centered, you have to alter the values HSS, HSE, VSS, and VSE to tweak the display. One way to correct any minor display problems is to run the xvidtune utility that comes with XFree86. If your X display is working but the display does not look as good as you think it should (for example, if it does not fill the whole screen or is skewed to one side), type xvidtune in a terminal window. The program prints a few lines of information about the monitor on the terminal window. The xvidtune window and a dialog box appear. The dialog box (see Figure 3-8) displays a message that warns you about the possibility of damaging your monitor and video card if you use the xvidtune program improperly.
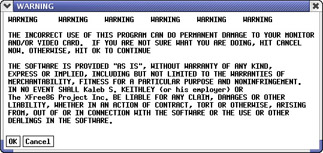
Figure 3-8: Warning Message from xvidtune.
If you decide to proceed, click OK to dismiss the dialog box. You have to interact with xvidtune through its main window, as shown in Figure 3-9.
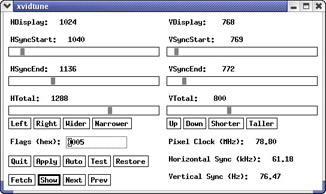
Figure 3-9: Adjust ModeLine Parameters from the Main Window of xvidtune.
Click the Auto button. Then, click the appropriate buttons (Up, Down, Left, Right, Shorter, Taller, Wider, and Narrower) to adjust the display. After each click, the display changes. After you have adjusted the display to your liking, click Show. This prints a ModeLine of the following form on the terminal window:
"1024x768" 78.80 1024 1040 1136 1288 768 769 772 800 +hsync +vsync
The idea is that you can use this ModeLine in the Monitor section of the /etc/X11/ XF86Config file, save the file, and restart the X display (press Ctrl-Alt-Backspace to kill the X server).
If you want to adjust the other video modes, you can click the Next and Prev buttons to switch modes. The effect of these buttons is equivalent to pressing Ctrl-Alt-Keypad+ and Ctrl-Alt-Keypad- (Keypad- means the minus key in the numeric keypad), respectively.
When you are through using xvidtune, click the Quit button to exit the program.


