Preparing Your PC for Linux Installation
Preparing Your PC for Linux Installation
Before you install Linux, you should prepare your PC for the installation. You can be in either of two situations:
-
You already have a PC that runs some version of Microsoft Windows.
-
You are about to buy a new PC, and you plan to run Red Hat Linux on that PC at least some of the time.
If you are about to purchase a PC, you are lucky because you can get a PC configured with peripherals that Red Hat Linux supports. To pick a Red Hat Linux-compatible PC, simply consult the current list of hardware that Red Hat Linux supports, and select a PC certified by Red Hat. If you don’t see the PC model you are considering listed as Red Hat–certified, you can still make sure that key hardware components in the PC will work with Red Hat Linux. You may have to ask the PC vendor explicitly for detailed information about hardware, such as the video card, CD-ROM drive, and networking card, to ensure that you can use the peripherals under Red Hat Linux. Selecting a PC with Red Hat Linux–supported hardware minimizes the potential for problems when you install Red Hat Linux.
If you want to install Red Hat Linux on an existing PC, verify that the latest Red Hat Linux distribution supports all of the hardware on your PC. In other words, you have to take an inventory of your PC’s hardware components and determine whether Red Hat Linux currently supports all of them.
Checking the Red Hat Hardware Compatibility List
Like many other operating systems, Linux supports various types of hardware through device drivers. For each type of peripheral device, such as a networking card or a CD-ROM drive, Linux needs a driver. In fact, each kind of peripheral needs a separate driver. Because Linux is available free (or relatively inexpensively) and because many programmers scattered throughout the world cooperate to develop Linux, you cannot demand support for a specific kind of hardware. You can only hope that someone who can write a Linux driver has the same hardware you do. In all likelihood, that person will write a driver, which eventually will find its way into a version of Linux, then you can use that hardware under Linux. It may take a while for Linux to support new interfaces.
Red Hat categorizes all hardware into four categories depending on their compatibility with Red Hat Linux:
-
Certified hardware has been tested and certified by Red Hat. This type of hardware is fully supported. The installation program automatically detects such hardware and installs the appropriate drivers.
-
Compatible hardware has been reviewed by Red Hat and is supported. Such hardware is generally known to work, but Red Hat has not certified the hardware. The installation program should be able to detect and use compatible hardware.
-
Community Knowledge hardware is not tested and not supported by Red Hat. To support Community Knowledge hardware, you may have to perform some explicit steps, such as manually loading the driver module or editing the /etc/ modules.conf file.
-
Not supported hardware may be compatible with Linux but is not officially supported by Red Hat Linux.
For the most recent and detailed list of hardware Red Hat Linux supports, as well as the level on which a specific hardware belongs, check Red Hat’s Hardware Compatibility List at http://hardware.redhat.com/hcl/.
Cross Ref Appendixes B through F provide more information about whether or not Linux supports your system’s unique hardware configuration. In these Appendixes, you can also find information about how to get the most from your PC’s hardware under Linux.
Making a Hardware Checklist
After you have seen a list of various hardware peripherals Red Hat Linux supports, you should have a rough idea of whether or not you have the right PC hardware to use it. If you are buying a new PC to run Red Hat Linux, the hardware-compatibility list at http://hardware.redhat.com/hcl/ should help you decide the hardware configuration of your new PC.
To summarize, go through the following checklist to see whether or not you are ready to install Red Hat Linux:
-
Does your PC have an 80386 or better processor, with the ISA, EISA (Extended Industry Standard Architecture), VLB (VESA Local-Bus), MCA (Micro Channel Architecture), or PCI (Peripheral Component Interconnect) bus; at least 64MB of RAM; a high-density floppy disk drive; and a large hard drive (at least 4GB)? Remember that to comfortably run both Windows and Red Hat Linux on your PC, you need at least 10GB of disk space.
-
Does your PC have a CD-ROM drive that Red Hat Linux supports? (This is not a problem for new PCs with IDE CD-ROM drives. You need a CD-ROM drive to install Red Hat Linux from this book’s companion CD-ROMs.)
-
Can you get a second hard drive? (If so, you can install Red Hat Linux on that hard drive. Installing Red Hat Linux on a second drive prevents you from having to repartition your first hard drive, which usually has Windows loaded on it.)
-
If you have a SCSI (Small Computer System Interface) controller with any SCSI devices that you want to use under Red Hat Linux, does Linux support the SCSI controller?
-
Does XFree86 support your video card? (If not, you won’t be able to set up and run the X Window System.)
As the comments after the questions indicate, you do not necessarily have to answer yes to each question. You must answer yes to the first two items, however, because without that basic hardware configuration, Red Hat Linux cannot run on your system.
| Insider Insight |
If you plan to install Red Hat Linux on an empty second hard disk or if you want to install Linux over an existing DOS/Windows partition, you do not have to go through the process of partitioning (dividing) your hard disk under MS-DOS. You can skip the next few sections and proceed to “Creating the Red Hat Installer Boot Disk.” Then you can boot Linux from the CD-ROM or the installer boot disk and proceed to install Red Hat Linux. |
Repartitioning Your Hard Drive
If your PC has a single hard disk drive, chances are good that you have some version of Microsoft Windows installed on that drive. If your hard drive is at least 10GB, I recommend that you keep Windows installed on your system, even if you want to work mostly in Linux. After all, you may have Windows applications that you paid for and would like to use now and then. You can access the Windows files from Linux. You get the best of both worlds if you keep Windows around when you install Linux.
Typically, your PC hard disk is set up as a single large partition, designated by the drive letter C (Windows XP installations often have a hidden first partition and the second partition designated as drive C). Unless you can scrounge up a second hard disk for your PC, or you already have a second disk, your first task is to shrink the existing partition on your one and only hard disk and create free space on the disk for Red Hat Linux.
You can use one of the following tools to resize the existing partition on your hard disk:
-
PartitionMagic: This is a commercial product that can resize hard disk partitions and create new partitions on any version of Microsoft Windows and Linux. In particular, PartitionMagic can resize partitions that contain NTFS file systems used in Windows NT/2000/XP.
-
FIPS: This is a free program that comes with Red Hat Linux and runs in MS-DOS mode and can split an existing partition into two. FIPS works only with Windows 95/98/Me systems that use the FAT or FAT32 file system. FIPS does not work with the NTFS file system that’s often used in Windows NT/2000/XP systems. For those systems, your best bet is PartitionMagic.
With both of these tools, the idea is to shrink the existing Windows partition and to create unused disk space for the Linux partition. Later on, during Red Hat Linux installation, you have to create new partitions for Red Hat Linux in the unused space. You can either let the Red Hat installer automatically partition the unused disk space or create the partitions yourself by using the Disk Druid tool.
The bottom line is that once you have successfully shrunk the existing Microsoft Windows partition and created a block of unused disk space for Red Hat Linux, you are past the biggest hurdle in installing Red Hat Linux while retaining Windows intact.
Repartitioning with PartitionMagic
PartitionMagic, from PowerQuest, can resize and split disk partitions in all Microsoft operating systems from Windows 95/98/Me to Windows NT/2000/XP. It’s a commercial product, so you have to buy it to use it. At the time I’m writing this, the list price of PartitionMagic 8.0 is $69.95. You can read about it and buy it at http://www.powerquest.com/partitionmagic.
| Caution |
Resizing the disk partition always involves the risk of losing all data on the hard disk. Therefore, before you resize hard disk partitions using a disk partitioning tool such as PartitionMagic, you should back up your hard disk. After making your backup, please make sure that you can restore files from the backup. |
When you run PartitionMagic, it shows the current partitions in a window. If you are running Windows XP, you probably have two partitions—one small hidden partition that contains Windows XP installation files and a huge second NTFS partition that serves as the C drive. You have to reduce the size of the existing C drive, which creates unused space following that partition. Then, during Red Hat Linux installation, the installation program can create new Linux partitions in the unused space.
To reduce the size of the partition, follow these steps:
-
In the partition map in PartitionMagic’s main window, right-click the partition and select Resize/Move from the menu (see Figure 2-1). The Resize Partition dialog box appears.
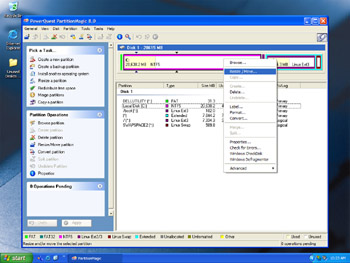
Figure 2-1: Right-Clicking on the Partition to Resize in PartitionMagic 8.0. -
In the Resize/Move Partition dialog box, click and drag the right edge of the partition to a smaller size. For a large hard disk (anything over 10GB), reduce the Windows partition to 5GB and leave the rest for Red Hat Linux. If possible, try to leave 5GB or more for Red Hat Linux.
-
Click OK and then Apply to apply the changes. After PartitionMagic has made the changes, click OK.
-
Reboot the PC.
You do not have to do anything with the disk space left over after shrinking the partition that used to be the C drive. Later, in the “Partitioning and Using the Hard Disk” section, you learn to use the free disk space to install Red Hat Linux.
Repartitioning with FIPS
Red Hat Linux comes with a utility program called FIPS (The First Nondestructive Interactive Partition Splitting Program), which can split an existing primary DOS partition into two partitions. FIPS cordons off the unused part of a hard disk, making a new partition out of it without destroying any existing data.
| Insider Insight |
Before using FIPS, make sure that the hard disk has only a FAT or FAT32 partition and that there is enough free space to install Linux. You need 3GB to 4GB of free space for a useful Red Hat Linux installation. |
| Caution |
Resizing partitions with FIPS may cause loss of all data on the hard disk. Therefore, you should back up your hard disk before using FIPS. |
The FIPS.EXE program and related files are located in the \DOSUTIL subdirectory of the first CD-ROM. To use FIPS, follow these steps:
-
For FIPS to work, all used areas of the disk must be contiguous or at least as tightly packed as possible. You can prepare the disk for FIPS by running a defragmenter. In Windows 95/98/Me, click the right mouse button on the disk symbol in the Explorer window, select Properties from the pop-up menu, click the Tools tab, and click the Defragment Now button. Another way to start the defragmenter is to select Start>Programs>Accessories>System Tools>Disk Defragmenter.
-
Create a bootable disk by using the command FORMAT A: /S. In Windows 95/98/Me, create a startup disk by using the Add/Remove Programs option in the Control Panel and then following the instructions on the Startup Disk tab.
-
Copy the following files from the CD-ROM to the formatted disk (the following example assumes that D: is the CD-ROM drive):
COPY D:\DOSUTILS\FIPS.EXE A:
COPY D:\DOSUTILS\RESTORRB.EXE A:
COPY D:\DOSUTILS\FIPSDOCS\ERRORS.TXT A:
FIPS.EXE is the program that splits partitions. ERRORS.TXT is a list of FIPS error messages. You consult this list for an explanation of any error messages displayed by FIPS. RESTORRB.EXE is a program that allows you to restore certain important parts of your hard disk from a backup of those areas FIPS has created.
-
Leave the bootable disk in the A drive, and restart the PC. The PC boots from the A drive.
-
Type FIPS. The FIPS program runs and shows you information about your hard disk. FIPS gives you an opportunity to save a backup copy of important disk areas before proceeding. After that, FIPS displays the first free cylinder on which the new partition can start (as well as the size of the partition, in megabytes).
-
Use the left and right arrow keys to adjust the starting cylinder of the new partition (the one that results from splitting the existing partition) to change the partition size. Press the right arrow to increase the starting cylinder number (this leaves more room in the existing partition and reduces the size of the new partition you are creating).
-
When you are satisfied with the size of the new partition, press Enter. FIPS displays the modified partition table and prompts you to enter C to continue or R to re-edit the partition table.
-
Press C to continue. FIPS displays some information about the disk and asks whether you want to write the new partition information to the disk.
-
Press Y. FIPS writes the new partition table to the hard disk and exits.
Remove the disk from the A drive, and reboot the PC. When the system comes up, everything in your hard disk should be intact, but the C drive will be smaller. You have created a new partition from the unused parts of the old C drive.
You needn’t do anything with the newly created partition under DOS. Later, in the “Partitioning and Using the Hard Disk” section, you will learn to use the new partition under Linux.
Creating the Red Hat Installer Boot Disk
After you repartition the hard disk and make room for Linux, you can begin the next step of installing Red Hat Linux from this book’s CD-ROM: creating the Red Hat installer boot disk. (For this step, you should turn on your PC without any disk in the A drive and run Windows as usual.)
| Note |
This book comes with the Publisher’s Edition version of Red Hat Linux 9 that was provided by Red Hat. Unfortunately, these CDs do not include the DOSUTILS directory. If you have full Red Hat Linux distribution, you can use the following directions to create the boot disk. Otherwise, please download rawrite.exe from one of the FTP sites listed at http://www.redhat.com/download/mirror.html Click on one of the Distribution links and then look in the directory corresponding to the Red Hat Linux version number. For example, rawrite.exe for Red Hat Linux 9 should be in the 9/en/os/i386/dosutils directory. Use a Web browser to download the rawrite.exe file. Then, follow the steps outlined next, but run the version of rawrite.exe that you have downloaded from the FTP site. |
| Insider Insight |
You do not need the Red Hat installer boot disk if you can boot your PC from the CD-ROM. You may have press a key (such as the F2 key) to go into the SETUP mode as the PC powers up and change the boot device to the CD-ROM. If you can boot directly from the first companion CD-ROM, skip this section and proceed to the section entitled “Booting the Red Hat Installer.” |
Like the MS-DOS or Windows boot disk, the Red Hat installer boot disk is used to start your PC, start Linux, and run the Red Hat installation program. Once you have installed Red Hat Linux, you no longer need the Red Hat installer boot disk.
The Red Hat installer boot disk contains an initial version of Linux that you use to start Linux, run the installer, prepare the hard disk, and load the rest of the files from the CD-ROMs to the hard disk. Creating the Red Hat installer boot disk involves using a utility program called RAWRITE.EXE to copy a special file called the Red Hat Linux boot image to a disk.
To create the Red Hat boot disk under Windows, follow these steps:
-
In Windows 95/98/Me, open an MS-DOS Prompt window by selecting Start>Run and then typing the word Command in the text field.
-
In Windows NT/2000/XP, select Start>Run. Click the Browse button and go to the WINNT folder; then open the SYSTEM32 folder, and select the CMD.EXE file in that folder. Click OK to run that program.
-
Put the first companion CD-ROM in the CD-ROM drive. Then, type the following commands in the window you opened in Step 1 or 2 (my comments are in parentheses, and your input is in boldface):
d:   (use the drive letter for the CD-ROM drive)
cd \dosutils
rawrite
Enter disk image source filename: \images\bootdisk.img
Enter target diskette drive: a
Please insert a formatted diskette into drive A: and press -ENTER- :
-
As instructed, you should put a formatted disk into your PC’s A drive and press Enter. RAWRITE copies the boot-image file to the disk.
After you see the DOS prompt again, you can take the Red Hat boot disk out of the A drive and (if you haven’t done so already) label it so you know what it is.
| Cross Ref |
If you are installing Red Hat Linux on a laptop, please see the “Installing Linux on a Laptop” section for more information. |


