Securing the Network
Securing the Network
To secure your Red Hat Linux system, you have to pay attention to both host security and network security. The distinction between the two types of security is somewhat arbitrary because securing the network involves fixing up things on the host that relate to what Internet services your system offers. The next few sections explain how you can secure the Internet services (mostly by not running unnecessary services), how you can use firewall to stop unwanted network packets from reaching your network, and how to use secure shell for secure remote logins.
Securing Internet Services
For an Internet-connected Red Hat Linux system (or even one on a TCP/IP LAN that's not connected to the Internet), a significant threat is the possibility that someone will use one of many Internet services to gain access to your system. Each service-such as mail, Web, or FTP-requires running a server program that responds to client requests arriving over the TCP/IP network. Some of these server programs have weaknesses that can allow an outsider to log in to your system-maybe with root privileges. Luckily, Red Hat Linux comes with some facilities that you can use to make the Internet services more secure.
| Caution |
Potential intruders can employ a port-scanning tool-a program that attempts to establish a TCP/IP connection at a port and to look for a response-to check which Internet servers are running on your system. Then, to gain access to your system, the intruder can potentially exploit any known weaknesses of one or more services |
Using the chkconfig Command to Disable Services
To provide Internet services such as Web, mail, and FTP, your Red Hat Linux system has to run server programs that listen to incoming TCP/IP network requests. Some of these servers are started when your system boots, and they run all the time. We call such servers standalone servers. The Web server and mail server are examples of standalone servers. The other servers are started on demand by another server called xinetd.
You can turn both standalone servers and the ones started by xinetd on or off using the chkconfig command. Here's how you should use chkconfig to stop unneeded services:
-
Log in as root and type chkconfig -list to view all the services set to start automatically at the run levels 0 through 6. At the end of the list you see the services started by xinetd. Note that the xinetd-controlled services do not depend on the run level; they run at those run levels when xinetd itself is turned on.
-
The services that are turned on for run levels 3 and 5 matter most because your Red Hat Linux system is usually at run level 3 (text mode) or 5 (graphical login). Type runlevel to see the current run level.
-
Decide which services you don't need. What you need or don't need depends on how you use your Red Hat Linux system. For example, if it's just a personal workstation, you don't need to run most services.
-
To stop a service, use the following form of the chkconfig command:
chkconfig --level 345 service_name off
-
where service_name, is the name of the service you want to turn off. For example to prevent the vsftpd service (this is the FTP service) from automatically starting at run levels 3, 4, and 5, type the following command:
chkconfig --level 345 vsftpd off
-
You can also use chkconfig to turn on or off xinetd-controlled services. For example, to turn the Telnet service on, type:
chkconfig telnet on
| Insider Insight |
You use chkconfig to stop services from starting at boot time, but if you want to immediately stop a service that's currently running, use the service command like this: service service_name stop where service_name is the name of the service to stop. For example, if the mail server (sendmail) is already running, you can stop it with the command: service sendmail stop |
Configuring the xinetd Server to Disable Services
In addition to the stand-alone servers such as Web server (httpd), mail (sendmail), and domain name server (named), you have to configure another server separately. That other server, xinetd (the Internet super server), starts a host of other Internet services, such as TELNET, POP3, and so on whenever a client makes a request over the network. The xinetd server includes some security features that you can use to disable the services that it can start on demand.
The xinetd server reads a configuration file named /etc/xinetd.conf at startup. This file, in turn, incorporates all the configuration files stored in the /etc/xinetd.d directory. The configuration files in /etc/xinetd.d tell xinetd which ports to listen to and which server to start for each port. Type ls /etc/xinetd.d to see a list of the files in /etc/xinetd.d directory on your system. On my system, here's what the ls /etc/xinetd.d command lists:
chargen      daytime-udp  imap   kotalk  rexec   servers   telnet
chargen-udp  echo         imaps  ktalk   rlogin  services  time
cups-lpd     echo-udp     ipop2  ntalk   rsh     sgi_fam   time-udp
daytime      finger       ipop3  pop3s   rsync   talk
This list shows all the services xinetd can start. However, the configuration file for a service can also turn off a service simple by having a disable = yes line in the file. For example, here's the telnet file's content:
# default: on
# description: The telnet server serves telnet sessions;
#     it uses unencrypted username/password pairs for
#     authentication.
service telnet
{
        flags           = REUSE
        socket_type     = stream
        wait            = no
        user            = root
        server          = /usr/sbin/in.telnetd
        log_on_failure  += USERID
        disable         = yes
}
Notice the last line in the configuration file-that line disables the Telnet service.
I won't explain the format of the xinetd configuration files here (Chapter 6 covers xinetd configuration files), except to reiterate that you can turn off a service simply by adding the following line in the configuration file somewhere between the two curly braces {...}:
disable = yes
Conversely, to turn a service on, change that line to disable = no or comment is out by placing a number sign (#) at the beginning of the line.
| Caution |
After you make any changes to any xinetd configuration file, you must restart the xinetd server; otherwise the changes won't take effect. To restart the xinetd server, type the following command: service xinetd restart This stops the xinetd server and then starts it again. When it restarts, it'll read the configuration files, and the changes will take effect. |
| Insider Insight |
If you don't feel like editing the configuration file for a service in /etc/xinetd.d directory, you can use the chkconfig command to turn these services on or off. To turn one of these services off, type chkconfig servicename off. There is no need to specify any run levels because these services are activated by xinetd and can run only when xinetd is running. |
Depending on how you use your system, you may be able to disable many of the services. If you do not want anyone to log in remotely or download files from your system, simply disable the Telnet and FTP services. Note that to disable FTP, you have to type chkconfig -level 35 vsftpd off because FTP service is now a standalone service and the name of the server is vsftpd.
Another security feature of xinetd is its use of TCP wrapper library to start various services. The TCP wrapper provides an access-control facility for Internet services. The TCP wrapper can start other services, such as FTP and Telnet, but before starting a service, it consults the /etc/hosts.allow file to see if the host requesting service is allowed that service. If nothing appears in /etc/hosts.allow about that host, TCP wrapper checks the /etc/hosts.deny file to see if it should deny the service. If both files are empty, TCP wrapper provides access to the requested service.
Follow these steps to tighten access to the services that xinetd is configured to start:
-
Use a text editor to edit the /etc/hosts.deny file, adding the following line into that file:
ALL:ALL
This denies all hosts access to any Internet services on your system.
-
Edit the /etc/hosts.allow file and add to it the names of hosts that can access services on your system. For example, to enable only hosts from the 192.168.1.0 network and the localhost (IP address 127.0.0.1) access the services on your system, place the following line in the /etc/hosts.allow file:
ALL: 192.168.1.0/255.255.255.0 127.0.0.1
-
If you want to permit access to a specific Internet service to a specific remote host, you can do so using the following syntax for a line in /etc/hosts.allow:
server_program_name: hosts
Here, server_program_name is the name of the server program (for example, in.telnetd for Telnet), and hosts is a comma-separated list of hosts that can access the service. You may also write hosts as a network address or an entire domain name, such as .mycompany.com. For example, here's how you can give Telnet access to all systems in the mycompany.com domain:
in.telnetd: .mycompany.com
You should edit configuration files in /etc/xinetd.d directory to turn off unneeded services and use the /etc/hosts.deny and /etc/hosts.allow files to control access to the services that are allowed to run on your system. After you edit the files in the /etc/xinetd.d directory, remember to type service xinetd restart to restart the xinetd server.
Using Secure Shell (SSH) for Remote Logins
Red Hat Linux comes with the Open Secure Shell (OpenSSH) software, a suite of programs that provide a secure replacement for the Berkeley r commands: rlogin (remote login), rsh (remote shell), and rcp (remote copy). OpenSSH uses public-key cryptography to authenticate users and to encrypt the communication between two hosts, so users can securely log in from remote systems and copy files securely.
In this section, I briefly describe how to use the OpenSSH software in Red Hat Linux. To learn more about OpenSSH and read the latest news about it, visit www.openssh.com or www.openssh.org.
The OpenSSH software is installed during Red Hat Linux installation. Table 22-3 lists the main components of the OpenSSH software.
|
Component |
Description |
|---|---|
|
/usr/sbin/sshd |
The secure shell daemon that must run on a host if you want users on remote systems to use the ssh client to log in securely. When a connection from an ssh client arrives, sshd performs authentication using public-key cryptography and establishes an encrypted communication link with the ssh client. |
|
/usr/bin/ssh |
The secure shell client that users can run to log in to a host that is running sshd. Users can also use ssh to execute a command on another host. |
|
/usr/bin/slogin |
A symbolic link to /usr/bin/ssh |
|
/usr/bin/scp |
The secure copy program that works like rcp, but securely. The scp program uses ssh for data transfer and provides the same authentication and security as ssh. |
|
/usr/bin/ssh-keygen |
The program you use to generate the public and private key pairs you need for the public-key cryptography used in OpenSSH. The ssh-keygen program can generate key pairs for both RSA and DSA (Digital Signature Algorithm) authentication. |
|
/etc/ssh/sshd_config |
The configuration file for the sshd server. This file specifies many parameters for sshd, including the port to listen to, the protocol to use (there are two versions of SSH protocols, SSH1 and SSH2, both supported by OpenSSH), and the location of other files. |
|
/etc/ssh/ssh_config |
The configuration file for the ssh client. Each user can also have a ssh configuration file named config in the .ssh subdirectory of the user's home directory. |
OpenSSH uses public-key encryption where the sender and receiver both have a pair of keys-a public key and a private key. The public keys are freely distributed, and each party knows the other's public key. The sender encrypts data by using the recipient's public key. Only the recipient's private key can then decrypt that data.
To use OpenSSH, do the following:
-
If you want to support SSH-based remote logins on a host, start the sshd server on your system. Type ps ax | grep sshd to see if the server is already running. If not, log in as root, and type the following command at the shell prompt to immediately start the sshd server:
service sshd start
Then type the following command to ensure that the sshd server starts when the system reboots:
chkconfig --level 35 sshd on
-
Generate the host keys with the following command:
ssh-keygen -d -f /etc/ssh/ssh_host_key -N ''
The -d flag causes the ssh-keygen program to generate DSA keys, which the SSH2 protocol uses. If you see a message saying that the file /etc/ssh/ ssh_host_key already exists, that means that the key pairs were generated during Red Hat Linux installation. You can then use the existing file without having to regenerate the keys.
A user who wants to log in using ssh also has to generate the public-private key pair. For example, here is what I do so that I can log in from another system on my Red Hat Linux system using SSH:
-
I type the following command to generate the DSA keys for use with SSH2:
ssh-keygen -d
I am prompted for a passphrase and the last message informs me that my public key is saved in /home/naba/.ssh/id_dsa.pub.
-
I copy my public key-the /home/naba/.ssh/id_dsa.pub file-to the remote system and save it as the ~/.ssh/authorized_keys2 file (this refers to the authorized_keys2 file in the .ssh subdirectory of my home directory on the other system, assuming that the remote system is also another Red Hat Linux system). Note that the 2 in the name of the authorized_keys2 file refers to the SSH2 protocol.
-
To log in to my account on my Red Hat Linux system (with hostname lnbp200), I type the following command on the remote system:
ssh lnbp200 -l naba
naba@lnbp200's password: (I type my password and press Enter.)
I am prompted for my password on lnbp200. After I enter my password, I have a secure login session with that system. I can also log in to this account with the following equivalent command:
ssh naba@lnbp200
If I simply want to copy a file securely from the lnbp200 system, I can use scp like this:
scp lnbp200:/etc/ssh/ssh_config .
naba@lnbp200's password: (I type my password.)
ssh_config           100% |*****************************|  1167       00:00
This command securely copies the /etc/ssh/ssh_config file from the lnbp200 host to the system from which I type the scp command.
Setting up Simple Firewalls
An Internet firewall is an intermediary between your internal network and the Internet. The firewall controls access to and from the protected internal network.
If you connect an internal network directly to the Internet, you have to make sure that every system on the internal network is properly secured-which can be nearly impossible, because it takes only one careless user to render the entire internal network vulnerable. A firewall is a single point of connection to the Internet: you can direct all of your efforts toward making that firewall system a daunting barrier to unauthorized external users.
To be useful, a firewall should have the following general characteristics:
-
It must control the flow of packets between the Internet and the internal network.
-
It must not provide dynamic routing, because dynamic routing tables are subject to route spoofing-use of fake routes by intruders. Instead, the firewall should use static routing tables (which you can set up with the route or ip command on Red Hat Linux systems).
-
It must not allow any external user to log in as root. That way, even if the firewall system is compromised, the intruder will not be able to become root from a remote login.
-
It must be kept in a physically secure location.
-
It must distinguish between packets that come from the Internet and packets that come from the internal protected network. This feature allows the firewall to reject packets that come from the Internet, but have the IP address of a trusted system on the internal network (an attack wherein packets use fake IP addresses is known as IP spoofing).
-
It should act as the SMTP mail gateway for the internal network. The sendmail software should be set up so that all outgoing mail appears to come from the firewall system.
-
It should not have any user accounts. However, the firewall system may need to have a few user accounts for those internal users who need access to external systems. External users who need access to the internal network should use SSH for remote login (see discussion of SSH earlier in this chapter).
-
It should keep a log of all system activities, such as successful and unsuccessful login attempts.
-
It should provide DNS name lookup service to the outside world to resolve any host names that should be known to the outside world.
-
It should provide good performance so that it does not hinder the internal users' access to specific Internet services (such as HTTP and FTP).
A firewall can take many different forms. Here are three common forms of a firewall:
-
Screening router with packet filtering-This simple firewall uses a router capable of filtering (blocking) packets based on IP addresses.
-
Dual-homed host with proxy services-In this case, a host with two network interfaces-one on the Internet and the other on the internal network-runs proxy services that act as a gateway for services, such as FTP and HTTP.
-
Perimeter network with bastion host-This firewall configuration includes a perimeter network between the Internet and the protected internal network. A secure bastion host resides on the perimeter network and provides various services.
Insider Insight In a large organization, you may also need to isolate smaller internal networks from the corporate network. You can set up such internal firewalls the same way you set up Internet firewalls.
In the next few sections, I describe the common forms of firewall: a screening router with packet filtering, a dual-homed host, a perimeter network with bastion host, and an application gateway.
Screening Router with Packet Filtering
If you were to directly connect your organization's internal network to the Internet, you would have to use a router to ensure proper exchange of packets between the internal network and the Internet. Most routers can block a packet based on its source or its destination IP address (as well as its port number). The router's packet-filtering capability can serve as a simple firewall. Figure 22-4 illustrates the basic concept of packet filtering.
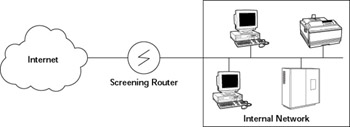
Figure 22-4: Packet Filtering with a Screening Router Provides a Simple Firewall.
Many router vendors, such as Cisco and 3Com, offer routers that can be programmed to perform packet filtering. The exact details of filtering depend on the router vendor, but all routers operate according to rules that refer to the basic attributes of an Internet packet:
-
Source IP address
-
Destination IP address
-
Protocol (TCP, UDP, or ICMP)
-
Source port number (if protocol is TCP or UDP)
-
Destination port number (if protocol is TCP or UDP)
-
ICMP message type
In addition, the router knows the physical interface on which the packet arrived and the interface on which the packet will go out (if it is not blocked by the filtering rules).
Most packet filters operate in the following sequence:
-
You define the rules for allowing or blocking specific types of packets based on IP addresses and port numbers. These packet-filtering rules are stored in the router.
-
The screening router examines the header of each packet that arrives for the information (such as IP addresses and port numbers) to which your rules apply.
-
The screening router applies the rules in the order in which they are stored.
-
If a rule allows the packet to be forwarded, the router sends the packet to its destination.
-
If a rule blocks the packet, the router drops the packet (stops processing it).
-
If none of the rules applies, the packet is blocked. This rule epitomizes the security philosophy that one should 'deny unless expressly permitted.'
Although packet filtering with a screening router is better than no security, packet filtering suffers from the following drawbacks:
-
It is easy for the network administrator to introduce errors inadvertently into the filtering rules.
-
Packets are filtered on the basis of IP addresses, which represent specific hosts. Essentially, packet filtering either blocks or routes all packets from a specific host. That means that anyone who breaks into a trusted host can immediately gain access to your protected network.
-
Because it is based on IP addresses, packet filtering can be defeated by a technique known as IP spoofing, whereby a cracker sends packets with the IP address of a trusted host (by appropriating the IP address of a trusted host and setting up an appropriate route).
-
Packet filtering is susceptible to routing-attack programs that can create a bogus route that allows an intruder to receive all packets meant for the protected internal network.
-
Screening routers that implement packet filtering do not keep logs of activities. That makes it hard for you to determine if anyone is attempting to break into the protected network. As you see in the next section, a dual-homed host can provide logging.
-
A screening router does not hide the hostnames and IP addresses of the internal network. Outsiders can access and use this information to mount attacks against the protected network.
A more sophisticated approach is to use an application gateway that controls network traffic, based on specific applications instead of on a per packet basis. You can implement an application gateway with a dual-homed host known also as a bastion host.
Dual-Homed Host
A dual-homed host is a system with two network interfaces-one connected to the Internet and the other on an internal network that needs protection. The term dual-homed refers to the fact that the host 'lives' in two networks.
In fact, if your operating system supports IP routing-the ability to forward network packets from one interface to another-the dual-homed host can serve as a router. However, you must turn off the IP forwarding feature to use the dual-homed host as a firewall system.
The Linux kernel supports the IP forwarding feature. If you plan to use a dual-homed host as a firewall, you have to use the sysctl command (or write directly to a file in the /proc file system) to disable IP forwarding.
With IP forwarding turned off, systems on both networks-the internal network as well as the Internet-can reach the dual-homed host, but no one from the Internet can access the internal network (nor can anyone from the internal network access the Internet). In this configuration, the dual-homed host completely isolates the two networks. Figure 22-5 shows the basic architecture of a dual-homed host.
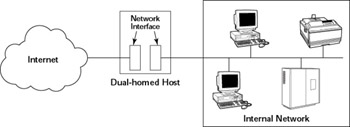
Figure 22-5: A Dual-Homed Host Can Act as an Internet Firewall.
The dual-homed host is turned into a firewall by running application gateways-proxy services-on the dual-homed host. These proxy services allow specific applications, such as FTP and HTTP, to work across the dual-homed host. That means that you can configure the firewall so that internal clients (on the internal network) are able to access Web and FTP servers on the Internet.
Your public website can also run on the dual-homed host and be accessible to everyone on the Internet.
| Caution |
Don't allow user logins on the dual-homed host. Anyone logged in to the host can have access to both the internal network, as well as the Internet. Because the dual-homed host is your only barrier between the Internet and the internal network, it's best not to increase the chances of a break-in by allowing users to log in to the firewall system. By having user accounts, you increase the chances of an intruder gaining access to the firewall by cracking a user's password. |
Perimeter Network with a Bastion Host
An Internet firewall is often more complicated than a single dual-homed host that connects to both the Internet and the protected internal network. In particular, if you provide a number of Internet services, you may need more than one system to host them. Imagine that you have two systems: one to run the Web and FTP servers and the other to provide mail (SMTP) and domain name system (DNS) lookups. In this case, you place these two systems on a network that sits between the Internet and the internal network. Figure 22-6 illustrates this concept of an Internet firewall.
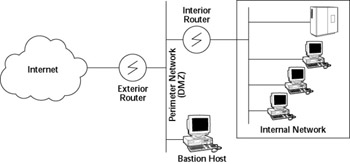
Figure 22-6: A More Complete Internet Firewall Includes a Perimeter Network and Bastion Hosts.
In this case, the firewall includes a perimeter network that connects to the Internet through an exterior router. The perimeter network, in turn, connects to the internal network through an interior router. The perimeter network has one or more hosts that run Internet services, including proxy services that allow internal hosts to access Web servers on the Internet.
| Insider Insight |
The term bastion host refers to any system on the perimeter network, because such a system is on the Internet and has to be well fortified. The dual-homed host is also a bastion host because the dual-homed host is also accessible from the Internet and has to be protected. |
In the firewall configuration shown in Figure 22-6, the perimeter network is known as a DMZ (demilitarized zone) network because that network acts as a buffer between the Internet and the internal network (just as the real-life DMZ is a buffer between North and South Korea).
Usually, you would combine a packet-filtering router with a bastion host. Your Internet service provider typically provides the external router, which means that you do not have much control over that router's configuration. But you provide the internal router, which means you can choose a screening router and employ some packet-filtering rules. For example, you might employ the following packet-filtering rules:
-
From the internal network, allow only packets addressed to the bastion host.
-
From the DMZ, allow only packets originating from the bastion host.
-
Block all other packets.
This ensures that the internal network communicates only with the bastion host (or hosts).
Like the dual-homed host, the bastion host also runs an application gateway that provides proxy services for various Internet services, such as Telnet, FTP, SMTP, and HTTP.
Application Gateway
The bastion host or the dual-homed host is the system that acts as the intermediary between the Internet and the protected internal network. As such, that system serves as the internal network's gateway to the Internet. Toward this end, the system runs software to forward and filter TCP/IP packets for various services, such as Telnet, FTP, and HTTP. The software for forwarding and filtering TCP/IP packets for specific applications are known as proxy services. Figure 22-7 illustrates a proxy server's role in a firewall.
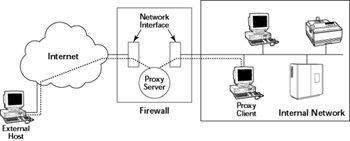
Figure 22-7: A Proxy Server Lets Internal Hosts Access Internet Servers.
A proxy server accepts a connection for a specific protocol, such as FTP, and forwards the request to another server. In other words, the proxy server acts as a proxy for an actual server. Because it acts as a gateway for a specific application (such as HTTP or FTP), a proxy server is also known as an application gateway.
Unlike a screening router, which blocks packets only on the basis of information in the packet header (such as source and destination IP addresses), a proxy server uses the packet's data to decide what to do. For example, a proxy server does not blindly forward packets to an Internet service. The proxy server can enforce a site's security policy and disallow certain operations, depending on the specific application. For example, an FTP proxy server may prevent users from internal networks from using the FTP put command to send files to the Internet.
Accessing an Internet service through a proxy server can be a bit more involved than accessing that service directly. For example, a user on the internal network establishes a Telnet session with an Internet host with the following steps:
-
The user establishes a Telnet session with the firewall host-the system that runs the Telnet proxy. To do this, the user has to enter a user name and password so that the firewall host can verify that the user has permission to connect to the Internet.
-
The user enters a command (which the Telnet proxy accepts) to connect to the Internet host. The Telnet proxy, in turn, establishes a Telnet connection between itself and the Internet host.
-
The Telnet proxy on the firewall begins passing packets back and forth between the Internet host and the user's system (until the user ends the Telnet session with the Internet host).
Besides acting as a gateway, the Telnet proxy also logs the user's session with the Internet host. The logging is part of an application gateway's security feature because the log file keeps track of all firewall accesses (as well as attempted accesses that may fail because of a wrong user name or password).
Although the Telnet session involves two steps-first Telnet to the firewall host and then connect to the Internet host-the process of accessing services through a proxy need not be too cumbersome. The exact steps you take to access services through a firewall depend on the proxy software and the client program you use to access a service. With the right client program, proxies can be transparent to the user. For example, many Web browsers make it easy to access a website through an HTTP proxy. All you need to do is indicate through a menu choice the HTTP proxy you want to use.
Enabling Packet Filtering in Red Hat Linux
Red Hat Linux comes with built-in packet filtering software in the form of something called netfilter that's in the Linux kernel. All you have to do is use the iptables command to set up the rules for what happens to the packets based on the IP addresses in their header and the network connection type.
The built-in packet-filtering capability is handy when you do not have a dedicated firewall between your Red Hat Linux system and the Internet. This is the case, for example, when you connect your Red Hat system to the Internet through a DSL or cable modem. You can essentially have a packet-filtering firewall inside your Red Hat Linux system, sitting between the kernel and the applications.
Setting the Security Level with a GUI Tool
You can turn on different levels of packet filtering through the a graphical Security Level Configuration tool. To run the tool, log in as root and select Main menu>System Settings>Security Level. The Security Level Configuration window appears (see Figure 22-8).
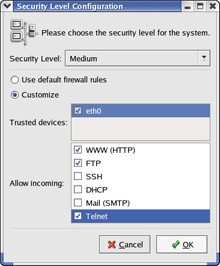
Figure 22-8: Setting the Security Level with a GUI Tool.
You can select three predefined levels of simple firewalling (more precisely, packet filtering) with the Security Level Configuration tool:
-
High-Rejects all connection requests except DNS (for querying IP addresses corresponding to names) and DHCP (for obtaining an IP address for a network interface).
-
Medium-Rejects connection requests to ports lower than 1023 (these are the standard reserved ports used by Internet services such as FTP, SSH, Telnet, and HTTP). Some other ports used by NFS, the X Window System, and the X Font Server are also blocked.
-
No firewall-Does not perform any filtering, and all connections are allowed (you can still turn off Internet services by not running the servers or disabling them in the xinetd configuration files). This security level is fine if your Red Hat Linux system is inside a protected local area network.
With High and Medium settings, you can also click the Customize radio button and then select one or more trusted devices (network interfaces) or allow incoming packets meant for specific Internet services such as SSH, Telnet, and FTP. If you select a network interface such as eth0 (the first Ethernet card) as trusted, then all network traffic over that interface will be allowed without any filtering.
Behind the scenes, the GUI security level tool uses iptables rules to implement the packet filerting implied by the selections you make.
Filtering IP Packets with iptables
You can set up packet filtering manually using the iptables command. The iptables command works with the netfilter software, built into the Linux kernel, to intercept network packets and apply filtering rules to the packets. With the iptables command, you can set up, view, and manage tables of rules for filtering IP packets.
Packet filtering with iptables relies on the concept of a chain-a sequence of rules-to filter packets. Each rule says what to do with a packet if the header contains certain information (such as the source or destination IP address). If a rule does not apply, iptables consults the next rule in the chain. By default, there are three chains:
-
INPUT chain-The first set of rules against which packets are tested. The packets continue to the next chain only if the input chain does not specify DROP or REJECT.
-
FORWARD chain-Contains the rules that apply to packets attempting to pass through this system to another system (for example, when you use the Red Hat Linux system as a router between your LAN and the Internet).
-
OUTPUT chain-Includes the rules applied to packets before they are sent out (either to another network or to an application)
Figure 22-9 shows a high-level depiction of how IP packets are processed by iptables through these three chains.
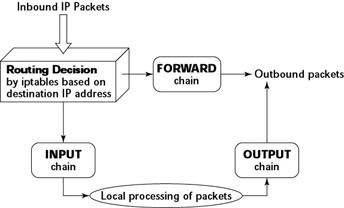
Figure 22-9: Simplified View of the iptables Processing Chains.When an incoming packet arrives, the kernel uses iptables to make a routing decision based on the destination IP address of the packet. If the packet is for this server, the kernel passes the packet to the INPUT chain. If the packet satisfies all the rules in the INPUT chain, then the packet is processed by local processes such as an Internet server that is listening for packets of this type.
If the kernel had IP forwarding enabled and the packet has a destination IP address of a different network, the kernel passes the packet to the FORWARD chain. If the packet satisfies the rules in the FORWARD chain, it's sent out to the other network. If the kernel does not have IP forwarding enabled and the packet's destination address is not for this server, then the packet is dropped.
If the local processing progams that received the input packets want to send network packets out, then those packets pass through the OUTPUT chain. If those packets are accepted by the OUTPUT chain, they are sent out to the specified destination network.
You can view the current chains, add rules to the existing chains, or create new chains of rules by using the iptables command. When you view the current chains, you can also save them to a file. For example, if you have done nothing else and your system has no firewall configured, typing the iptables -L command should show the following:
Chain INPUT (policy ACCEPT)
target     prot opt source               destination

Chain FORWARD (policy ACCEPT)
target     prot opt source               destination

Chain OUTPUT (policy ACCEPT)
target     prot opt source               destination
In this case, all three chains-INPUT, FORWARD, and OUTPUT-show the same ACCEPT policy, which means that everything is wide open.
If you are setting up a packet filter, the first thing you do is specify the packets that you want to accept. For example, to accept packets only from the 192.168.0.0 network, add the following rule to the INPUT chain:
iptables -A INPUT -s 192.168.0.0/24 -j ACCEPT
Now, add rules to drop everything except local loopback (the lo network interface) traffic and stop all forwarding with the following commands:
iptables -A INPUT -i ! lo -j REJECT
iptables -A FORWARD -j REJECT
The first iptables command, for example, appends to the INPUT chain (-A INPUT) the rule that if the packet does not come from the lo interface (-i ! lo), iptables should reject the packet (-j REJECT).
Before rejecting all other packets, you should also add more rules to each of the INPUT chains to allow specific packets in. Otherwise, you cannot effectively use the Internet. For example, packets coming from Internet servers such as name servers and Web servers will not be accepted by your system. You can further configure the firewall by adding rules to accept or reject packets based on many different parameters such as source and destination IP addresses, protocol types (TCP, UDP), network interface, and port numbers.
You can do all sorts of specialized packet filtering with iptables. For example, suppose that you are setting up a Web server and you want to accept packets meant for only HTTP (port 80) and secure shell (SSH) services. The secure shell service (port 22) is for you to securely log in and adminsiter the server. Suppose that the server's IP address is 192.168.0.10. Here is how you might set up the rules for this server:
iptables -P INPUT DROP
iptables -A INPUT -s 0/0 -d 192.168.0.10 -p tcp --dport 80 -j ACCEPT
iptables -A INPUT -s 0/0 -d 192.168.0.10 -p tcp --dport 22 -j ACCEPT
In this case, the first rule sets up the default policy of the INPUT chain to DROP, which means that if none of the specific rules match, the packet will be dropped. The next two rules say that packets addressed to 192.168.0.10 and meant for ports 80 and 22 are accepted.
| Caution |
Don't type iptables commands from a remote login session. A rule that begins denying packets from all addresses can also stop what you type from reaching the system; once that happens, you may have no way of accessing the system over the network. To avoid unpleasant surprises, always type iptables rules at the console-the keyboard and monitor that are connected directly to your Red Hat Linux PC that is running the packet filter. If you want to delete all filtering rules in a hurry, flush all the rules by typing the following command: iptables -F |
I won't provide all the details of the iptables commands in this section. Type man iptables to read a summary of the commands. You can also read about netfilter and iptables at http://www.iptables.org.
After you define the rules by using the iptables command, they are in the memory and will be gone when you reboot the system. To save them, use the iptables-save command to store the rules in a file. For example, you can save the rules in a file named iptables .rules by using the following commands:
iptables-save > iptables.rules
Here's a listing of the iptables.rules file, generated on a Red Hat Linux system:
# Generated by iptables-save v1.2.7a on Fri Feb  7 20:47:16 2003
*filter
:INPUT ACCEPT [480:30210]
:FORWARD ACCEPT [0:0]
:OUTPUT ACCEPT [3266:217223]
-A INPUT -s 192.168.0.0/255.255.255.0 -j ACCEPT
-A INPUT -i ! lo -j REJECT --reject-with icmp-port-unreachable
-A FORWARD -j REJECT --reject-with icmp-port-unreachable
COMMIT
# Completed on Fri Feb  7 20:47:16 2003
In case you are curious, these rules correspond to the following iptables commands I used to configure the filter:
iptables -A INPUT -s 192.168.0.0/24 -j ACCEPT
iptables -A INPUT -i ! lo -j REJECT
iptables -A FORWARD -j REJECT
If you want to load these saved rules into iptables, use the following command:
iptables-restore < iptables.rules
| Insider Insight |
On a Red Hat Linux system, the process of saving and restoring firewall rules is automated by saving the iptables rules in the file /etc/sysconfig/iptables and by enabling iptables with the following command: chkconfig iptables on That should ensure that the /etc/init.d/iptables start command is executed at system startup. The /etc/init.d/iptables script then runs the /sbin/ iptables-restore command to restore the iptables rules from the /etc/ sysconfig/iptables file. |


