Managing User Accounts
Managing User Accounts
Adding user accounts to the system is a key system-administration function. You get the chance to add user accounts when you boot Red Hat Linux for the first time. If you didn't add other user accounts at that time, you can do so now. You can use the Red Hat User Manager or the useradd command to add a new user account to your system.
| Insider Insight |
A good idea is to create other user accounts besides root. Even if you're the only user of the system, logging in as a less-privileged user is good practice, because you can't damage any important system files inadvertently. If necessary, you can type the su - command to log in as root and perform any system-administration tasks. |
Using Red Hat User Manager to Add User Accounts
You can use the Red Hat User Manager to add user accounts. To start the Red Hat User Manager, log in as root at the graphical login screen and then select Main Menu>System Settings>Users and Groups from the GNOME or KDE Panel. If you're not logged in as root, the Red Hat User Manager prompts you for the root password. You can enter the password and click OK, then the Red Hat User Manager window appears.
The window shows two tabs: Users and Groups (see Figure 12-2). The Users tab displays the current list of users from the /etc/passwd file. The Groups tab lists the name of groups from the /etc/group file. Initially, the Red Hat User Manager filters out any system users and groups. However, you can turn off the filer by selecting Preferences>Filter system users and groups. Figure 12-2 shows the Red Hat User Manager window with a listing of all user accounts, including the system ones.
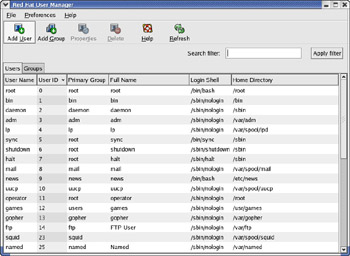
Figure 12-2: Red Hat User Manager Window.
You can add new users and groups or edit existing users and groups from the Red Hat User Manager. To edit the information for an existing user, click the user name in the list in the Users tab, and then click the Properties button on the toolbar. That user's information appears in a User Properties dialog box. You can then edit the information and click OK to make the changes.
To add a new user, click the New User button on the toolbar. This action opens the Create New User dialog box, as shown in Figure 12-3.
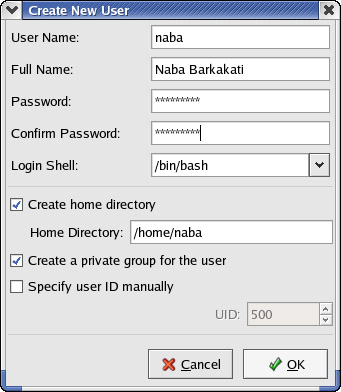
Figure 12-3: Entering Information for a New User.
Fill in the requested information. In particular, you must enter the user name and the password. After filling in all the fields, click the OK button. The new user should now appear in the list on the Users tab in the Red Hat User Manager window.
| Note |
If you want to remove a user account, click the user name in the list on the Users tab that displays all user accounts (see Figure 12-2), then click the Delete button on the toolbar. |
Notice the checkbox labeled Create a private group for the user in Figure 12-3. It's checked by default, and that means each new user is in a separate private user group. However, sometimes you want a user to be in a specific group so that the user can access the files owned by that group. It's easy to add a user to another group. For example, suppose that I want to add the user name naba to the group called wheel. I can do this simply by typing the following command in a terminal window:
usermod -G wheel naba
If you simply uncheck that check box labeled Create a private group for the user (see Figure 12-3), the new user is assigned the group named users. Type more /etc/group to see the group names and group ID.
Using Commands to Manage User Accounts
If you're working from a text console, you can create a new user account by using the useradd command. Follow these steps to add an account for a new user:
-
Log in as root. (If you're not already logged in as root, type su - to become root.)
-
Type the following useradd command with the -c option to create the account:
/usr/sbin/useradd -c "Ashley Barkakati" ashley
-
Set Ashley's password by using the passwd command, as follows:
passwd ashley
Changing password for user ashley
New password: (Type the password and then press Enter.)
Retype new password: (Type the password again and press Enter.)
passwd: all authentication tokens updated successfully
Notice that, if you type a password that someone can easily guess, the passwd program rejects it.
The useradd command consults the files /etc/default/useradd and /etc/ login.defs to obtain default information on various parameters for the new user account. The /etc/default/useradd file, for example, specifies the default shell (/bin/bash) and default home directory location (/home). The /etc/login.defs file provides systemwide defaults for automatic group and user IDs, as well as password expiration parameters.
You can delete a user account by using the userdel command. Simply type userdel username at the command prompt to delete a user's account. To wipe out that user's home directory as well, type userdel -r username.
To modify any information in a user account, use the usermod command. For example, if I want my user name, naba, to have root as the primary group, I would type:
usermod -g root naba
To learn more about the useradd and userdel commands, type man useradd or man userdel in a terminal window.
Understanding the /etc/passwd File
The /etc/passwd file is a list of all user accounts. It's a text file, and any user can read it; no special privileges are needed. Each line in /etc/passwd has seven fields, separated by colons (:).
Here is a typical entry from the /etc/passwd file:
naba:x:500:10:Naba Barkakati:/home/naba:/bin/bash
Figure 12-4 uses this typical entry to explain the meaning of the seven fields.
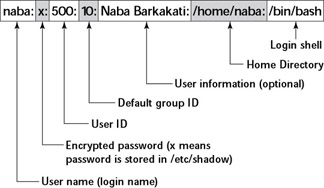
Figure 12-4: Meaning of Fields in a Typical /etc/passwd Entry.
As the example shows, the format of each line in /etc/passwd looks like this:
username:password:UID:GID:GECOS:homedir:shell
Table 12-1 explains the meaning of the seven fields in each /etc/passwd entry.
|
Field |
Meaning |
|---|---|
|
username |
An alphanumeric user name, usually eight characters long and unique (Red Hat Linux allows user names to be longer than eight characters, but some other operating systems do not) |
|
password |
When present, a 13-character encrypted password (an empty field means that no password is required to access the account, an x means the password is stored in the /etc/shadow file, which is more secure) |
|
UID |
A unique number that serves as the user identifier (root has a UID of 0 and usually the UIDs between 1 to 100 are reserved for nonhuman users, such as servers; it's best to keep the UID less that 32,767) |
|
GID |
The default group ID (GID) of the group to which the user belongs (GID 0 is for group root, other groups are defined in /etc/group and users can be and usually are in more than one group at a time) |
|
GECOS |
Optional personal information about the user (the finger command uses this field and GECOS stands for General Electric Comprehensive Operating System, a long-forgotten operating system that's immortalized by the name of this field in /etc/passwd) |
|
homedir |
The name of the user's home directory |
|
shell |
The command interpreter (shell) such as Bash (/bin/bash) that's executed when this user logs in |
Managing Groups
A group is an something to which users belong. A group has a name and an identification number (GID). After a group is defined, users can belong to one or more of these groups.
You'll find all the existing groups listed in /etc/group. For example, here is the line that defines the group named wheel:
wheel:x:10:root,naba
As this example shows, each line in /etc/group has the following format with four fields separated by colons:
groupname:password:GID:membership
Table 12-2 explains the meaning of the four fields in a group definition.
|
Field |
Meaning |
|---|---|
|
groupname |
The name of the group (for example, wheel) |
|
password |
The group password (an x means the password is stored in the /etc/shadow file) |
|
GID |
The numerical group ID (for example, 10) |
|
membership |
A comma-separated list of user names who belong to this group (for example, root,naba) |
If you want to create a new group, you can simply click the Add Group button in the Red Hat User Manager (Figure 12-2). An even quicker way is to use the groupadd command. For example, to add a new group called class with an automatically-selected group ID, just type the following command in a terminal window (you have to be logged in as root):
groupadd class
Then, you can add users to this group with the usermod command. For example, to add the users naba and ashley to the group named class, I type the following commands:
usermod -G class naba
usermod -G class ashley
That's it. Now I check /etc/group to find that it contains the following definition of class:
class:x:502:naba,ashley
If you want to remove a group, use the groupdel command. For example, to remove the group named class, type
groupdel class


