Configuring CUPS Print Queues
Configuring CUPS Print Queues
Setting up a printer in Red Hat Linux involves setting up a queue for the print spooler or scheduler-the process that accepts and sends files for printing and does whatever is needed to get them printed. The queue is essentially a holding place for files that are to be sent to a printer. Before being sent to the printer, however, the files are usually processed to convert them to a form that the printer can understand. For example, to print on a PostScript printer, the files have to be converted to PostScript, which is a page description language (from Adobe Systems Incorporated) that many printers understand.
If you have printed under Microsoft Windows, you may already be familiar with spooling. Spooling refers to the ability to print in the background. When you print from a word processor in Windows, for example, the output first goes to a file on the disk. Then, while you continue working with the word processor, a background process sends that output to the printer.
The Red Hat Linux printing environment, which consists of several programs described later in this chapter, also supports spooling. The spool directory refers to the directory that contains output files intended for the printer.
Print job refers to what you print with a single print command. The printing environment queues print jobs by storing them in the spool directory. A background process periodically sends the print jobs from the spool directory to the printer.
Red Hat Linux uses the Common UNIX Printing System (CUPS) for its printing environment. CUPS is a printing system based on the Internet Printing Protocol (IPP)-an application-level protocol for distributed printing using Internet technologies. IPP assumes a client/server model with the client being an application and the server a 'Printer'-an abstraction of an output device or a printing service provider. IPP supports a distributed printing environment with the clients and Printer servers communicating over the Internet. You could use an IPP client to print on a printer anywhere on the Internet. The client and Printer exchange data using the HTTP 1.1 protocol. The client application uses IPP to inquire about capabilities of a printer, submit print jobs, and inquire about and cancel print jobs. Because IPP uses HTTP-the same protocol that Web servers use, CUPS configuration directives are similar to those used by the Apache Web server (Chapter 14 describes the Apache Web server configuration files).
CUPS has been developed by Easy Software Products and is distributed under the GNU General Public License (GPL), version 2. The CUPS application programming interface (API) library is distributed under the GNU Library General Public License (LGPL), version 2. For a discussion of GPL and LGPL, see Chapter 23.
You can configure CUPS print queues through the graphical Red Hat printer configuration tool or by typing the lpadmin command in a terminal window (a print queue or printer queue is a mechanism for scheduling printing on a specific printer). You can also manage CUPS print queues through the Web browser. To access the CUPS administration functions, point the Mozilla Web browser to http://localhost:631/.
Your Red Hat Linux system should have CUPS already installed. That installation also includes documentation on CUPS. To read the CUPS documentation, start the Mozilla Web browser and open the file /usr/share/doc/cups*/documentation.html. You can also read CUPS documentation from the Internet at http://www.cups.org/documentation.php.
For the latest information about CUPS and to read the CUPS Frequently Asked Questions (FAQ), visit the CUPS website at http://www.cups.org/.
At the user level, you can use either System V UNIX commands or Berkeley Software Distribution (BSD) UNIX commands to submit and manage print jobs. Although CUPS supports both BSD and System V-style print commands, it favors the System V print commands such as lp to print a file and lpstat to check the status of the print queues. As you become more knowledgeable about UNIX (or if you are a UNIX old-timer), you may find this bit of information useful because it tells you the printing commands you can use in Red Hat Linux. If you don't know anything about System V or BSD UNIX, don't worry; you will learn about the printing commands in the following sections.
Using the Red Hat Printer Configuration Tool
In Red Hat Linux, you can configure a printer by using the printer configuration GUI tool. To configure printers with this tool, you must be running GNOME or KDE. From the graphical login screen, log in as root, and select Main Menu>System Settings>Printing from the GNOME or KDE desktop. You can also start the tool by typing the command redhat-config-printer in a terminal window.
The main window of the printer configuration tool appears (see Figure 4-1).

Figure 4-1: The Main Window of the Printer Configuration Tool.
You can create and manage print queues by using the printer configuration tool. Each print queue refers to a holding place for files that are to be sent to a specific printer (note that the terms print queue and printer queue are typically used interchangeably). Thus, a print queue is associated with at least one printer. To add a printer to your Red Hat Linux system is equivalent to creating a printer queue and associating that queue with the printer.
To add a new printer queue, click the New button on the toolbar. The printer configuration tool displays the Add a new print queue Wizard that takes you through the process of adding a new printer queue. The initial step shows a message that assures you that nothing will be changed until you click the Apply button at the end of all the steps. Click the Forward button to continue. The next screen prompts you for the print queue's name and a short description, as shown in Figure 4-2.
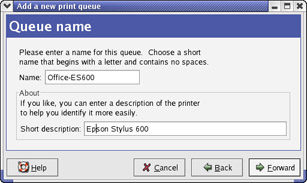
Figure 4-2: Set the Print Queue Name and Description.
Enter a name for the queue and description. You should use some systematic approach when naming the print queue. For example, if I have a HP Laserjet 4 printer on the second floor in Room 210, I might name the queue Room-210-HPLJ4 because this makes it easy to find the printer. Sometimes systems administrators choose cute names such as kermit, piggy, elmo, cookiemonster, and so on, but once you have too many printers, such cute schemes do not work well. It's best to provide a clue about the printer's location as well as the make and model in the print queue's name. After entering the queue name and description, click Forward.
The Queue Type window appears. You have to select a queue type from the drop-down selection box (see Figure 4-3). As the drop-down list shows, you have to select the queue type from the following list:
-
Locally-connected printer-Refers to a printer connected directly to the serial, parallel, or USB port of the PC
-
Networked IPP (CUPS) queue-Refers to a CUPS print queue at another server on the network (IPP refers to the Internet Printing Protocol that is used to communicate with the remote CUPS server)
-
Networked UNIX (LPD) printer-Refers to a print queue managed by the LPD server on another UNIX system on the local network (LPD refers to Line Printer Daemon-another print spooler for UNIX systems)
-
Networked Windows (SMB) printer-Refers to a printer connected to another PC on the local network and that uses the Server Message Block (SMB) protocol, the underlying protocol in Windows file and print sharing
-
Networked Novell (NCP) printer-Refers to a printer connected to a Novell Netware server on the local network
-
Networked JetDirect queue-Refers to a network-connected printer that prints data received at a specific TCP/IP port (typically, port number 9100). HP JetDirect cards use this method of printing.
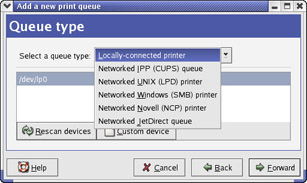
Figure 4-3: Select the Print Queue Type.
Select the print queue type that applies to your configuration. When you select any of the networked print queues, you have to identify the server and remote queue name using the syntax appropriate for that type of queue. For example, if you want to set up a print queue directed at a Windows (SMB) printer, you have to identify the printer by using the following syntax:
//WindowsMachine/PrinterName
On the other hand, for remote CUPS or LPD queues, you specify the server's hostname and the queue's name (as defined on that remote server).
If you select a locally-connected printer, you should see the parallel port device (/dev/lp0) listed. If you want to connect the printer to another port (such as serial port or USB), you can click the Custom device button. Then enter the device name (such as /dev/ttyS0 for the first serial port or /dev/usb/lp0 for the first USB printer) in the dialog box that appears. After specifying the device, click Forward and the wizard takes you to the next step, where you select a print driver from a list. Click the drop-down list (above the scrolling list) and a list of printer manufacturers appear. Select the printer manufacturer, and the scrolling list displays the names of different printer models from that manufacturer, as shown in Figure 4-4 (for Epson).

Figure 4-4: Select a Printer Manufacturer and Model.
You can then select your printer model from the list. If you have a PostScript printer, you can simply go to the Generic list (Generic is one of the choices in the manufacturer list) and select PostScript printer. After selecting the print driver, click Forward to continue. This brings you to the final screen, as shown in Figure 4-5.
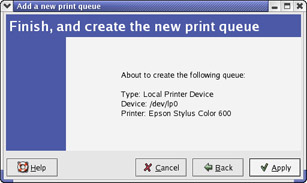
Figure 4-5: Finish Creating the New Print Queue.
This step displays a message that tells you what print queue you are about to create. Click Apply to complete the task.
A dialog box prompts you if you want to print a test page. Click Yes. This applies all the changes and restarts cupsd-the print scheduler daemon that takes care of printing (a daemon is essentially a background process that runs as long as the system is up). The printer should print a test page. A message box appears asking you to check the test page. Click OK to dismiss the message box.
Now, the new print queue should appear in the printer configuration window, and you should be able to submit print jobs to this queue. To quit the printer configuration tool select Action>Quit or close the printer configuration window by clicking the X button in the upper-right corner of the window's frame.
| Insider Insight |
If you did not print a test page when you initially set up the print queue, you can always do so from the Test menu in the Red Hat printer configuration tool. Click the print queue in the Printer configuration window, and then select Test>CUPS Test page from the menu to print a test page on the printer. |
The next section describes some of the commands you can use to print and check the status of print jobs.
Administering Printers with CUPS Web Interface
Although you can use the Red Hat printer configuration tool to configure CUPS printers, there is another way to administer CUPS. You can also administer CUPS printers through its Web interface. In fact, the Web interface is the method used to configure CUPS printers on non-Red Hat systems because the Red Hat configuration tool is meant for Red Hat Linux systems only.
The CUPS scheduler-cupsd-listens on port 631 on your system. Port 631 is assigned to the IPP service. For example, here's what you should get when you search for ipp in the /etc/services file:
grep ipp /etc/services
ipp             631/tcp          # Internet Printing Protocol
ipp             631/ucp          # Internet Printing Protocol
When you use a Web browser to connect to port 631 on your system, cupsd displays its Web interface, as shown in Figure 4-6.
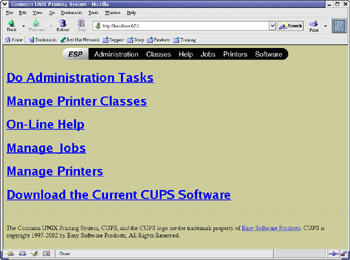
Figure 4-6: Accessing the CUPS Web Interface at Port 631.
You can perform a variety of administration tasks through the links and the buttons on the CUPS Web interface. If you click the Do Administration Tasks link, CUPS displays a new Web page from which you can manage printer classes (explained later in this section), jobs, and printers.
To add a printer through the CUPS Web interface, follow these steps:
-
Start the CUPS Web interface by pointing the Mozilla Web browser at http://localhost:631/. The Web interface appears, as shown in Figure 4-6.
-
Click the Manage Printers link. CUPS displays information about each of the current printers as well as buttons for performing many different tasks (Figure 4-7). A set of buttons enable you to perform tasks such as print a test page and stop a printer. Additionally, a single Add Printer button enables you to add a printer.
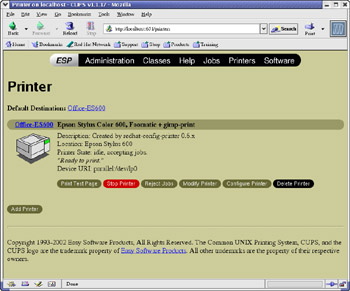
Figure 4-7: Managing Printers through the CUPS Web Interface. -
Click the Add Printer button. CUPS prompts for information about the new printer.
-
Enter the printer's name, location, and description, then click Continue. CUPS asks you to select the device from a drop-down list. The list is more extensive than what the Red Hat printer configuration tool shows.
-
Select printer device, and click Continue. CUPS prompts for the make of the printer. The list is much shorter than what you get from the Red Hat printer configuration tool.
-
Select the printer make and click Continue. CUPS prompts for the printer model. That list depends on the make you selected.
-
Select the model, and click Continue. CUPS adds the printer by adding the new printer's information to the /etc/cups/printers.conf file and creating a PPD file for the printer in the /etc/cups/ppd directory.
| Insider Insight |
A key concept in CUPS is the idea of a class of printers. You can define a class consisting of a number of printers and then send print jobs to the class (instead of individual printers). CUPS then sends the print job to the first available printer in the class. This is a good way to share the printing load among a number of printers. You can print on a class just as you print on an individual printer. For example, if your system has the class pr5 defined, then you can print the sample.ps file on this class with the following lp command: lp -d pr5 sample.ps |
To define a class of printers from the CUPS Web interface point the Web browser to http://localhost:631/ and then follow these steps:
-
Click Classes on the tool bar in the Web interface. CUPS displays the current classes, if any, and an Add Class button.
-
Click the Add Class button. A dialog box prompts for a user name and password. Enter the root as user name and the root password. CUPS then prompts for information about the class.
-
Enter the following identifying information about the new class:
-
Name-The class name, up to 127 printable characters (no embedded spaces)
-
Location-Information about where this class of printes is located
-
Description-A brief description of this class of printers
Click Continue. CUPS asks you to select which of the currently defined printers should be members of this class.
-
-
Click the printers you want to add to the class, then click Continue. CUPS creates the new class.
When you create a new class, the class definition is added to the /etc/cups/classes .conf file. For example, here's the definiton of a class named pr5:
<Class pr5>
Info Printers on 5th Floor
Location 5th Floor
State Idle
Accepting Yes
JobSheets none none
Printer 5N28-hplj4
Printer 5X15-hplj5000
Printer 5Z15-hplj4200
QuotaPeriod 0
PageLimit 0
KLimit 0
</Class>
In this case, the pr5 class contains three printers idenfied by the Printer lines inside the class definition.


