Introducing Tk
Introducing Tk
Tk (pronounced tee-kay) is an extension of Tcl. Tk provides an X Window system–based toolkit you can use in Tcl scripts to build GUIs. As you might expect, Tk provides a set of Tcl commands beyond the core built-in set. You can use these Tk commands to create windows, menus, buttons, and other user-interface components and to provide a GUI for your Tcl scripts.
Tk uses the X Window system for its graphic components, known as widgets. A widget represents a user-interface component, such as a button, scroll bar, menu, list, or even an entire text window. Tk widgets provide a Motif-like, three-dimensional appearance.
If you are familiar with the Motif widgets, you may know that Motif relies on Xt Intrinsics—an X toolkit used to build widgets. Unlike Motif, the Tk toolkit is not based on any other toolkit; it uses only Xlib, which is the C-language library for the X Window system. The upshot is that you need only the freely available X Window system to use Tk.
As with anything new, you can best learn Tk through examples, which the following sections provide.
Saying “Hello, World!” in Tk
Tk is a major-enough extension to Tcl to warrant its own shell, called wish (the windowing shell). The wish shell interprets all built-in Tcl commands, as well as the Tk commands. You must start X before you can run wish; after all, wish enables you to use X to create graphical interfaces.
The wish program should be in the /usr/bin directory, which should be in your PATH environment variable by default. To start wish, all you have to do is type the following at the shell prompt in a terminal window:
wish
%
The wish program displays its prompt (the percent sign) and a small window, as shown in the upper-right corner of Figure 25-1.
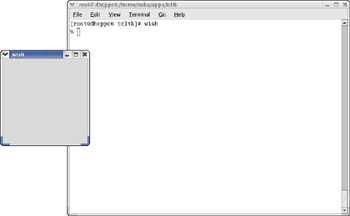
Figure 25-1: The Result of Running wish from a Terminal Window.
Therefore, wish provides an interactive prompt from which you can enter Tk commands to create a graphical interface. As wish interprets the commands, it displays the resulting graphical interface in the window.
To see how this interactive creation of graphical interface works, try the following commands at the wish prompt):
% label .msg -text "Hello, World!"
.msg
% button .bye -text "Bye" -command { exit }
.bye
% pack .msg .bye
%
Figure 25-2 shows the result of these commands; wish displays a Hello, World! label with a Bye button below it.
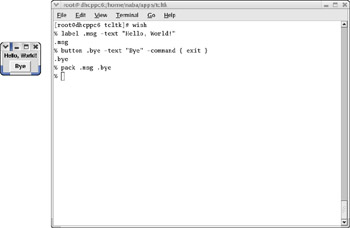
Figure 25-2: Interactively Creating a Label and a Button in wish.
Notice that the label and the button do not appear until you enter the pack command. In addition, the wish window shrinks to a size just large enough to hold the label and the button.
Click the Bye button; the wish program exits. This is because the -command { exit } argument of the button command associates the Tcl command exit with a click of the Bye button.
To create a Tk program or script that displays the Hello, World! label and the Bye button, all you have to do is place the Tk commands in a file and add a special line at the beginning to ensure that the wish shell processes the file. To do so, follow these steps:
-
Use a text editor to enter and save the following lines in a file named hellotk:
#!/usr/bin/wish # A simple Tk script label .msg -text "Hello, World!" button .bye -text "Bye" -command { exit } pack .msg .bye -
Type the following command at the shell prompt to make the hellotk file executable (that’s what the +x in the chmod command means):
chmod +x hellotk
-
To run the hellotk script, type the following at the shell prompt in a terminal window:
./hellotk
Figure 25-3 shows the window with a Hello, World! label and the Bye button that should appear when you run the hellotk script. Click the Bye button to close the window and end the script.

Figure 25-3: The Result of Running the hellotk Script.
As this example shows, the basic steps for writing a Tk script are the same as those for creating and running any Tcl script. The only difference is that the Tk commands generate graphical output.
Learning Tk Widget Basics
Now that you have been exposed to Tcl, you can begin writing Tk scripts. What you need to know are the Tk commands used to create and configure widgets.
The term widget has the same meaning in Tk as it does in an X toolkit, such as Motif—a widget is a user interface component, such as a push button, list box, or dialog box.
As the examples in the preceding section show, you use the label command to create a label and the button command to create a button widget. This is a general guideline for working with all Tk widgets—the command for creating a widget is the same as the widget’s name. Table 25-4 lists the names of Tk’s widgets, which are also the widget-creation commands.
|
Command |
Action |
|---|---|
|
button |
Creates a button widget |
|
canvas |
Creates a canvas widget on which you can display text, bitmaps, lines, boxes, polygons, and other widgets |
|
checkbutton |
Creates a toggle button and associates it with a Tcl variable |
|
entry |
Creates a one-line text-entry widget |
|
frame |
Creates a frame widget that is capable of holding other widgets |
|
label |
Creates a read-only, one-line label widget |
|
listbox |
Creates a list-box widget that is capable of scrolling lines of text |
|
menu |
Creates a menu |
|
menubutton |
Creates a menu-button widget that pops up an associated menu when clicked |
|
message |
Creates a read-only, multiple-line message widget |
|
radiobutton |
Creates a radio-button widget that is linked to a Tcl variable |
|
scale |
Creates a scale widget that can adjust the value of a variable |
|
scrollbar |
Creates a scroll bar widget that you can link to another widget |
|
text |
Creates a text widget where the user can enter and edit text |
|
toplevel |
Creates a top-level widget (a widget whose window is a child of the X Window system’s root window) |
As you create a widget, you can specify many of its characteristics as arguments of the command. You can, for example, create a blue button with a red label (test) and display the button by using the following commands:
button .b -text test -fg red -bg blue
pack .b
The pack command does not create a widget; rather, it positions a widget in relation to others. Table 25-5 lists all the widget-manipulation commands.
| Insider Insight |
To look up online help about any Tk command listed in Tables 25-4 and 25-5, type man n, followed by the command name. To get online help about the bind command, for example, type man n bind. |
|
Command |
Action |
|---|---|
|
after |
Executes a command after a specified amount of time elapses |
|
bind |
Associates a Tcl command with an X event, so that the Tcl command is automatically invoked whenever the X event occurs |
|
destroy |
Destroys one or more widgets |
|
focus |
Directs keyboard events to a particular window (gives that window the input focus) |
|
grab |
Confines pointer and keyboard events to a specified widget and its children |
|
lower |
Lowers a window in the stacking order. (The stacking order refers to the order in which various windows overlap one another on the display screen.) |
|
option |
Provides access to the X resource database |
|
pack |
Automatically positions widgets in a frame, based on specified constraints |
|
place |
Allows manual positioning of a widget relative to another widget |
|
raise |
Raises a window’s position in the stacking order |
|
selection |
Manipulates the X PRIMARY selection (the standard name of a selection in X) |
|
send |
Sends a Tcl command to a different Tk application (used for interprocess communications) |
|
tk |
Provides information about the internal state of the Tk interpreter |
|
tkerror |
Handles any error that occurs in Tk applications (the interpreter calls this command when errors occur in Tk applications) |
|
tkwait |
Waits for an event, such as the destruction of a window, or a change in the value of a variable |
|
update |
Processes all pending events and updates the display |
|
winfo |
Returns information about a widget |
|
wm |
Provides access to the window manager. (You can send commands to the window manager, requesting a size for your top-level window, for example.) |
Defining Widget Hierarchies in Tk
From the example that creates a label and a button, you may have guessed that the argument that follows the widget-creation command is the widget’s name. If you are wondering why all the names start with a period, which is required at the beginning of a widget’s name, it is because widgets are organized in a hierarchy.
Suppose that you have a main window that contains a menu bar, a text area, and a scroll bar. The menu bar has two buttons, labeled File and Help. Figure 25-4 shows this widget hierarchy as it appears onscreen; it also shows how the widget names relate to this hierarchy.
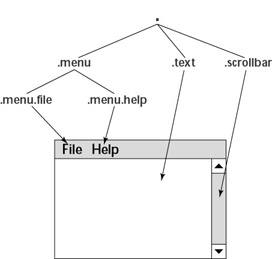
Figure 25-4: Relationship between Widget Names and the Widget Hierarchy.
The root of the widget hierarchy is the main window of the application; a single period (dot) is used to denote the main window. This main window is a child of the root window of the X display. Each child of the main window has a name that begins with a dot. Thus, .menu is a child of the main window.
The names of other widgets depend on their positions in the hierarchy. The buttons in the menu bar have names—.menu.file and .menu.help—that indicate that they are child widgets of the .menu widget. As you create widgets, you specify the name of each widget, in turn defining the widget hierarchy.
If you think about it, you can see that the widget-naming scheme is similar to the pathname of a file in Linux. The period (.) in a widget’s name is analogous to the slash (/) in a file’s pathname. In fact, the Tk documentation and online manual pages use the term Tk pathname to indicate the widget hierarchy.
All widget names must start with a lowercase letter or a number. The name cannot include a period, because the period indicates the widget’s location in the hierarchy. Names that start with an uppercase letter denote a class used in specifying resources; the meaning of the term resources is the same as in X.
Configuring Widgets
Tk treats each widget name as a command name. You can perform operations on a specific widget by using that widget’s name, followed by arguments that make sense for that widget. If you have a button named .b, for example, use the following command to set that button’s background to blue:
.b config -fg blue
You can change the button’s label to Goodbye! by using the following command:
.b config -text Goodbye!
The arguments -fg blue and -text Goodbye! specify the attributes of a widget. Each attribute name begins with a hyphen (-), as in -text. The next argument is that attribute’s value.
Displaying Widgets
Tk does not display a widget, until you use a command to position the widget in the main window. To display the widgets, you have to use a geometry manager—a Tk procedure that arranges one or more child widgets in a parent widget.
Tk provides two geometry-management commands for organizing and displaying widgets:
-
The place command enables you to position a widget at a fixed location in the window of a designated master widget (which does not necessarily have to be a parent widget). The master widget is used as a reference—other widgets are positioned relative to the master widget. Also, you can specify relative positions, such as a horizontal position half the width of the master widget.
-
The pack command arranges child widgets around the edges of the master window. You can specify the side of the parent on which the child widget is placed, as well as any extra space you want to use around the child. As the name suggests, the pack command packs widgets together as tightly as possible.
Although the pack and place commands take many different options, their basic use is straightforward. I suggest you start wish, create a few widgets, and try the place and pack commands to see their effects. After that, you can consult the online manual for the exact options whenever you need them. Type man n pack for the pack command’s online help; for help on the place command, type man n place.
| Insider Insight |
The pack and place commands have a form—pack forget and place forget —that you can use to hide a widget. If you want to hide a button named .btn1, for example, use the command pack forget .btn1. To make the button reappear, use the pack .btn1 command again. |
Using the pack Command
The pack command is the most commonly used geometry-management command in Tk. As some of the simple examples in this chapter show, to make a button named .btn1 appear, use pack as follows:
pack .btn1
You can specify several widget names on the same pack command line. To display the buttons .btn1, .btn2, and .btn3, arranged in a vertical line in that order, use the following:
pack .btn1 .btn2 .btn3
On a menu bar, for instance, this type of pack command makes the most efficient use of the available space.
Table 25-6 summarizes the pack command’s syntax. As Table 25-6 shows, you can use the pack command to position widgets and get information about the widget hierarchy.
|
Command |
Description |
|---|---|
|
pack widgetNames options |
Packs the listed widgets according to the specified options (same as pack configure). Table 25-7 shows the list of available options. |
|
pack configure widgetNames options |
Packs the listed widgets according to the specified options |
|
pack forget widgetNames |
Hides (unpacks) the specified widgets |
|
pack info widget |
Returns the packing configuration (a list of options and values) of the specified widget |
|
pack propagate widget boolean |
If boolean is 1, this enables geometry propagation for the specified widget; otherwise, this command disables propagation. (When geometry propagation is enabled, the size of a widget’s window is determined by the sizes of the widgets contained in that window.) |
|
pack slaves widget |
Returns the list of widgets managed by a specified widget If you want a more complicated layout of widgets, you have to use the packing options shown in Table 25-7. |
|
-after widgetName |
Places the widget that is being packed after the widget specified by widgetName |
|
-anchor anchorPos |
Determines where the managed widget is placed. (This applies only when the containing widget is larger than the managed widget.) The anchorPos value can be center, e, n, ne, nw, s, se, sw, or w; the default is center. |
|
-before widgetName |
Places the widget that is being packed before the widget specified by widgetName |
|
-expand boolean |
If boolean is 1, the contained widget expands to use any space left over in the containing widget |
|
-fill style |
Indicates how to expand the containing widget, if it becomes bigger than what the widgets contained in it require. The style value can be both, none, x, or y. |
|
-in widgetName |
Indicates the widget in which the widgets specified in the pack command line are placed. If you do not use this option, widgets are packed in their parent widget (.f.b is packed in .f). |
|
-ipadx amount |
Specifies extra horizontal space inside the widget being packed (in addition to the space that it already needs). The amount value is a number, in screen units. |
|
-ipady amount |
Specifies extra vertical space inside the widget being packed (in addition to the space it already needs). The amount value is a number, in screen units. |
|
-padx amount |
Specifies extra horizontal space outside the border of the widget that is being packed. The amount value is a number, in screen units. |
|
-pady amount |
Specifies extra vertical space outside the border of the widget being packed. The amount value is a number, in screen units. |
|
-side sideName |
Packs against the specified side. The sideName value is bottom, left, right, or top; the default is top. |
| Insider Insight |
If you are wondering how to remember all these options, my advice is that you not remember them. Usually, you can get by with just a few of these options, and you will begin to remember them after a while. To become familiar with what each option does, start wish, create a few widgets, and try packing them with different options. From then on, whenever you need the exact syntax of an option, consult the online manual by typing man n pack or simply man pack. |
Using the place Command
The place command is a simpler way to specify the placement of widgets as compared to the pack command, but you have to position all the windows yourself. It is simpler than pack because the place command gives you direct control of the widget positions. On the other hand, direct control of widget placement is fine for a few windows, but it can get tedious in a hurry when you have many widgets in a user interface.
Using place, you can position a widget at a specific location. For example, to place .btn1 at the coordinate (100, 50) in its parent widget, use the following command:
place .btn1 -x 100 -y 50
A good use of place is to center a widget within its parent widget. For this purpose, use the -relx and -rely options of place. If .f is a frame widget (a widget that contains other widgets), you can display it at the center of the parent window by using the following commands:
frame .f
button .f.b1 -text Configure
button .f.b2 -text Quit
pack .f.b1 .f.b2 -side left
place .f -relx 0.5 -rely 0.5 -anchor center
As the code fragment shows, the buttons inside the frame are packed with the pack command. Only the frame, .f, is positioned with the place command. The -relx and -rely options enable you to specify the relative positions in terms of a fraction of the containing widget’s size. A zero value for -relx means the left edge; 1 is the right edge; and 0.5 means the middle.
Like pack, the place command has several forms, listed in Table 25-8.
|
Command |
Description |
|---|---|
|
place widgetNames options |
Positions the listed widgets according to the specified options (same as place configure). Table 25-9 shows the list of available options. |
|
place configure widgetNames options |
Positions the listed widgets according to the specified options |
|
place forget widgetNames |
Stops managing the specified widgets and unmaps (hides) them |
|
place info widget |
Returns the list of options and their values for the specified widget |
|
place slaves widget |
Returns the list of widgets managed by the specified widget In addition, place takes several options, summarized in Table 25-9. Use these options with the plain place command or the place configure command. |
|
Option |
Description |
|
-anchor anchorPos |
Specifies which point of the managed widget is placed in the specified position in the managing window. The anchorPos value can be center, e, n, ne, nw, s, se, sw, or w; the default is nw (upper-left corner). |
|
-bordermode bmode |
Indicates how the managing widget’s borders are used when the managed widgets are positioned. The bordermode value must be ignore, inside, or outside. |
|
-height size |
Specifies the height of the managed widget |
|
-in widgetName |
Indicates the widget relative to which the positions of the widgets specified in the place command line are specified. If you do not use this option, widgets are placed relative to their parent widgets (.f.b is positioned relative to .f). |
|
-relheight fraction |
Specifies the height of the managed widget as a fraction of the managing widget. The fraction is a floating-point value. |
|
-relwidth fraction |
Specifies the width of the managed widget as a fraction of the managing widget. The fraction is a floating-point value. |
|
-relx fraction |
Specifies the horizontal position of the managed widget as a fraction of the managing widget’s width. The fraction is a floating-point value; 0.0 means the left edge, and 1.0 means the right edge. |
|
-rely fraction |
Specifies the vertical position of the managed widget as a fraction of the managing widget’s height. The fraction is a floating-point value; 0.0 means the top edge, and 1.0 means the bottom edge. |
|
-x coord |
Specifies the horizontal position of the managed widget’s anchor point in the managing widget. The coord value is specified in screen coordinates. |
|
-y coord |
Specifies the vertical position of the managed widget’s anchor point in the managing widget. The coord value is specified in screen coordinates. |
|
-width size |
Specifies the width of the managed widget |
Binding Actions to Events
When you write a program that has a graphical user interface, various program actions are initiated by events, such as the user clicking a button in the user interface. In a Tk script, you indicate what the program does by associating actions with events. In this case, an action is simply a Tcl script that performs some task. In the case of a Quit button, for example, a logical action is the Tcl command exit, which ends the Tk script.
For buttons, a click of the button is a simple way to form this association. Use the command option of the button command to specify a Tcl command to be executed when the user clicks the button. The exit command is associated with the Quit button as follows:
button .b -text Quit -command { exit }
| Insider Insight |
The curly braces are not necessary when you have only one Tcl command, but you must enclose multiple commands inside braces. |
The bind command is the most common way to associate an action with an event. Following is the general syntax of the bind command:
bind widgetName <eventSpecification> TclCommand
The widgetName argument is usually the pathname of a widget, although you can bind an event to a class of widgets, such as all buttons. Typically, you have to consult online help to specify eventSpecification. (In this section, I show you an example and explain event specifications.) The last argument—TclCommand—refers to the Tcl commands you want to execute when the specified event occurs. These Tcl commands can be any Tcl script, ranging from a simple puts command to a complete Tcl script stored in a separate file.
To see a more detailed example of how to bind an action to an event, consider this scenario. You may have noticed that many Microsoft Windows applications, as well as GNOME and KDE applications, sport a toolbar—essentially, a collection of buttons, each of which is meant to perform a specific task. Typically, each button bears an icon that indicates its purpose. To help users learn the meaning of a button quickly, many Windows applications have a feature called tool help. If you place the mouse pointer on a button, a small window pops up, displaying a short help message that tells you what the button does.
You can use Tk to implement a similar tool-help feature. Follow these steps:
-
Create the button.
-
Prepare the help message as a label (preferably with a bright background, such as yellow).
-
When the mouse pointer enters a button, an Enter event occurs. Bind the Enter event to a command that makes the help label visible. Use the place command to position the label relative to the button, so that the tool help label always appears near the associated button. The following example shows how bind is used to associate the place command (shown within braces) with the Enter event:
bind .f.q <Enter> { place .bh -in .f.q -relx 0.5 -rely 1.0 } -
When the mouse pointer leaves the button, a Leave event occurs. Bind the Leave event to the place forget command to hide the help message, as follows:
bind .f.q <Leave> { place forget .bh }
The following sample toolhelp script demonstrates how to implement tool help in Tk:
#!/usr/bin/wish -f
# Demonstrates a "tool help" window that appears when you
# place the mouse pointer inside the Quit button.

wm geometry . 180x60

frame .f
button .f.b -text File
label .bh -text "Quit program"
.bh config -bg yellow
button .f.q -text Quit -command { exit }

bind .f.q <Enter> { place .bh -in .f.q -relx 0.5 -rely 1.0 }
bind .f.q <Leave> { place forget .bh }


pack .f.b .f.q -side left
pack .f -fill x
Make the toolhelp script file executable by using the chmod +x toolhelp command. Then run that script by typing ./toolhelp at the shell prompt in a terminal window. Figure 25-5 shows the window that results after you place the mouse pointer on the Quit button.
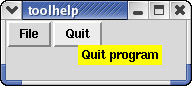
Figure 25-5: A Tk Script That Demonstrates How to Implement toolhelp Messages.
When you use bind to associate a Tcl script with an event, you need to know how to specify the event. Most are either keyboard events or mouse events. A smaller number of events are related to the state of a widget’s window. <Map> and <Unmap> events, for example, occur when a widget is managed or unmanaged (when you use pack forget or place forget).
Understanding Keyboard Events
There are two keyboard events:
-
<KeyPress> occurs when you press a key.
-
<KeyRelease> occurs when you release a key.
You can specify a keyboard event for a specific key by appending that key’s keysym (which is the X Window system’s standard name for a key) to the string KeyPress- and enclosing everything in angle brackets. The event associated with pressing the q key, for example, is specified by <Keypress-q>. Tk provides a shorter format for keyboard events. You can simply place the keysym inside angle brackets, as follows:
<q>
For most key presses, the event specification is straightforward. If you want to exit when the user presses Ctrl-C inside a widget named .text, use the bind command as follows:
bind .text <Control-c> exit
Table 25-10 shows some other commonly used keysyms.
|
Keysym |
Name of Key |
|---|---|
|
BackSpace |
Backspace |
|
comma |
Comma |
|
Down |
Down arrow |
|
dollar |
Dollar sign ($) |
|
Escape |
Escape |
|
exclam |
Exclamation mark |
|
Left |
Left arrow |
|
numbersign |
Number sign (#) |
|
period |
Period |
|
Return |
Enter |
|
Right |
Right arrow |
|
Tab |
Tab |
|
Up |
Up arrow |
Inside the Tcl commands that are bound to a key event, use the %A keyword to refer to the printable character the user presses. For any nonprintable character, %A is replaced by {} (a pair of empty braces). The %W keyword is replaced by the name of the widget that receives the keypress. Thus, you can use the following code to insert text into a text widget named .text1:
# Assume .text1 is a text widget
bind .text1 <KeyPress> {
    if { "%A" != "{}"} { %W insert insert %A}
}
Remember that a widget’s name itself is a command and that the command’s argument depends on the type of widget. For a text widget, the command %W insert insert %A, as shown in the example, inserts the character into the text widget.
Understanding Mouse Events
Use <ButtonPress> and <ButtonRelease> to denote mouse-button click and release events, respectively. You have to append the button number to make the event specific. Thus, clicking the left mouse button (which is button 1 in X terminology) is denoted by <ButtonPress-1>. A shorthand notation for button presses is to omit Press; thus, you can write <Button-1> to denote the event generated by clicking the left mouse button.
In the Tcl commands that are bound to a mouse event, the keywords %x and %y denote the x and y coordinates of the mouse pointer (relative to the widget’s window) at the time of the mouse event. Thus, you can track the position of mouse clicks on a widget .text1 as follows:
bind .text1 <Button-1> { puts "Click at (%x, %y) on widget: %W"}


