Exploring the Start Here Window
Exploring the Start Here Window
Both GNOME and KDE desktops in Red Hat Linux come with a Start Here icon on the desktop that provides access to icons for performing many system- and network-administration tasks, including adding new users. This section provides an overview of some system administration tasks that you can perform through the Start Here window.
To open the Start Here window, double-click the Start Here icon on the GNOME or KDE desktop. This action opens the initial Start Here window, as shown in Figure 12-5.
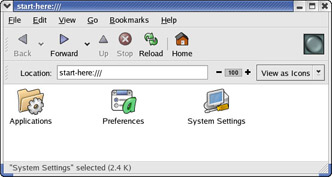
Figure 12-5: The Initial Start Here Window, After You Double-Click the Start Here Icon on the Desktop.
The window shown in Figure 12-5 has three icons. Double-clicking each icon brings up further icons with which you can perform specific tasks from starting applications to configuring various aspects of your Red Hat Linux system. The three icons in Figure 12-5 serve the following purposes:
-
Applications-Brings up icons that provide access to all the applications that are also available through the Main Menu
-
Preferences-Displays icons through which you can configure many aspects of the desktop
-
System Settings-Enables you to perform many system administration tasks through a number of icons
To perform system-administration tasks, double-click the System Settings icon. This action accesses a new set of icons in the System Settings window, as shown in Figure 12-6. The System Settings window is somewhat similar to the Control Panel in Microsoft Windows. You can perform various tasks by double-clicking the icons in the window.
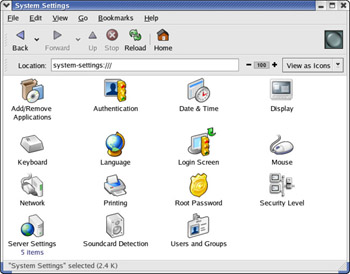
Figure 12-6: System Settings Icons.
The System Settings icons shown in Figure 12-6 enable you to perform the following system-administration tasks through easy-to-use GUIs:
-
Add/Remove Applications-Red Hat's Package Management utility through which you can install or remove package groups (I describe this utility in Chapter 21).
-
Authentication-GUI utility used to configure authentication (similar to what you do during Red Hat Linux installation, described in Chapter 2).
-
Date & Time-A utility that enables you to set the date and time. You can also set the time zone and enable the use of Network Time Protocol (NTP) to automatically get the date and time from an Internet time server (Red Hat provides two such time servers-clock.redhat.com and clock2.redhat.com).
-
Display-The redhat-config-xfree86 GUI tool to configure the display settings (Chapter 3 describes the redhat-config-xfree86 utility).
-
Keyboard-GUI tool to select the keyboard layout suitable for your language (similar to the keyboard configuration that you perform during Red Hat Linux installation, as described in Chapter 2).
-
Language-Tool to select the default language out of the languages that you have installed on your system.
-
Login Screen-GUI tool to configure the GNOME Display Manager (GDM). The tool enables you to set options in the /etc/X11/gdm/gdm.conf file (Chapter 9 describes the GDM configuration options).
-
Mouse-Tool to select your mouse from a list of available mouse types (similar to the mouse configuration screen that you encounter when installing Red Hat Linux, as described in Chapter 2).
-
Network-The Network Configuration tool for configuring, activating, and deactivating network interfaces (described in Chapter 6).
-
Printing-Printer configuration tool for setting up print queues (described in Chapter 4).
-
Root Password-GUI tool to set the root password, similarly to the way you set the root password during Red Hat Linux installation, as described in Chapter 2.
-
Security Level-Tool to configure the security level of the firewall to one of three predefined levels-High, Medium, No Firewall (described in Chapter 22).
-
Server Settings-Opens the Server Settings window with five icons for configuring the Web server, DNS, NFS, and Samba, and turning all services on or off.
-
Soundcard Detection-Tool that detects the sound card and displays the information, but does not provide any way to configure the sound card (described in Chapter 5).
-
Users and Groups-The Red Hat User Manager tool, which enables you to add new users and groups and edit existing user information (as I described in the section 'Managing User Accounts,' earlier in this chapter).
You can explore these tools by double-clicking the icons one at a time. If you're not logged in as root, each utility first prompts you for the root password and then proceeds to display the GUIs through which you can perform a specific set of tasks.
You can access some of these system administration utilities from the GNOME and KDE panels as well. The following section describes a few of these tools.


