Getting Acquainted with the Tablet PC Extras
Getting Acquainted with the Tablet PC Extras
When you are working with Tablet PCs, you’ll find additional accessories on the computer. These accessories include:
-
Input Panel
-
Snipping Tool
-
Sticky Notes
-
Windows Journal
Entering Text Using the Tablet PC Pen
You use Input Panel to enter text using the Tablet PC pen instead of the computer keyboard. Input Panel converts any handwriting you enter using the pen to typed text. Input Panel supports several new features, including AutoComplete, Back-of-Pen erase, and additional scratch-out gestures.
Getting Started with the Tablet PC Input Panel
When you are working with a program that accepts handwriting input from a pen, such as Microsoft Office Word or Windows Mail, the Input Panel icon is displayed next to text entry areas when Input Panel is available, allowing you to display Input Panel by tapping the icon. You can then use the pen to write and insert the converted text by clicking the Insert button. In Input Panel, the Insert button is displayed below and to the right of your converted text.
If it is not already running, you can start Input Panel by clicking Start, pointing to All Programs, and then selecting Input Panel. Input Panel has changed in several ways since it was introduced with Microsoft Windows XP Tablet PC Edition. When you run Input Panel, it appears as a tab on the left side of the screen. To open Input Panel, move the mouse pointer over the tab and then click. Input Panel will then slide out from the edge of the screen.
Clicking the Close button hides Input Panel.
| Tip |
By default, Input Panel floats in the window. You can move Input Panel by dragging it to a desired position or docking it at the top or bottom of the screen. If you then hide Input Panel, it will reappear in the same location the next time you open it. The Input Panel tab remains available even if the program you are using is running in full-screen mode. |
Input Panel provides three input modes:
-
Writing pad Provides a space for continuously writing with the pen as if you were writing on a lined sheet of paper. Each word you write is converted to text separately and displayed. If you click the word, you can correct letter case, change punctuation around the word, modify the letters, or delete letters.
-
Character pad Provides a space for entering single letters, digits, or symbols. Each character you write is converted to text separately. Clicking below a character displays an options menu with a list of related characters, such as those that are alternatives to the character you’ve entered or frequently confused with the character you’ve entered.
-
On-screen keyboard Provides an on-screen keyboard that allows you to use pen taps to select characters to use.
Figure 7-10 shows Input Panel in writing pad mode. The buttons on the right provide quick access to common functions. You can:
-
Click Num to display the number pad, which contains the digits 0 through 9 and arithmetic symbols.
-
Click Sym to display the symbols pad, which contains options for the most commonly used characters.
-
Click Web to display the Web pad, which contains character shortcut options for entering URLs.

Figure 7-10: Using Input Panel in writing pad mode
Using AutoComplete, Back-Of-Pen Erase, and Scratch-Out Gestures
AutoComplete works much like AutoComplete in other Microsoft programs. As you enter text, AutoComplete lists possible matches based on items that you’ve entered before. If an item in the list matches the text that you want to enter, simply tap the suggestion to enter it in the text entry area.
| Tip |
If you don’t want to use AutoComplete, you can disable it in the Options dialog box. In Input Panel, click Tools, and then click Options. On the Settings tab, clear the Suggest Matches In Input Panel When Possible check box, and then click OK. |
The Back-Of-Pen Erase feature allows Input Panel to support Tablet PC pens that have erasers. If the Tablet PC pen has an erase function, you can use it to delete entries from Input Panel. Another way to delete entries is to use Scratch-Out Gestures. As in Windows XP, the Windows Vista Input Panel supports the Z-shaped scratch-out gesture. If you draw a Z over an entry or a series of entries, the entry or entries are deleted.
Windows Vista allows you to use several additional scratch-out gestures. These additional scratch-out gestures are:
-
Strikethrough scratch-out If you draw a horizontal line across an entry or a series of entries, the entry or entries are deleted. The horizontal line can be drawn right to left or left to right.
-
Angled scratch-out If you draw a line at an angle across an entry or a series of entries, the entry or entries are deleted. The line can be drawn at an angle from the upper right to the lower left or from the upper left to the lower right.
-
Vertical scratch-out If you draw an M or a W over an entry or a series of entries, the entry or entries are deleted. The M or W should be larger than the entries you are deleting.
-
Circular scratch-out If you draw a circle over an entry or a series of entries, the entry or entries are deleted. The circle can be drawn around or within the entries.
Tip If you’d rather use only the Z-shaped scratch out, you can disable the other types of scratch-out gestures by using the Options dialog box. In Input Panel, click Tools, and then click Options. On the Gestures tab, select the Only The Z-Shaped Scratch-Out Gesture option, and then click OK.
Capturing Screen Snips
You use Snipping Tool to capture and mark up snippets of documents. Snipping Tool is designed to work with the Table PC pen and includes pen selection, highlighter, and eraser features. Snipping Tool captures any screen elements that you select, including text and images. A captured element is referred to as a snip.
You can open Snipping Tool by clicking Start, pointing to All Programs, and then selecting Snipping Tool. Snipping Tool has two modes:
-
New Snip mode for capturing snips
-
Edit mode for working with snips
Using the Snipping Tool New Snip Mode
Snipping Tool starts in New Snip mode, which is the mode for capturing a snip. In the main snipping window, you can start a capture by clicking the New Snip button on the toolbar. In New Snip mode, the snipping window is displayed in the foreground, and the rest of the screen is brightened automatically to make it easier to distinguish the Snipping Tool interface elements from the background elements you are capturing.
Figure 7-11 shows Snipping Tool in New Snip mode. From left to right, the buttons on the toolbar are used as follows:
-
New starts a new capture using the current capture mode.
-
Capture mode (the options button to the right of the New button) sets the capture mode.
-
Stop cancels the current capture.
-
Options sets capture options.
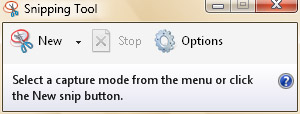
Figure 7-11: Using Snipping Tool in New Snip mode
Snipping Tool has four capture modes:
-
Free Form Snip With freeform snip mode, you outline the area that you want to snip by drawing freehand around it. To capture a snip in this mode, click and then drag to outline the area you want to capture.
-
Rectangular Snip With rectangular snip mode, you outline the area that you want to snip by drawing a rectangle around it. To capture a snip in this mode, click and then drag around the area that you want to capture.
-
Window Snip With window snip mode, you capture an entire window as a snip. To capture a snip in this mode, move the mouse pointer over the window that you want to capture, and then click.
-
Full-Screen Snip With full-screen snip mode, you capture the full screen as a snip. The full screen is captured automatically after you select this mode.
The default capture mode is rectangular. To change the capture mode, click the Capture Mode button, and then select a new capture mode. You then click the New button to start the capture.
Snipping Tool is a great general-purpose screen capture utility. By default, snips are captured using a single-file Hypertext Markup Language (HTML) format that can recognize separate text and image components. You can also capture snips as JPEG, PNG, or GIF image files so that the entire snip is handled as a single picture. To change the capture mode, click Tools, click Options, and then use the Capture Snip As list to select the desired capture type. Regardless of the capture type, you can save the snip in HTML format or as a JPEG, PNG, or GIF image file.
By default, any snips you capture have a thick red selection line around them. This is meant to help you easily distinguish snips from other content if you later add the snips to other documents. Using Snipping Tool options, you can change the color of the line or clear the option altogether so that a selection line is not displayed around snips. To clear the selection line, click Tools, click Options, and then clear the Show Selection Line After Capturing Snips check box.
William Stanek
Author, MVP, and series editor for the Microsoft Press Administrator’s Pocket Consultants
Using the Snipping Tool Edit Mode
After you’ve captured a snip, the Snipping Tool window changes to Edit mode. In this mode, you can mark up a snip by using the pen and also add highlights by using the highlighter. Figure 7-12 shows Snipping Tool in Edit mode. From left to right, the buttons on the toolbar are used as follows:
-
New Snip switches to New Snip mode (and discards the current snip).
Caution If you click New Snip before saving a snip, the current snip is lost.
-
Save As allows you to save the current snip as a single-file HTML document or as a JPEG, PNG, or GIF image.
-
Copy copies the snip to the Windows Clipboard.
-
Send Snip allows you to send the snip to someone in an e-mail message. Click the Options button to see additional send options, such as Send To E-Mail Recipient (As Attachment).
-
Pen allows you to select the pen color. The default pen color is blue. To change the ink thickness, change the pen tip type, or select a custom color, click the Customize option.
-
Highlighter allows you to highlight areas of the snippet.
-
Eraser allows you to erase pen ink and highlights.

Figure 7-12: Using Snipping Tool in Edit mode
Creating Sticky Notes
The Sticky Notes accessory gives you a virtual scratch pad. You can use Sticky Notes to record both written and voice memos. Any sticky notes you create remain in the stack of sticky notes until you delete them.
To open Sticky Notes, click Start, point to All Programs, and then select Sticky Notes. As shown in Figure 7-13, Sticky Notes gives you a virtual work pad on which you can write notes using the pen. To add to the current work pad, simply use the pen to write the text of the note or click the Record button to record a voice note.

Figure 7-13: Using Sticky Notes
You can create a new note by clicking the New Note button. As you add notes, your stack of sticky notes grows. You can navigate the stack by using the Previous Note and Next Note buttons on the toolbar. The X/Y value on the toolbar shows you which note you are currently viewing and the total number of notes in the stack. In Figure 7-13, note 2 of 3 is displayed. If you no longer want a sticky note, click the Delete This Note button (the red X) on the toolbar, and then confirm the action by clicking Yes.
You can erase notes by moving the pen from side to side several times over the entries that you want to erase without lifting the pen. When you lift the pen, the entries are removed.
| Tip |
If you use sticky notes regularly, you might want the Sticky Notes accessory to run automatically each time you start Windows Vista and log on. To configure Sticky Notes for automatic startup, click Tools, click Options, and then select Open At Startup. |
Using Windows Journal
While Sticky Notes is useful for creating short notes or memos, you’ll want to use Windows Journal for longer writing samples, such as reports, agendas, or meeting notes. Windows Journal gives you a virtual journal that you can use with the Tablet PC pen in much the same way you would use a stationery pad and an ink pen.
Getting Started with Windows Journal
You can open Windows Journal by clicking Start, pointing to All Programs, and then selecting Windows Journal. As shown in Figure 7-14, the Windows Journal main window looks like a notepad with lined paper, and you can use the Tablet PC pen to write your notes directly on the paper.

Figure 7-14: Using Windows Journal
Using Windows Journal is similar to using Sticky Notes. Your virtual journal can have a stack of pages just like a real journal. When a journal has multiple pages, you can navigate pages by clicking and dragging the scroll bar. Beneath the scroll bar are several buttons:
-
Previous Goes to the previous page. You can display the previous page by clicking the Previous button or by pressing Page Up on the keyboard. If you’re on the first page of the journal, this button is dimmed.
-
Next Goes to the next page. You can display the next page by clicking the Next button or by pressing Page Down on the keyboard. If you’re on the last page of the journal, this button is replaced by the New Page button.
-
New Page Creates a new page. You can add a new page to the end of the journal by clicking the New Page button. This button is available only if you’re on the last page of the journal and you’ve written on the page.
When working with Windows Journal, you might also want to insert a page before the current page. You can insert a page by clicking New Page on the Insert menu.
Setting the Stationery Style
Windows Journal uses a college-ruled notepad as the default stationery style. You can easily change to narrow-ruled, wide-ruled, standard-ruled, or other stationery as well. To do this, follow these steps:
-
In Windows Journal, click Options on the Tools menu.
-
On the Stationery panel, make sure that the Stationery option is selected, and then click Default Page Setup.
-
In the Default Page Setup dialog box, click the Style tab.
-
Use the Line Style list to choose the style to use. Options include Standard Ruled, Narrow Ruled, Wide Ruled, Large Grid, Small Grid, and Blank.
-
Click OK twice.
Copying Handwriting and Replacing Text
With a few simple taps of the pen, you can convert handwriting to text, edit converted text, and copy converted text to the Clipboard. This allows you to use handwriting entered into Windows Journal as text in other programs.
To copy handwriting as text and edit it, follow these steps:
-
Press and hold the pen to the screen.
-
Drag the pen around the handwriting you want to select.
-
When you release the pen, a shortcut menu is displayed. Select Copy As Text to display the Copy As Text dialog box, as shown in Figure 7-15. Windows Journal converts the handwriting to text automatically.
-
Tap a word or character that you want to correct.
-
Choose a replacement from the Alternative list.
-
Click Copy to copy the text to the Clipboard.

Figure 7-15: Copying handwriting as text


