Introducing the New and Enhanced Windows Vista ManagementTools
Introducing the New and Enhanced Windows Vista Management Tools
Windows Vista includes new and updated tools that make it easier for you to maintain and manage computers throughout the enterprise. This section provides an introduction to key tools, including the following:
-
Event Viewer
-
Task Scheduler
-
Performance rating and monitoring
-
The Previous Versions feature
-
Backup
Introducing Event Viewer: What’s Changed
The event logs are used to track informational, warning, and error messages generated by applications, services, and system components. Earlier versions of Windows store most events in one of three event logs:
-
Application
-
Security
-
System
You access the event logs by using Event Viewer; the event logs themselves are written using the Event Viewer (.evt) file format. If you search through the logs, you can identify many types of problems or potential problems that need your attention. Unfortunately, however, many applications, services, and system components have their own logs. Typically these logs are stored in separate folders and aren’t always accessible or in a readable format, which makes it difficult to diagnose and resolve problems.
Windows Vista seeks to resolve problems with logging by requiring all applications, services, and components to use centralized logging and the native Windows Vista event log (.elf) file format. The version of Event Viewer included in Windows Vista supports both .elf and .evt files. As Figure 14-11 shows, centralized logging in Windows Vista is very different from the way logging is handled in earlier versions of Windows.
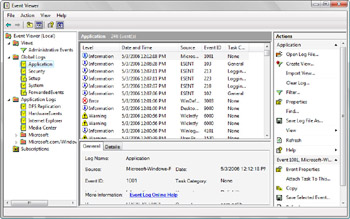
Figure 14-11: The Event Viewer
The best way to master the new Event Viewer is to consider the way logs and events are organized. You have:
-
Individual logs Logs for individual applications, services, and system components, referred to as application logs, are listed under the Application Logs node by type and vendor. For example, you’ll find individual application logs for Internet Explorer and HardwareEvents. If you expand the Application Logs, Microsoft, and Windows nodes, you’ll find application logs for every installed service and system component that creates its own event log.
-
Global logs Global logs are system-wide logs. You’ll find the Application log, a systemwide log for events logged by applications installed on the system; the Security log, a systemwide log for security-related events, such as those related to user rights assignment or logon; and the System log, a system-wide log for events logged by the operating system and its components.
-
Cross-log views Cross-log views, as the name implies, provide a view across multiple logs. Event Viewer can run queries that search across multiple logs simultaneously. The results of these cross-log queries can be stored with custom views, which you can define to display events that match specific criteria from selected log files. The Administrative Events view is provided by default to help administrators find warning and error events in the global logs.
When you want to search across all logs on a computer, you’ll use cross-log views. You can create a cross-log view by following these steps:
-
Open Event Viewer by clicking Event Viewer on the Administrative Tools menu or typing wevtvwr.msc in a Command Prompt window.
-
Right-click the Views node, and then select Create View to display the Create View dialog box, shown in Figure 14-12.
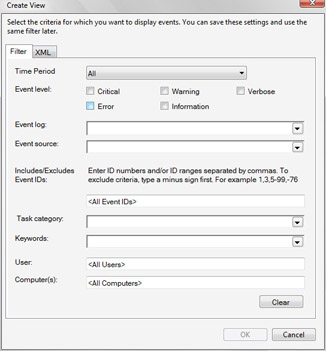
Figure 14-12: Creating a cross-log view -
Use the Time Period list to select the time period you want to work with when using the view. For example, if you want to the view to always display events for the last 24 hours, select Last 24 Hours as the time period.
-
Use the Event Level check boxes to specify the types of events to search for.
-
Click the Event Log list to display an options entry. Expand the Global Logs and Application Logs nodes, and then specify the event logs that you want to search across. Multiple event logs can be selected by using the check boxes provided.
-
If you are looking for events generated by a specific event source, such as Software Installation or Software Licensing Service, use the Event Source list to specify the event sources to use as part of the search criteria.
-
Provide event task, keyword, user, and event ID details as necessary.
-
If you are looking for events that occurred on a specific date or a range of dates, use the From and To options to set the event dates to use as part of the search criteria.
-
Click OK. Type a name for the view, and then click OK again to begin the search and create the cross-log view, which is accessible under the Views node in Event Viewer.
Introducing Task Scheduler: What’s Changed
For automation, Windows Vista includes the new Task Scheduler service. Similar to the Scheduled Task service in Windows XP, the Task Scheduler service allows you schedule tasks to occur at specific times and on specific dates. You can configure recurring tasks, such as daily, weekly, or monthly tasks. For example, you could schedule Disk Cleanup to occur once on Monday at 3:00 P.M. or every Monday at 3:00 P.M. That’s about where the similarities end, however, because the Windows Vista Task Scheduler is much smarter than its predecessors.
Not only can you specify whether the task should run when a user is logged on, but you can also start tasks immediately at startup, logon, or both (according to task configuration) if a scheduled run of a task was missed. If a task fails, you can configure Task Scheduler so that it attempts to restart the task automatically. For example, you could configure an automatic restart to occur once every two hours until the task runs successfully. In addition to standard power management features that control whether a task runs when a computer is running on battery, you can also configure whether a task should start only if a network connection is available. Task Scheduler can also wake a computer to run a task and allow it to return to sleep when the task is complete, saving energy while still ensuring that critical tasks run on time.
Figure 14-13 shows the Task Scheduler window. You can access Task Scheduler by clicking Task Scheduler on the Administrator Tools menu. To improve the security of scheduled tasks, each task runs in a separate user session that is based on the user credentials provided when the task was created.
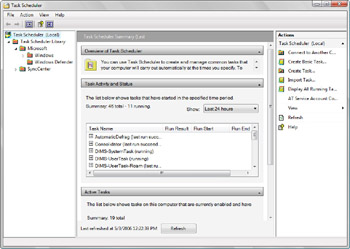
Figure 14-13: Using Task Scheduler
Windows Vista introduces the following concepts:
-
Hidden tasks
-
Triggers
-
Actions
Most tasks run by the operating system to perform automated maintenance and support are configured as hidden tasks. When you are working with Task Scheduler, you can view hidden tasks by selecting Show Hidden Tasks on the View menu. When you are creating tasks, you can designate them as hidden as well. Because tasks in Windows Vista cannot be directly copied to or used by earlier versions of Windows, you have the option of specifying that a task should be configured for Windows Server 2003, Windows XP, or Windows 2000 when creating a new task. In this way, the task is created so that it is compatible with earlier version of Windows, and you can then copy the task to other computers without worrying about compatibility issues.
You can create a new task by selecting the Task Scheduler node and clicking the Create Task option in the Actions pane. The Create New Task dialog box, shown in Figure 14-14 has five tabs:
-
General Use the options on this tab to set the name and description of the task, specify the user account under which the task runs, specify whether the task should be hidden, and specify whether the task should be configured for Windows Vista or for earlier versions of Windows.
-
Triggers Use the options on this tab to create and manage triggers that are associated with a task. On the Triggers tab, you click the New button to create a new trigger.
-
Actions Use the options on this tab to create and manage actions that are associated with a task. On the Actions tab, you click the New button to create a new action.
-
Conditions Use the options on this tab to specify the conditions under which the task should run.
-
Settings use the options on this tab to specify additional options that affect the behavior of the task.

Figure 14-14: Creating a new taskNote All tasks can have triggers and actions associated with them.
As Figure 14-15 shows, triggers allow you to specify the circumstances under which a task begins and ends. You can begin a task in one of the following ways:
-
On a schedule
-
At logon
-
At startup
-
On idle
-
On an event
-
On registration
-
On Terminal Server session connect
-
On Terminal Server session disconnect
-
On workstation lock
-
On workstation unlock
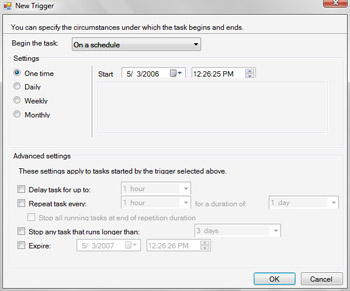
Figure 14-15: Using triggers with scheduled tasks
You can specify multiple triggers as well. Being able to trigger a scheduled task when a specific event occurs is extremely powerful. It allows you to gracefully handle errors and to resolve warning states before bigger problems occur. In this way, you can proactively maintain computers in your organization.
As Figure 14-16 shows, actions allow you to start programs, send e-mail messages, and show messages when a scheduled task runs. You can specify multiple actions if necessary.
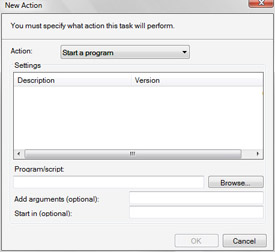
Figure 14-16: Associating actions with scheduled tasks
Introducing Performance Rating and Monitoring: What’s New and What’s Changed
Built-in performance diagnostics make monitoring performance in Windows Vista very different from monitoring performance in earlier versions of Windows. First of all, Windows Vista monitors performance automatically and adjusts system settings as necessary to improve performance. Often, but not always, Windows Vista prompts the user before adjusting computer settings.
Windows Vista tracks performance by assigning a performance rating to a computer. A performance rating is a measure of the computer’s overall capability in terms of the following:
-
Processor speed
-
Total physical memory
-
Free hard disk space
-
Graphics processor
-
Graphics memory
When you first install a computer, it will not have a performance rating, and you might be able to improve performance by allowing Windows Vista to assign a performance rating. To assign a performance rating to a computer or to refresh a computer’s rating, follow these steps:
-
Click Start, and then click Control Panel.
-
In Control Panel, click System And Maintenance.
-
On the System And Maintenance page, click Performance Ratings And Tools.
-
On the Performance Ratings And Tools page, click Rate This Computer or Refresh My Rating Now as appropriate for the state of the computer.
-
A higher rating usually means that the computer will perform better and faster than a computer with a lower rating. You can learn more about what a rating means by clicking What Does This Number Mean.
Once you’ve allowed Windows Vista to assign a performance rating to a computer, Windows Vista can do a better job of tracking performance issues. Over time, a list of issues affecting performance will be listed under the Performance Issues heading, as shown in Figure 14-17. Click an issue to see details about addressing the problem.
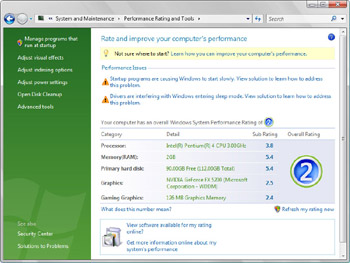
Figure 14-17: Viewing a computer’s performance details and rating
Because of the built-in diagnostics capabilities, performance monitoring is very different in Windows Vista. For starters, the Performance console has been completely redesigned and renamed the Windows Performance Diagnostic console. You can open the Windows Performance Diagnostic console by clicking Performance on the Administrative Tools menu.
The standard Performance console features provided in earlier versions of Windows can be accessed by clicking the Performance Monitor node, as shown in Figure 14-18. Windows Vista enhances the standard features by providing an expanded set of objects and counters for improved performance tracking.
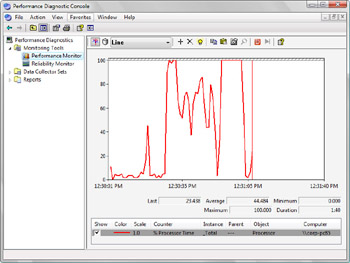
Figure 14-18: Using the Windows Performance Diagnostic console
Windows Vista also introduces Data Collector Sets and Reports. Data Collector Sets allow you to specify sets of performance objects and counters that you want to track. Once you’ve created a Data Collector Set, you can easily start or stop monitoring of the performance objects and counters included in the set. In a way, this makes Data Collector Sets similar to performance logs. However, Data Collector Sets are much more sophisticated. A single data set can be used to generate multiple performance counters and trace logs. You can also:
-
Associate multiple run schedules and stop conditions for monitoring.
-
Assign access controls to manage who can access collected data.
-
Use data managers to control the size of collected data and reporting.
-
Generate reports based on collected data.
The Windows Performance Diagnostic console also includes Reliability Monitor, shown in Figure 14-19. Reliability Monitor tracks changes to the system and compares them to changes in system stability. In this way, you can see a graphical representation of the relationship between changes in the system configuration and changes in system stability. By recording software installation, software removal, application failure, driver failure, and hardware failure as well as key events regarding the configuration of a system, you can see a timeline of changes in both the system and its reliability and then use this information to pinpoint changes that are causing problems with stability. For example, if you see a sudden drop in stability, you can click a data point and then expand the related data set, such as Application Failure, to find the specific event that caused the drop in stability.

Figure 14-19: Using Reliability Monitor
Introducing the Previous Versions Feature
Previous Versions allows you to restore files that have been inadvertently changed or deleted. You can:
-
Make a copy of a previous version.
-
Revert a file or folder to any previous version.
-
Restore a previous version from a backup (made by using the Backup utility).
With the Previous Versions feature, Windows Vista brings the Shadow Copy feature provided in Microsoft Windows Server 2003 to the client. Computers running Windows Vista automatically make daily copies of files and folders that have changed. You can also create copies of files that have changed by setting a system protection point on the System Protection tab in the System utility. A system protection point is a point-in-time backup that includes any files and folders that have changed.
Although protection points are created daily, only those versions of files that are actually different from the current version are stored as previous versions. Previous Versions is automatically enabled in Windows Vista. You can enable or disable the feature for each available volume by using the System Protection tab in the System Properties dialog box. Because Previous Versions uses the protection points stored on the local computer, it does not require a server to act as a repository for the shadow copies, and administrators are no longer required to manage the Previous Versions configuration.
To view or change the protection settings, click Start, right-click Computer, and then click Properties. In the System window, click System Protection to open the System Properties dialog box. You can then use the options on the System Protection tab, shown in Figure 14-20, to configure how protection points are created and used. If you want protection points to be created for a disk, select the check box for that disk under Available Disks. If you don’t want protection points to be created for a disk, clear the check box for that disk under Available Disks.
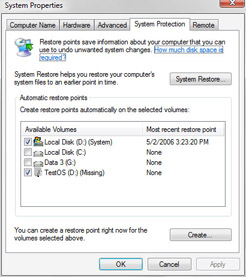
Figure 14-20: Working with System Protection
When you right-click a file or folder for which previous versions are available and then select Properties, you see a Previous Versions tab. If you select this tab, you should see previous versions of the file or folder. You can then use:
-
Open to open any of the previous versions.
-
Copy to create a copy of a previous version.
-
Restore to revert the file or folder to a selected previous version.
Backing Up and Recovering Windows Vista: What’s New and What’s Changed
Windows Vista includes Previous Versions, Protection Points, and System Restore as part of its comprehensive data protection feature set. Previous Versions and Protection Points work as discussed in the preceding section. System Restore is the system component that creates Protection Points. In addition to being used to create previous versions of files and folders, Protection Points are also used to store the information needed to recover a system to the state it was in prior to a configuration change or an application installation.
| Note |
System Restore doesn’t affect any documents, pictures, or other personal data. It affects only the system configuration. |
You can work with System Restore in Windows Vista in much the same way as you work with System Restore in Windows XP. If you want to create a protection point prior to installing an application or making a system configuration change, you can do so by following these steps:
-
Click Start, right-click Computer, and then click Properties.
-
In the left pane of the System window, click System Protection.
-
In the System Properties dialog box, click Create on the System Protection tab.
-
Type a descriptive name for the protection point.
-
Click Create.
To restore a computer to a previous protection point, you use the System Restore utility. You can run this utility by clicking Start, pointing to All Programs, Accessories, System Tools, and then clicking System Restore. The System Restore Wizard starts. Follow the instructions on the subsequent pages, and then click Finish to restore your computer’s system to the protection point you selected.
System Restore doesn’t create a full backup of a computer and all its data. To create a full backup of a computer, you must use Windows Backup, shown in Figure 14-21. This utility is an enhanced version of the Backup utility included in earlier versions of Windows. You can run this utility by clicking Start, pointing to All Programs, Accessories, System Tools, and then clicking Backup.
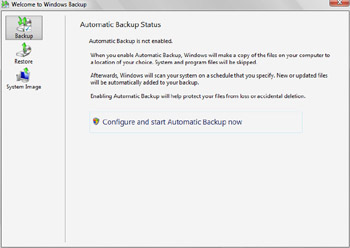
Figure 14-21: Using Windows Backup
Windows Backup is designed to help you automate the backup process. If you enable automatic backups, you can identify the disks, folders, and files you want to back up regularly and then set a schedule for backing up these items to the media you’ve selected. Windows Backup supports writing to local disks, shared network folders, CD media, and DVD media.
Using Windows Backup, you can restore files using a basic or an advanced restore operation. A basic restore allows you to recover accidentally deleted files or folders. It also allows you to restore all files and folders. An advanced restore allows you to load a backup from another computer and restore files with administrator privilege.
For creating backups of an entire computer, Windows Backup includes System Image. A System Image backup contains everything needed to completely restore a computer. If the computer you’ve imaged is damaged or stolen, you can restore the computer from an image by using the System Recovery Troubleshooter. Similar to the Startup Repair Tool discussed previously under “Recovering Automatically from Failure,” System Recovery Troubleshooter is available as a recovery option when you are attempting to recover a computer.


