Assessing the Site: The Code
In this task, you won't make any changes to the files; rather, you'll customize the Dreamweaver environment to make it more friendly to the kind of work we'll be doing, and then you'll explore the code in the index page of the start files so you can learn about its shortcomings.
These shortcomings will not show up at all if you view the page in a browser. That is, the page should look just fine in most major browsers. If the page looks fine in a browser, you might wonder, how could the code have any shortcomings? The answer is that the starting code in this project is outdated and noncompliant with recent standards. We'll explore the significance of code and standards at the end of this task.
Often a Web redesign project will begin with outdated, non-compliant code, so you might as well learn how to spot it. Later, you'll learn how to fix it.
Double-click index.htm to open it.
Unless you have already customized the Dreamweaver environment, the page opens in design view, as shown in the accompanying screenshot.

Back in the late 1990s, when the HTML editor market was crowded with editors that either did code well and design badly, or vice versa, the introduction of Dreamweaver, which excelled at both, caused a revolution. Several years later, Dreamweaver remains the only editor in its league when it comes to doing both design and code. Many designers, knowing that Dreamweaver was writing clean HTML in the background, were content to design sites in design view and never worry too much about the code.
But working exclusively in design view is a luxury of the past.
If you are serious about Web development, and need to develop database-driven Web content, you have to get involved with the code. Moreover, if you want to upgrade older HTML code to standards-compliant XHTML code, you need to roll up your sleeves and do some hand-coding.
Click the Show Code and Design Views button.
Code and design view, commonly (and hereafter) referred to as "split view," is a best-of-both-worlds feature. It gives you access to the code, so you can hand-edit code when necessary, even while it leaves the traditional design view open, which makes some kinds of edits, such as edits to body text, much easier than working in code view.
Split view is indispensable for working with dynamic sites. While Dreamweaver enables you to accomplish many tasks using wizard-based server behaviors and its built-in visual SQL builder, you still need to edit code directly. You'll also find that some edits are much faster in code view than they are in design view. Yet another benefit is that it will teach you code. While I assume if you are reading this book, you are familiar with HTML, you may have forgotten some of the details; for example, you might not remember all of the attributes of a given tag. Split view will help you master HTML. From now on (and for all your future projects), make split view your default view. You should avoid using either the code view or the design view alone unless you have a specific reason to do so. And when you are done, switch back to split view.
All of the problems specified in the subsequent steps in this task are revealed only in code viewthey are all invisible in design view. Split view is already paying dividends.
TIP
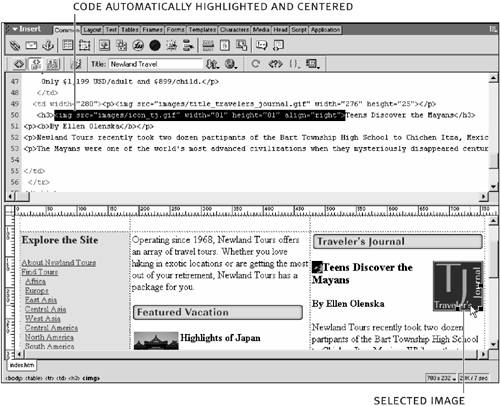
Another benefit of working in split view is that you can easily find a piece of code in code view by clicking its corresponding object in design view. For example, to see the code for a given image, click the image. All of the relevant HTML will be centered in the window and highlighted in code view. This is especially helpful in pages with hundreds of lines of code.
If necessary, turn on line numbering in code view by choosing View > Code View Options > Line Numbers.
This setting displays line numbering beside the code in the code section of your screen. Line numbering makes it easier to communicate about portions of code to others. (I'll make use of line numbering quite often in this book.) It also makes troubleshooting much easier, because when they encounter problems, ASP and ColdFusion send back error messages that specify the line number of the code that caused the problem.
Determine which version of HTML the document currently uses (scroll to line 1).
This task is difficult in design view, but split view shows right away that the document's code is HTML 4.01 transitional. How do we know that? It says so in the DOCTYPE declaration, in line 1. This declaration tells the browser which version of HTML the document uses, so the browser can render it properly. All well-formed HTML documents should have a DOCTYPE declaration.
HTML 4.01 transitional is now an outdated version of HTML. It still renders as well as ever in every major browser. But it has been replaced with XHTML, and future browsers may not support it. In Lesson 2, you'll upgrade the site to XHTML.
Upgrading to XHTML means more than changing the DOCTYPE declaration, of course. XHTML is a major revision of HTML, and several coding practices have been changed. One such change, for example, is that all elements must be closed. In HTML 4 and earlier, empty elements were acceptable. Empty elements have no closing tags; or they have nothing between opening and closing tags. Examples of empty tags include <br>, <hr>, <input>, and <img>. In XHTML, all tags must be closed. To accomplish this with empty tags, just add a space and a forward slash (/) before the closing angled bracket, so <br> becomes <br />, and <img src="picture.jpg"> becomes <img src="picture.jpg" />. If you take a look at the end of line 32, you'll see a <br> tag. It is one of hundreds of empty elements in the site. We'll deal with them later.
Check for compliance with accepted accessibility practices (scroll to lines 11 and 12).
For years, many Web developers neglected the needs of those with impairments that interfere with their ability to use sites. For example, users with visual impairments that prevent them from seeing the site had no way to access the site's content. Given that much of a site's content is text, a special kind of browser, called a screen reader, was developed that reads Web page content aloud. One problem with these readers, though, is that they have no way to articulate visual content, such as graphics. If these graphics communicate any important information about the siteand most graphics dothen users accessing sites with these browsers were not accessing that content.
A simple way to enable screen readers to articulate all of the information that your page communicates is to add a text string to describe the contents of the image. If you put in a description of each image, including both graphics of substance (such as a diagram) and those used for mere decoration or even spacing, then users will never have to wonder what they're missing.
You can accomplish this in code by adding an attribute to each image element that associates a text string with that image. The attribute in question is alt. To use it, you'd add alt="A description of the image" to each <img> tag in the document. The screen reader reads the alt description aloud and the user has access to the content.
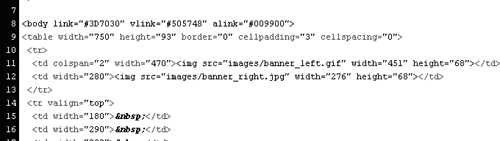
When you scroll down to lines 11 and 12 of the current document, you'll see two images in the first row of the table. These images are the Newland Tours banner and a single graphic holding the three photos (the beach, forest, and mosque). As you can see, they lack alt attributes, which means these images are inaccessible to users accessing the page with screen readers.
NOTE
Adding the alt attribute to images is not the only accessibility concern. For example, to make pages accessible, you might add shortcuts at the top of the page that enable users to skip over navigation bars to the page content. Another code feature that undermines accessibility is the abuse of HTML tables. While there is nothing intrinsically inaccessible about HTML tables, their overuse breaks up content and may make it hard for a screen reader to present your page's content in a logical sequence.
The overriding goal of accessibility is to ensure that all users have equivalent access to all of your content. An extended discussion of accessibility is beyond the scope of this book, but you can learn more about it at Macromedia's Web site: www.macromedia.com/macromedia/accessibility/.
Check for obsolete and deprecated HTML code (scroll to line 21).
In line 21 of the code, you see:
<p><b><font color="#505748" size="4">Explore the Site</font></b></p>While this line of code is rendered just fine in Dreamweaver and in a browser, the code is dated and problematic.
As we'll discuss in more detail later, one of the goals of recent versions of HTML has been to separate HTML markup from the details of presentation. In other words, HTML markup should describe the structure and content of the document, but it should not attempt to describe how the content should be presented. Two tags in the line of code above are deprecated for this reason. (The term "deprecated" refers to a technique or code structure that has been removed from the standard but which is stillalbeit temporarilysupported.)
The <b> tag, which stands for bold, is a presentation tag. For users with screen readers, bold may not mean anything. Sometimes when we put something in bold we are trying to communicate that the content is somehow stronger or more emphatic than regular text. In this case, though, "Explore the Site" is not emphatic at all; it's simply a section title. Use of the <b> tag makes it unclear whether something is emphatic or just needs to stand out.
The other bad tag in the snippet is the <font> tag. This tag was used in HTML 3 and earlier to enable HTML developers to specify how their documents should appear. It has since been replaced with the much more powerful and efficient cascading style sheet. The <font> tags create significant problems for developers, because they are attached to single blocks of text. Imagine, for example, that you use the <font> tag to specify how to present all of your level 2 headings throughout the site. To do so, you'd have to add this tag to every instance of a level 2 heading. If you make a mistake, your site is no longer consistent. Worse, if you do a site redesign, you have to manually change every single instance of that tag. Every <font> tag in the site needs to be removed, and, now that you know it's a problem, you can do so.
To summarize what we've found here, the code is old and no longer compliant with current standards. It is not XHTML (we saw that in the DOCTYPE declaration). Its empty tags are not closed. The images don't have alt attributes. The code is loaded with presentation tags, such as <b> and <font>, that need to be replaced. These are not all of the problems in the code, but it is a good enough sampling to give you an idea of what you are up against.
Now, you might be asking, "It all looks fine in a browser, so why bother? It seems like such a headache to fixcan't we just ignore it and move onto the dynamic stuff?" There are several answers to this question.
Just because it renders fine in Netscape and Internet Explorer today, doesn't mean it will appear well in the future. If your code breaks when the next version of Internet Explorer comes out, your client won't be impressed with your work.
In fact, the code doesn't render in all current browsers now. You have to think of screen readers, in which, as you have already seen, all of the images are inaccessible.
In addition, emerging technologies, such as XSLT (eXtensible Stylesheet Language Transformations), require XHTML compliance to function. XSLT is not a part of this book, nor is it likely to be implemented in a site such as this at the time of this writing, but it may be in the future.
Taking the easy route now could create massive headaches later. Newland Tours is a small site at the momentfive HTML pages. Before beginning its overhaul, it's best to whip it into shape while it's still easy to do so.


