Dynamically Populated Drop-Down Menus
As you'll recall from Lesson 7, when the user submits the form on tourprice.asp, three pieces of data are sent: number of adults, number of children, and a dummy value for the cost of the tour. The ASP or ColdFusion script on tourprice_processor then multiplies the number of adults by the dummy tour price and multiplies the number of children by the dummy tour price, adds the two results together, and outputs the number in HTML.
To replace the dummy values with real data takes a little work. To begin, you need to populate the drop-down menu in the form with real data. As you know, the drop-down menu can send only one piece of data, but you need to access two: the price for adults and the price for children. Therefore, rather than sending a dollar value, you'll send a unique identifier for the tour. On tourprice_processor.asp, you'll use that unique identifier to query the database for the adult price and child price for just that tour. You'll insert these values into the calculation, outputting the correct final value.
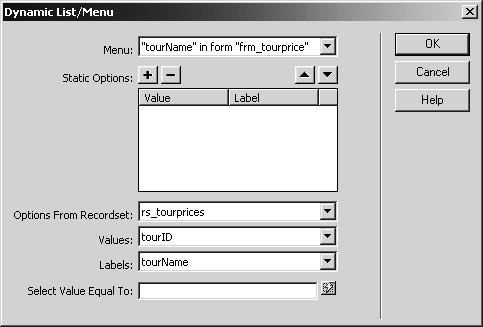
Now let's look more closely at the form menu element. As you know, each entry in a form menu has two attributes that need to be set: the label (the part users read, which is not submitted with the form), and the data (the information that is submitted as the value of the form element). It's easy enough to guess what the label should be: the tour name itself. Since there's a field in the database corresponding to the tour name, this should be easily retrieved. Now, how about the data? I said earlier that the data value that needs to be sent with the form should be the "unique identifier" for the tour. If you thought about tbl_tours' primary key when you read that, then you are thinking the right way. Remember, every database table has (or should have) a primary key, which contains a unique value for each row in that field (often this key is simply autonumbered). To summarize, each menu item's label will be the tour name, and its data value will be its primary key (tourID), both of which are stored in the tbl_tours table.
Open tourprice.asp. Click the New Binding (+) button in the Bindings panel, and choose Recordset (Query) from the list.
Before you can configure the menu you need to create the recordset that will make that data available so you can bind it to the form. Whenever you are working with database data, the first thing you have to do is create a recordset.

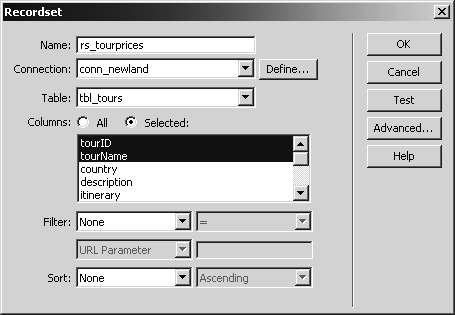
In the Recordset dialog, enter rs_tourprices as the Name. Select conn_newland as the Connection. Select tbl_tours from Table. In the Columns section, select Selected, and Ctrl-select (Windows) or Command-select (Macintosh) tourID and tourName.
NOTE
ColdFusion users who named their DSN newland, rather than conn_newland, should select newland in the Connection field.
Up to this point in the dialog, you have specified most of the information you'll need to populate the menu. You are creating a script that creates a recordset called rs_newland, which contains data obtained by going through conn_newland to find the appropriate database, and then finding the tbl_tours table, and retrieving all of the values stored in the tourID and tourName columns. You'll use the tourName data for the menu labels, and the tourID data for the menu data.
In the Sort drop-down menu, choose tourName, and verify that the box beside it is set to Ascending.
Unless you tell it otherwise, the database is going to display data in the order it appears in the database. However, the data was not entered in any particular order. By sorting the data by tourName ascending, you ensure that all of the tours are listed in alpha betical order, which will make it easier for your users to find the tour they want.

Click the Test button.
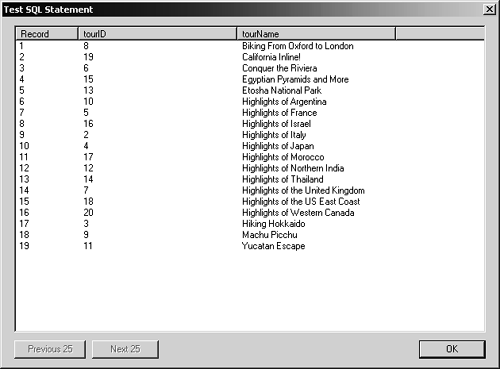
Clicking this button displays for you the contents (and order) of your recordset. Often, when you build queries you may need to do some trial and error. Here, you can see that all 19 tours have been retrieved, and that they are ordered alphabetically by tourName.
Click OK in the Test window to return to the dialog, and click OK.
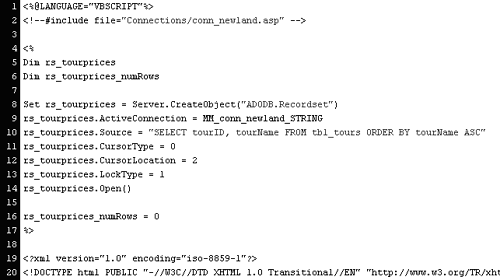
The appearance of the document doesn't change, though if you look in the code, you'll see a new block that contains the code necessary to create the query. We'll look specifically at this code later, but you can at least see it by looking in code viewit should be just below the top of the document. The screenshot shows the code for ASP. ColdFusion users comparing their screens with the screenshot may be surprised at how much less code they have, as well as how much easier it is to read.
Switch to design view, and click to select the menu in the form. In the Property inspector, click the List Values button to open the List Values dialog. In turn, select each of the label/data pairs, and click the Remove Value (minus sign) button.
At the end of this step, there should be no item labels or values in the dialog.
You added dummy data in Lesson 7 just so you could build the functionality. In this step, you are removing the dummy data, so you can add the real data you just placed in the rs_tourprices recordset.

With the menu still selected, in the Property inspector, click the Dynamic button.
This opens the Dynamic List/Menu dialog, used to bind dynamic data to form menus.
Choose rs_tourprices from the Options From Recordset field. Specify tourID in the Values field, and specify tourName from the Labels field. Click OK.
Dreamweaver adds the code necessary to bind the data to the menu. One important thing to note is that the resulting ASP or ColdFusion script loops through the data pulled from the database. In other words, just as you manually entered an item label and item value one at a time in Lesson 7, so each of the 19 tour label/value pairs must be loaded into the menu one at a time. Using a programming structure called a loop, ASP or ColdFusion goes through each tourName/tourID pairing in the recordset and adds it to the menu item.
Obviously, in addition to the initial conveniencewhat you just did was a lot faster than manually entering 19 label/value pairsyou have the added bonus that if the database is ever changed, this menu field is automatically and instantly updated. That means that as long as you maintain your database, Web maintenance will happen automatically.
Save, upload, and test the page.
When you click the menu, you should see all 19 tours listed, in alphabetical order.
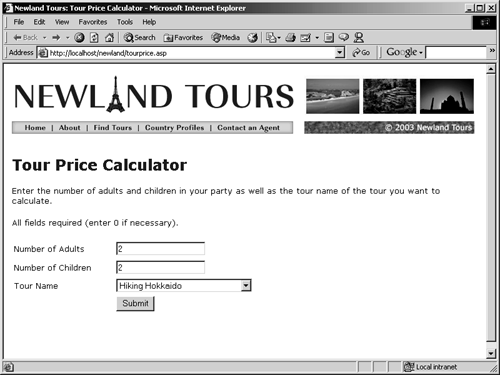
Complete the form and submit it.
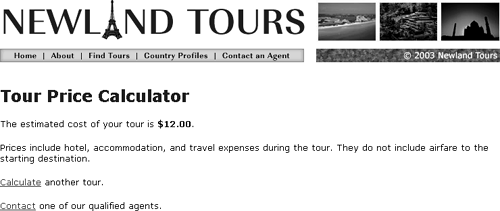
The page, tourprice_processor.asp, should load and the calculation should still work. Of course, the tour price suddenly meets even the thriftiest of budgets. That's because the calculation is now using the tourID as the dollar amount, and the tourIDs are under 20.