Passing Data to Other Applications
Users can now browse through all of the tour descriptions, five at a time. The descriptions are laid out and attractive, and the recordset navigation bar makes it easy to go back and forth through the recordsets. Before you wrap up the lesson, you need to add two more pieces of functionality.
At the bottom of each description should be two links. The first link is a country name that takes users to the country's profile on profiles_detail.asp. The second link takes users to the tour price calculator (tourprice.asp). You can't simply create a link to these two pages, however. You need to pass data to both pages as well, so that the pages know which tour description the user was reading when she or he clicked the link.
Handling this functionality is easy in the case of the country profiles. As you'll recall, the country profiles page uses a URL parameter, countryID, to determine which country to show. This URL parameter appears when the user clicks the country name on profiles.asp. To get the same functionality, you'll need to add the same URL parameter to the link on tour_detail.asp.
The tour price calculator link will be somewhat more complicated. That page has a dynamically generated drop-down menu listing all of the tours. But if the user is reading Highlights of Italy, clicks the Price this tour with the Tour Price Calculator link, and arrives at the tour price calculator form, he or she wants to see the price for Highlights of Italy (not the default option of Biking from Oxford to London). Again, the solution is similar to the country profile linkyou just need to send the page some extra data. But the tour price calculator is a little more complicated, because it isn't ready to receive and use that data; this is in contrast to the country profiles page, which is already expecting the countryID URL parameter. You'll take care of this (and a couple other issues) in this task.
First, let's take care of the link to the country profiles page.
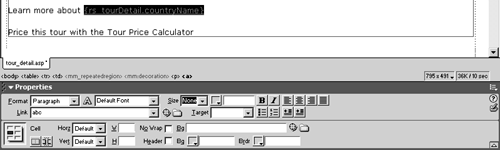
Select the dynamic text that appears at the end of the Learn more about paragraph. In the Property inspector, type abc as a placeholder to create a link.
Just as you did this in Lesson 10, the placeholder URL will be replaced as soon as you attach dynamic data. But you need to put something there to create the link in the first place.
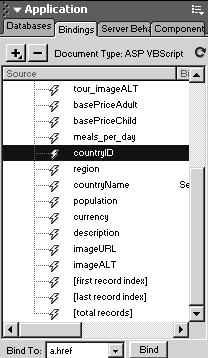
With the dynamic text still selected, click countryID in the Bindings panel, make sure that a.href is selected in the Bind To menu, and click Bind.
This step binds the value of countryID to the URL. Currently, the href attribute of the URL contains only a number. You need to go back and type in the main URL itself, as well as the variable name for the URL parameter.
With the link still selected, in the Link field of the Property inspector, position the insertion point at the very beginning, before the dynamic code, and enter profiles_detail.asp?countryid=.

This is the link to the page itself, and after the server has resolved all the code, the countryID value will be appended just after the = sign. The profiles_detail.asp page will function correctly at this point. If you like, you can test this page and click one of the country name links, to be sure.
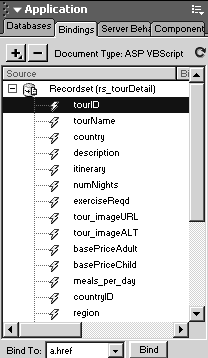
In the final paragraph of the description, select the words Tour Price Calculator. Enter abc in the Property inspector's Link field to add a link. Using the same technique as before, use the Bindings panel to bind tourID to a.href in the Bind To drop-down menu.
Once again, abc is replaced with the tourID value. You still need to go back and add the rest of the URL.
Position the cursor at the beginning of the Property inspector's Link field, and type the following URL before the dynamic text: tourprice.asp?tourID=. Save and close tour_detail.asp.
Once you have completed this step, you have added the functionality that sends the tourID value to tourprice.asp. Unfortunately, nothing on that page is expecting that value, so nothing happens.
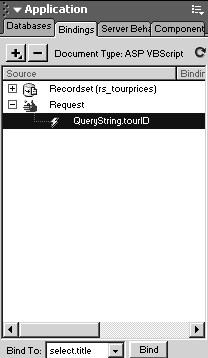
Open tourprice.asp, and open the Bindings panel. Add a new Request.Querystring (ASP) or URL (ColdFusion) variable called tourID.
By creating this binding, you make the URL variable sent from tour_detail.asp available on this page. In the next step, you'll bind this information to the menu, so that the correct tour is highlighted automatically.
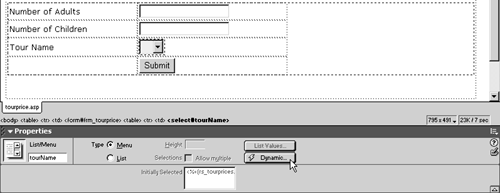
Click to select the drop-down menu in the form, beside Tour Name. In the Property inspector, click the Dynamic button.
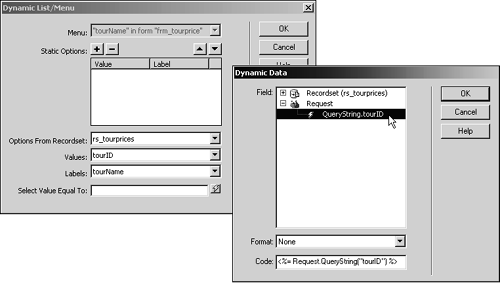
You've already bound dynamic data to this menu. In fact, all of the items listed in the menu are dynamically added from a database. Your goal at this point isn't to add any more itemsthey're all present and accounted forbut rather to set the default to match the parameter sent in the URL.
In the Dynamic List/Menu dialog, click the lightning bolt icon beside the Select Value Equal To field at the bottom to open the Dynamic Data dialog. In that dialog, select QueryString.tourID (ASP) or URL.tourID (ColdFusion), and click OK twice to save the settings.
As you probably recall from Lesson 9, the menu object has two main pieces of information that define it: its label (which humans can read and which are populated with tour names) and its values (which are sent with the form and which are populated with tour IDs). Here, you are setting the selected value (and hence label) to be equivalent to the value sent as a URL parameter.
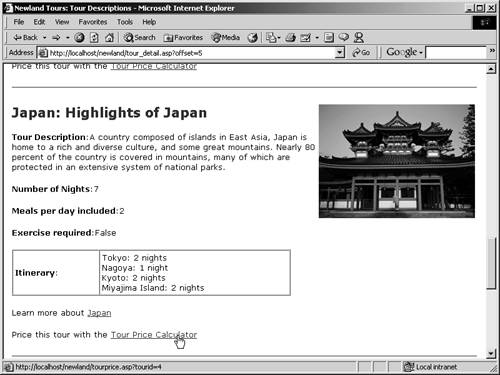
Save and upload tourprice.asp. Select tour_detail.asp in the Site panel, and press F12 to test it. Choose a random tour, and click both its country name link (which should take you to the correct profile) and its Tour Price Calculator link (which should load the proper tour name in the form menu).
Notice that the URL parameter is displayed at the bottom of the browser window, when you roll over the Tour Price Calculator link. The functionality is working pretty well, with one exception.
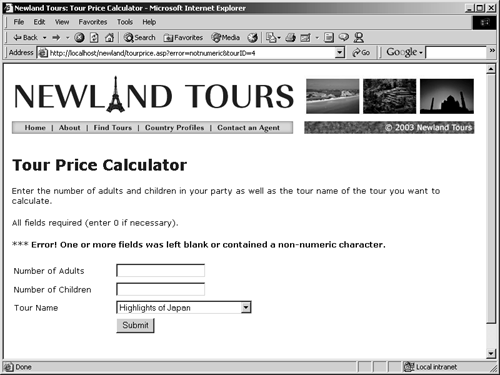
Still in the browser, click the Tour Price Calculator link from any tour. Without entering values for the Number of Adults or Number of Children, click Submit.
The form validation kicks in and reloads the page, displaying the error message. So far, so good. But notice that the Tour Name has reverted to Biking From Oxford to London. When the page was reloaded, the tourID URL parameter is no longer there, and so the menu fails to display the correct tour, and instead shows the first tour in the recordset.

Ideally, the form validation script on tourprice_processor.asp would send the tourID URL parameter back to tourprice.asp when it redirects the page.
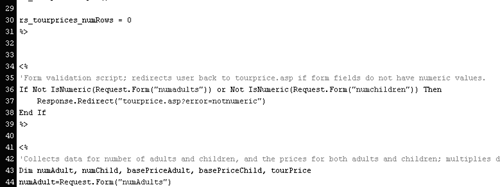
Close tourprice.asp, and open tourprice_processor.asp. Switch to code view. Near the top, look for the comment, "Form validation script; redirects user back to tourprice.asp if form fields…." In that script, locate the following code:
In ASP:
Response.Redirect("tourprice.asp?error=notnumeric")In ColdFusion:
<cflocation url="tourprice.cfm?error=notnumeric">This piece of code is where the form validation redirects back to tourprice.asp. As you can see, it is already appending a URL parameter. You might as well add another one, to complete the functionality.
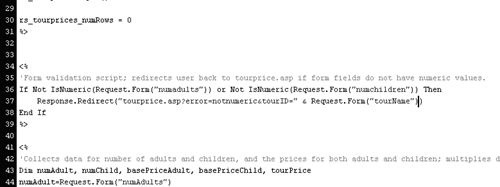
Change the code you just identified so that it reads as follows:
In ASP (on one line):
Response.Redirect("tourprice.asp?error=notnumeric&tourID=" & Request.Form("tourName"))In ColdFusion:
<cflocation url="tourprice.cfm?error=notnumeric&tourID=#form.tourName#">You can probably already guess what the added code does. It appends a URL variable called tourID to the page when it is redirected. The value of this tourID variable is the value of form.tourName, which is the active tour when the Submit button was pressed. As you know, since you just programmed it in steps 6 to 8 above, tourprice.asp selects the correct tour in the menu based on a URL variable called tourID.
Save, upload, and test the files all over again.
This time, the whole transaction should work. You seamlessly transfer from one application to another, and the page responds appropriately, thanks to some simple data transfer and preparation.