Creating and Applying Custom CSS Styles
By providing presentation specifications for HTML styles, you have quickly formatted the vast majority of your site, both as it stands now and as you will develop it during this book. Better yet, you've also optimized the site for maintenance, since to update the look of the site, you have only to change the CSS file, which you can now do using Dreamweaver's CSS Styles panel from any page in the site, and the settings update instantly throughout the site. If the site is already loaded on a server, all you need to upload is the updated CSS file; you do not need to re-upload each of the pages.
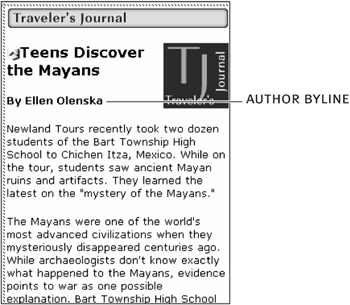
The only drawback to what you have done so far is that you've been limited to redefining the look of pre-existing HTML styles. You haven't been able to create custom styles for text elements that aren't part of the HTML specification. For example, there is an author by-line in the Traveler's Journal of the index page, but HTML has no <author_byline> tag. In this task, you will learn how to create and apply custom styles, or classes.
Open index.htm. Make sure you can see the Traveler's Journal section at the right side of the page.
The Traveler's Journal section is composed of three parts: a title, an author byline, and the body text of the article. The title is enclosed in a heading, and the body text is marked up in <p> tags, so in both cases the HTML markup represents the content reasonably well. The author byline is not so easy to categorize. It's represented in bold, using the <strong> tag. However, the author byline is bolded not because it is stronger, or more emphatic, than the surrounding text, but because it performs another function; it gives credit to the author. Again, since HTML doesn't have an <author_byline> tag, this is a good opportunity to create a custom CSS style.
The result of this new style, which we will call .author, will merely add bold to the element to which it is attached (in this case, a <p> tag), and it won't look any different in a browser than it does now. But making this change will make the code describe the text a little more meaningfully, and you'll also see the concept of inheritance in action again.
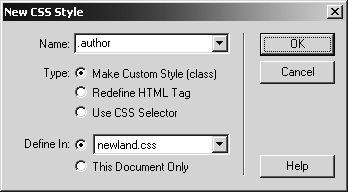
Click New CSS Style. In the New CSS Style dialog, select Make Custom Style (class) from the Type group, and verify that newland.css is still specified in the Define In group. In the Name field, type .author. Click OK.
These settings should, at this point, all make sense to you, with one exception: Why does the class name begin with a period (.)? The period indicates that the style does not redefine an HTML tag in its own right, as in "all <p> tags should look like XYZ," but rather that it defines an element subordinate to an HTML tag. One practical application of this is that you can use a custom class to specify the appearance of some <p> tags, but not all of them. That makes sense in this particular caseonly some paragraphs should be designated as author paragraphs.
Another benefit to custom classes is that they can be applied to different HTML elements. For example, not only could you apply the .author class to any <p> tag, but you could also apply it to a <span> or <div> tag.
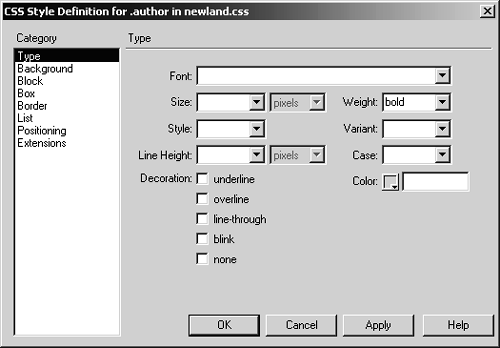
In the CSS Style Definition dialog, set the Weight to bold and click OK.
You don't need to specify any other information here, such as the font face or size, because that information is already specified in a parent tag (in this case, the <td> and <body> tags). So all we need the style to do is inherit all of that presentation information and add bolding.
Create a new class called .navhead with the following settings: Size = 12 points; Weight = Bold; Color = #505748.
This style will be used as the navigation header at the top of the navigation bar in the left-hand column of index.htm.
Create a new class called .caption with the lone attribute of Style = italic.
This style will be used for all of the image captions used in the site. Currently, they are formatted using <em>, which most browsers render as italics. Again, .caption better describes that content than <em>, and creating this style gives us precise control over the presentation of all the captions in the site (or will, once we apply the style).
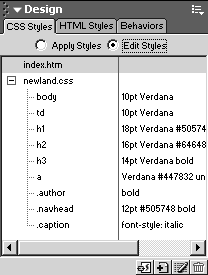
At this point, your CSS Styles panel should display nine styles. These are sufficient for now, though you'll add to this list as needed during development.
The next step, of course, is to apply these custom styles.
Select the Apply Styles radio button in the CSS Styles panel.
While in the Edit Styles portion of the CSS Styles panel, you can easily review and modify all of the styles you've created, including redefined HTML tags. You cannot, however, apply CSS styles from that side of the panel, so you have to switch back to the Apply Styles portion.
Hey, once you switched over, two-thirds of your styles disappeared! You should see only the three custom classes listed in this panel now; the redefined HTML tag styles are gone. The reason for this is that the HTML styles are applied automatically as soon as they are created, so you don't need to apply them. Thus, the only styles you can apply are the custom classes, and those are the only ones that should be listed in the Apply Styles portion of the panel.
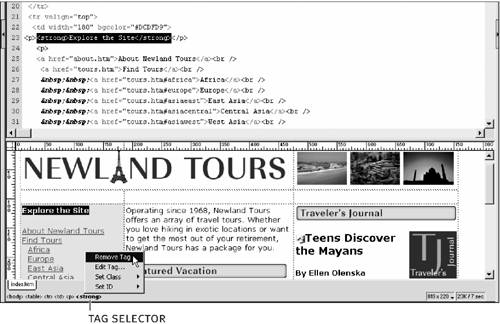
Back on the index.htm page, click once anywhere in the Explore the Site text at the top of the navigation bar. Right-click (Windows) or Control-click (Macintosh) the <strong> tag in the tag selector and choose Remove Tag from the context menu.
In this step, you are stripping the <strong> tag out of the code. It's no longer needed, since the .navhead class you created has bold already built in.
Make sure you are clicking in the tag selector, not in the text on the page.
TIP
The tag selector is a very useful tool for specifying which tag you want to affect in a Dreamweaver operation. One of the challenges when working with a graphical program to edit HTML code is that it is often hard to tell the editor which element in a string of nested elements you want to affect. For example, if you want to add background color to a string of text, how does the editor know that you are not actually trying to change the background color of a <td> cell that the string of text happens to be nested in?
TIP
A related problem is getting Dreamweaver to display the version of the Property inspector that you want. Imagine you want to change the cellpadding attribute of a table used for page layout. How can you get the Property inspector to show the settings for the <table> element, rather than the settings for one of the dozens of elements nested inside it? The answer is the tag selector. Click anywhere on the page that's inside the attribute you are trying to affect, and then select the desired tag from the tag selector. The Property inspector shows settings for that tag, and the context menu provides several additional options for modifying it.
Click the <p> tag in the tag selector, and then click navhead in the CSS Styles panel.
Not only does the heading update in design view, but the new style is reflected both in the source and in the tag selector itself.
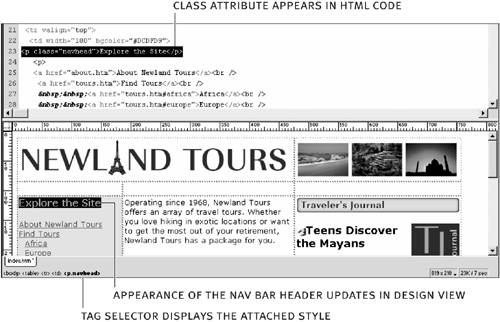
Let's take a moment to look at the code:
<p class="navhead">Explore the Site</p>In the previous task, when you redefined HTML tags, the pages updated instantly, and you did not need to update the code. To apply a CSS class, however, you need to change the HTML code. Specifically, you add the class attribute to the desired HTML tag, and list the style name (without the period) as the value of the attribute. The class is attached to the whole tag, and everything inside it, including text, images, and other tags, is affected by the style.
You cannot, therefore, attach a class to a portion of a tag. For example, if you wanted to attach the navhead style just to the word Explore, you could not do so by attaching the style to the <p> tag, because the style would be applied to everything else in the tag as well. However, you can get the same effect by creating a new tag around Explore and attaching the class to that tag. To do so, you'd use the inline tag <span> since it is used to create arbitrary inline containers that you can use to specify a part of a larger element. So, to complete the example, if for some reason you wanted to put just Explore in the .navhead style, the code would look as follows: <p><span class="navhead">Explore</span> the Site</p>.
NOTE
Another convenient way to apply CSS styles is through the Property inspector. Position the insertion point inside any paragraph of text, and, in the Property inspector, click the A icon between the Format and Font fields, which toggles the Property inspector into CSS Mode. Once in CSS Mode, the most common HTML tags and custom CSS classes become available inside the Property inspector.
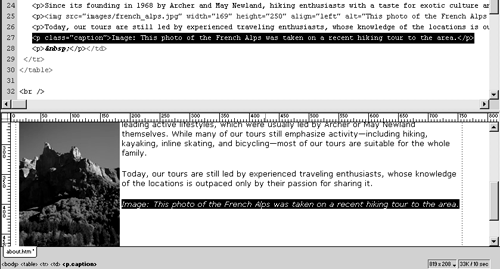
Repeat steps 7 and 8 to remove the <em> tag around the image caption beside the picture of the Japanese shrine, and then apply the .caption class to that paragraph.
The display in design view shouldn't change, since the <em> tag you are removing is represented with italics, and since the .caption style you are attaching specifies only italics. But you should see the changes reflected in the tag inspector and in the source code itself.
Remove the <strong> tags around the author byline ("By Ellen Olenska"), and attach the .author class to that paragraph.
Again, the page appearance won't change, but the class should be reflected in the tag inspector and in the source code.
Save and close index.htm.
You've completed the design and presentation of index.htm. All changes made to it from this point forward will affect its content and functionality, but not its design.
And of course, the site contains more than index.htm.
One at a time, open about.htm and contact.htm, and replace the <em> tags with the .caption class in the captions on those two pages. Save and close both pages.
Neither about.htm nor contact.htm has a navigation bar heading or an author byline, so you won't need to use the .navhead or .author classes.
You won't need to update the classes on profiles.htm or tours.htm, because both pages will undergo fairly radical overhauls later in the book, and any effort expended now would be wasted.


