Client-Side Form Validation
Depending on what you entered in the form when you tested it, you may have exposed a problem. The form does not verify that users enter the correct type of data. For example, you could enter anything as the email addressnothing verifies that it meets the username@domain.com format. But Newland Tours staff won't be able to respond to messages if users forget to enter their entire email address, which could result in lost business.
In this task, you will use a simple Dreamweaver behavior that verifies the user entered the correct type of information. This verification is called form validation, and it comes in two varieties: client-side and server-side validation. Client-side validation verifies that data entered in the form meets the needs of the page from within the browser, the moment the user presses the Submit button and before the HTTP request is sent. Server-side validation occurs in a script on the server after the HTTP request is sent. Each form of validation has its own strengths and limitations.
In this task, you will deploy client-side form validation, using a Dreamweaver behavior. This behavior writes JavaScript that ensures the user entered the correct information. If the user didn't, an alert pop-up appears, preventing further progress. If the user does enter the correct information, the JavaScript lets the page proceed as programmed.
Open contact.asp and in design view, select the Submit button.
You want the form validation to kick in as soon as the user clicks the Submit button. Therefore, you'll attach the behavior to the Submit button. The user clicking that button becomes the event that triggers the validation script.
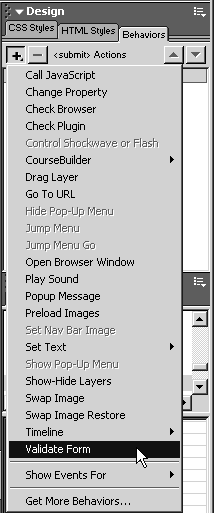
In the Behaviors panel (Window > Behaviors), click the Add Behavior (+) button, and choose Validate Form from the list.
This behavior enables you to enter a few parameters in a dialog box and then writes the requisite JavaScript for you.
In the Validate Form dialog, select the first item in the list, check the Required box, and select the Email Address radio button in the Accept group.
Here you are specifying that the user must fill in the emailAddress field of the form, and that what the user types in must be in the proper email format.
NOTE
This validation verifies only the proper email syntax. It does not ensure that the particular email address actually exists, let alone attempt to verify that it does belongs to the current user.
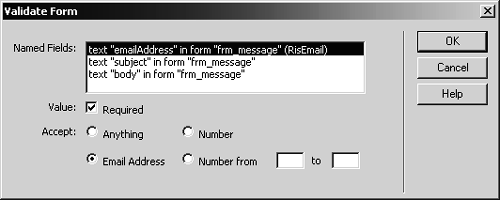
In turn, select each of the remaining two items in the list, and check the Required box. Leave the Accept radio setting at Anything.
Here you are forcing the user to enter subject and body text, but you are not specifying any particular format.
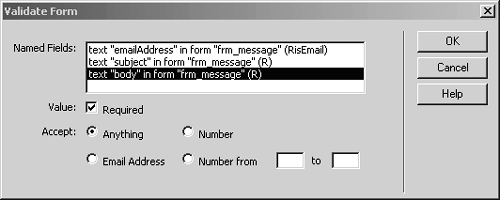
The completed dialog displays (RisEmail) beside the first item, and (R) beside the remaining two.
Click OK.
This applies the behavior to the Submit button.
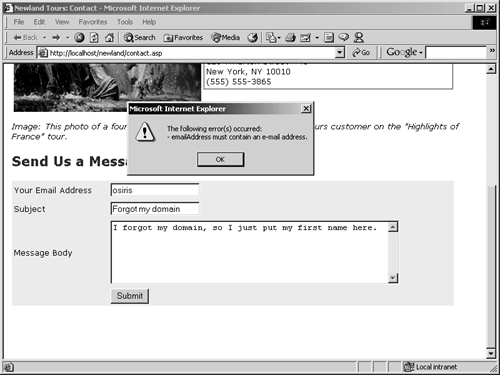
Save, upload, and test the functionality, by leaving a field blank or by entering a non-email address in the Email address field, and press Submit.
If you break one of the validation rules, you'll see a JavaScript alert dialog. Correct the error, submit the form, and check your email.