Building the Form and Hand-Coding a Recordset
In this task, you'll create the form that employees can use to insert new country profiles. You'll have the form submit its data to admin_cp_insert_processor.asp, where you'll also write the code necessary to insert the new record.
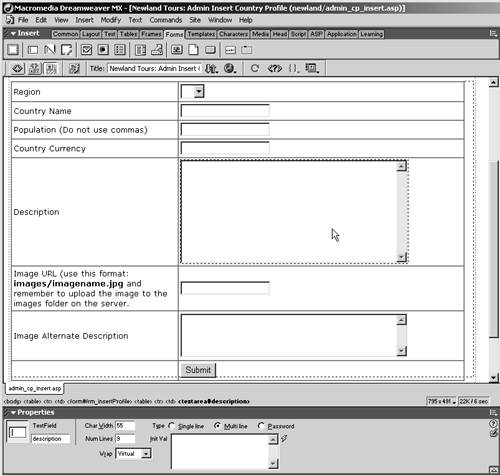
In admin_cp_insert.asp, create a form (Form Name: frm_insertProfile; Action: admin_cp_insert_processor.asp), and insert a table inside of it with eight rows, as shown in the screenshot.
The seven items listed in the left column correspond to seven of the eight fields in tbl_country (the eighth is the autogenerated primary key).
Add form elements into the right column, according to the following table:
ELEMENT TYPE
ELEMENT NAME
NOTES
List/Menu
region
Leave its type at the default, Menu, in the Property inspector
Text field
countryName
Text field
population
Text field
country_currency
Text area
description
Provide enough room for users to enter a description, by setting its Char Width to 55 and its Num Lines to 9 in the Property inspector. Set its Wrap to Virtual.
Text field
imageURL
Text area
imageALT
This doesn't need to be as large as the one for description. Give it a Char Width of 55 as well, but leave the Num Lines blank. Set its Wrap to Virtual.
Once again, the element names are the same as the field names in the corresponding table, making it easier to match the two. This time, you'll be hand-coding the SQL, so you won't be using Dreamweaver's Insert Record dialog, but it's nonetheless easier if the form fields match the database table fields.
The form is almost ready, but it lacks one critical piece: The menu at the top doesn't have any data in it. It should be populated by data from tbl_region, which means you'll have to create a recordset.
Switch to code view, and scroll to the portion of the document after the Restrict Access to Page server behavior but before the opening <?xml> tag. Type the code necessary to create a connection to the database.
In ASP:
<%
Dim dbConn
Dim rs_regions
set dbConn = server.CreateObject("adodb.connection")
dbConn.open("newland")

%>
In ColdFusion:
<cfquery name="rs_regions" datasource="newland">

</cfquery>

This code is sufficient to open a connection to the database. However, it doesn't actually do anything once the connection is established. You still need to add a SQL statement to make anything happen.
Let's look at the code for a moment. ColdFusion users have it fairly easy: They use the <cfquery> tag, give their query a name (rs_regions) and specify the data source (newland). ColdFusion figures out the rest.
ASP requires a bit more legwork. The word Dim is used to declare a new variable. Two are created here: dbConn and rs_regions. The variable dbConn will be used to create the database connection itself, and rs_regions will be used to hold the recordset. Both of these names are arbitrary, and you can call them whatever you want. The line after the Dim lines, which begins set dbConn =, tells ASP to create a new database connection object, whose name is dbConn. The next line then instructs ASP to actually open that connection to the DSN named "newland."
NOTE
ASP users might wonder why they enter "newland" rather than "conn_newland" as they have throughout the book. The reason is simple: newland is the DSN name that exists on the server and points to the Newland Tours database. Conn_newland, in contrast, is a connection created in Dreamweaver that uses the newland DSN but is separate from it. Since you are coding by hand, and not going through Dreamweaver server behaviors, you specify the DSN directly.
Part of the ASP framework is a group of ready-made objects designed to handle common tasks. ASP has many such objects, and you have made extensive use of them through the book (though you may not have realized it). These include the Request, Response, Session, and Application objects, among others. The Connection and Recordset objects are a part of ActiveX Data Objects, or ADO. The topic of object-oriented programming, or OOP, is beyond the scope of this book, but suffice it to say for now that you can reliably use the code developed in this lesson as a template for connecting to a database.
Add the code necessary to retrieve the desired records in the blank line you left in the preceding step.
In ASP:
Set rs_regions = dbConn.Execute("SELECT * FROM tbl_region ORDER BY regionName")In ColdFusion:
SELECT * FROM tbl_region ORDER BY regionNameThis particular SQL should pose no challenge to you by this point in the book. It retrieves all of the fields in all of the records in tbl_region, and orders them alphabetically by the name of the region.
Again, the ASP might be somewhat confusing. Remember, dbConn is the connection object, not the recordset. This line of code creates the recordset by creating a recordset object whose contents are equal to whatever is retrieved from the query executed through the connection.
This code is sufficient to create the recordset and make the data available to the page. If you look in the Bindings panel, you won't see this recordset listed. Dreamweaver doesn't realize it's there. Unfortunately, this also means that you won't be able to bind the recordset to the form object. You'll have to code it manually.
Still in code view, scroll down until you see the form. Just a few lines below it, inside the table, look for the <select> element, which is the menu. Press Enter or Return a few times to make some space between opening and closing tags.
The <select> tag creates the menu itself. To populate the menu, you use the <option> tag. Each option tag results in one more option in the menu. It uses the following syntax:
<option value="data">Label</option>In this example, Label is what appears in the menu that humans can read, while data is the value that is submitted with the form. We need to bind regionName to the label and regionID to the value attribute.
In the empty space between the <select> tags, type the code needed to bind database data to the <option> tag.
In ASP:
[View full width]<% Response.Write("<option value=""" & rs_regions("regionID") & """>" & rs_regions( "regionName") & "</option>")
%>
"regionName") & "</option>")
%>
In ColdFusion:
<cfoutput>
<option value="#rs_regions.regionID#">#rs_regions.regionName#</option>
<cfoutput>
You've bound regionID to the value attribute, and regionName appears as the label in the menu.
The ASP code, as usual, needs additional explanation. As you know from before, Response.Write() is the way ASP outputs text to the browser. In this line, you are telling it to output a line of HTML for the <option> tag. When you want ASP to output a string of text, you enclose that string in quotation marks. The complication is, you don't want ASP to literally write into the browser <option value=" rs_regions("regionID")>rs_regions("regionName")</option>. You want ASP to evaluate rs_regions("regionID") and rs_regions("regionName"), and write their results into the browser. But if you leave that portion of the script inside quotes, ASP would simply write, rather than evaluate and output, the code.
To get around this problem, you use a technique called concatenation, which refers to the building of strings out of different pieces. Here, the pieces are string literals, such as "<option value=" and expressions, such as rs_regions("regionID"). You glue together these pieces with the ampersand (&) character. ASP then knows to evaluate the expressions and then glue them into the string. ColdFusion uses the pound signs (#) to distinguish between string literals and expressions, eliminating the need to concatenate elements. So the final output to the browser of this code, whether you use ASP or ColdFusion, is <option value="6">Africa</option>.
ASP has another complication: Quotation marks are used in two different ways in this block of code. Like most programming languages, ASP uses quotes to distinguish between strings and expressions. Everything inside of the quotes ASP ignores and outputs as-is. Unfortunately, the string that ASP needs to output contains quotation marks: The proper syntax for the HTML attribute ASP needs to output is <option value="XYZ">. In the final output of this code, the number output by rs_regions("regionID") should appear in quotes, as in, <option value="6">. ASP gets confused when it sees the quotation marks used in the value attribute, and thinks that you are marking the end of the string, which in fact you are not. To solve this problem, when you want to tell ASP to write quotation marks, rather than interpret them, you insert two. Thus, in the code you just entered, "<option value=""" &, where you see three quotation marks in a row, the first two indicate the quotation marks that ASP should write into the HTML, and the third indicates the end of the string.
Save, upload, and test the file, and look at the menu. You'll see right away that Africa has loaded, and it is alphabetically the first region in the database table. That's good. But we've got a problem. Africa is the only option in the menu! You need to cause ASP or ColdFusion to create a new <option> tag for each record in the database. This calls for a programming structure known as a loop. In a loop, the same block of code is executed over and over until a condition is met. In this case, we need to create a loop that will output the <option> line over and over until it runs out of records.
Amend the block of code you added in step 6 so that it incorporates a looping structure.
In ASP:
[View full width]<% Do Until rs_regions.EOF Response.Write("<option value=""" & rs_regions("regionID") & """>" & rs_regions("regionName") & "</option>")
rs_regions.MoveNext
Loop
%>
In ColdFusion:
<cfoutput query="rs_regions">
<option value="#rs_regions.regionID#">#rs_regions.regionName#</option>
<cfoutput>
ColdFusion users need only add the query attribute to the <cfoutput> tag, and the loop is created automatically for them, behind the scenes.
ASP users, as usual, have a harder time. Do Until is a looping structure. Its sole parameter is the condition that must be met to break the loop, in this case rs_regions.EOF. EOF stands for End of File. In other words, the loop will break when the recordset runs out of records. The next line constructs the <option> element, as before. The MoveNext method tells ASP to advance to the next record. The last line, Loop, sends ASP back to the Do Until line.
Test the file again in a browser, and click the menu. You'll see all of the regions listed now.
ASP users only: In code view, scroll all the way to the bottom of the document, and after the last line of code, </html>, insert the following script, to close and destroy the recordset.
<%
rs_regions.Close()
Set rs_regions = Nothing
%>
At the top of the document, you opened a connection and created a recordset. This recordset exists in the server's memory. Unless you tell it to go away, it might stay in the server's memory. Over time, you could overwhelm your server with useless recordset data that is no longer being used. This code block removes all of the records from the recordset (rs_regions.Close()) and then destroys the recordset object itself (Set rs_regions = Nothing). Once these commands are processed, the recordset is cleared from memory. You add this script to the bottom of the page, of course, so that the rest of the page is processed before the recordset is destroyed. It wouldn't do your form any good if you destroyed the recordset before you had a chance to populate the menu with its data!
ColdFusion users don't have to worry about this step, because it happens automatically behind the scenes any time you deploy <cfquery>.


