Retrieving Data with Querystrings
At the end of the previous lesson, users filled out a short form and submitted it to a page that displayed the value they entered in the form. As you know from the preceding section, the variable sent from the form to the test_form_processor.asp page was enclosed in the body of the request. There are other ways to send data between pages. You can send variables through URLs, cookies, and session and application variables. You'll learn all about each of these during the course of the book, but for now it is sufficient to understand that there are many ways to share data among pages.
The logical question that follows from this is, why are there so many different ways, and how do you know which one to use? The answer is that each has unique capabilities and limitations.
For example, the form variable you sent in Lesson 4 in the body of the request sent the data from the form page to the page that processed and displayed the information. One limitation of this approach is that once the server completes this transaction, it forgets the firstName name-value pair. So though it outputs the user's first name to that page, if the user goes to a different page, the server no longer knows the value of the firstName variable, which means that this name-value pair is no longer available to your code. If you were developing a multiple-page shopping cart or survey, you'd soon encounter the limitations of form variables.
In this task, you'll pass data from the form to the test_form_processor.asp page in a different way: You'll use a querystring. A querystring is a list of variables appended to the end of a URL. You have probably noticed as you surfed the Web that sometimes URLs are quite long and seem to contain much more information than the page address; that information is a querystring. Let's modify the Web form you created in Lesson 4 so that it sends information using a querystring, rather than a form variable.
Open test_form.asp.
At the moment the form is somewhat minimalist.
Position the insertion point after the text field, and press Enter/Return. Type Last Name and add a second text field. Use the Property inspector to name the new field lastName. Position the insertion point after the lastName text field and press Enter/Return again to move the Submit button below the new field.
In this step, you are adding and formatting a second form field. Just because you are placing content in a form doesn't mean you can't format it as needed. You can insert just about any valid HTML element inside of a form.
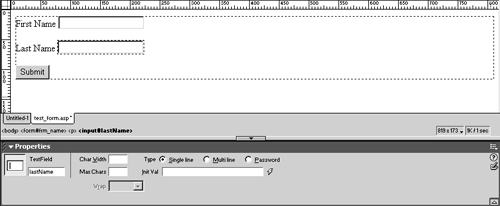
Click <form#frm_name> in the tag selector to select the whole form and also to bring up the form options in the Property inspector.
The easiest way to modify an element's attributesespecially an element with several child elements, such as the <form> elementis to select it in the tag selector.
In the Property inspector's Method drop-down menu, select GET.
Initially, the value is set to POST, which you specified in the previous lesson. By changing the method from POST to GET, you are changing the way that the data is sent to test_form_processor.asp. With POST, the data is sent in the request body, as discussed before. But with GET, the data will be sent as a querystring, which means that you see the firstName and lastName name-value pairs appended to the URL, as you will see in a moment.

Save and close test_form.asp. Open test_form_processor.asp.
You need to modify the test_form_processor.asp page because the dynamic text on that page is looking for the firstName value to come to the page as a form variable. Now that you have changed POST to GET, the firstName value won't be available as a form variable; it will be available only as a querystring. That means that you have to return to the Bindings panel and define a new binding.
In the Bindings panel, for ASP click the New Binding (+) button, choose Request Variable, and in the Request Variable dialog specify Request.Querystring as the type. Type firstName as the name. For ColdFusion, click the New Binding (+) button, choose URL variable, and enter firstName as the name. Click OK.
"Querystring" and "URL variable" are two variations of the same thing: a variable appended to the URL. There are some subtle differences between the way ASP and ColdFusion handle these types of variables, but for the purposes of this book, we'll treat them as if they are no more than two different names for the same thing.
When you are finished, the change should be reflected in the Bindings panel. The screenshot is for ASP. ColdFusion users will see two categories of variable: Form (with firstName nested inside) and URL (with firstName nested inside).
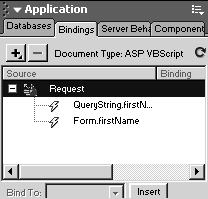
Repeat step 6 to add a Request.Querystring/URL Variable for the lastName variable.
Again, the Bindings panel should update, and you should now see three variables defined: two versions of firstName and one of lastName.
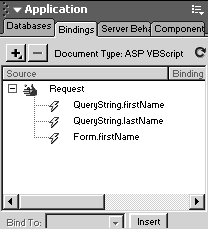
It might seem odd to have the same variablefirstNamelisted twice. But as far as ASP or ColdFusion is concerned, these are two completely different variables. One is a form variable, and is only retrievable from the body of the HTTP request. The other is a querystring variable, which is only retrievable from the URL itself. This conceptwhere variables are available only in a designated placeis known as variable scope. A variable's scope includes the place(s) where the variable exists, and excludes the places it does not. The lastName variable exists only as a URL querystring. If ASP or ColdFusion looks for it in the request body, it won't find it: The request body is outside of the querystring scope.
Scoping variables is a fundamental task in any programming language. Without it, you would have no way of ensuring both that data is available when you need it and that two different pieces of data don't inadvertently share the same name.
By changing the form's method from POST to GET, you change the firstName variable's scope. By making these changes in the Bindings panel, you gave your server-side code access to the appropriate scope. There are many more scopes than form and querystring variables (as you doubtless noticed when working in the Bindings panel), but conceptually, they all work the same way.
Click to select the blue-shaded {Form.firstName} dynamic text on the page, and press Delete to remove it. Position the insertion point just before the second comma, click QueryString.firstName (ASP) or URL > firstName (ColdFusion) in the Bindings panel, and press Insert.
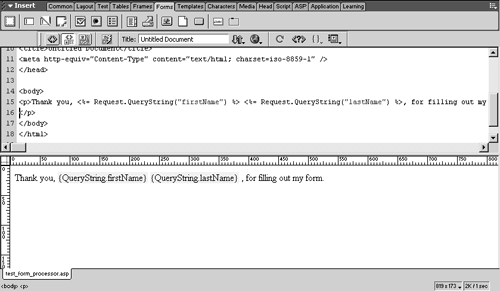
When you are finished, you should see a new blue-shaded dynamic text block that contains {QueryString.firstName} (ASP) or {URL.firstName} (ColdFusion).
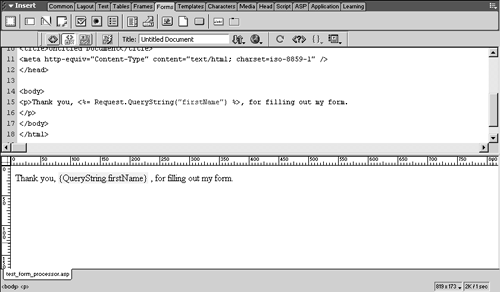
Now that you understand scope, you probably also can read Dreamweaver's dynamic text pseudocode. The curly braces {} represent a dynamic code block, and inside is listed the scope, followed by a period, followed by a variable name. Dreamweaver pseudocode gives you quick access to the scope and name of all dynamic text.
Looking beyond the pseudocode at the real code, you should see <%= Request. QueryString("firstName") %> embedded in the HTML on the ASP page, and <cfoutput>#URL.firstName#</cfoutput> on the ColdFusion page.
NOTE
In ColdFusion, values enclosed in #pound signs# are variables that ColdFusion must resolve before outputting. In the preceding example, if you omitted the pound signs, ColdFusion would write: "Thank you, URL.firstName, for filling out my page." Once in pound signs, ColdFusion knows it needs to evaluate the variable in the pound signsin this case, by outputting whatever value is stored in the firstName variable in the URL.
Position the insertion point after the firstName block, and bind the QueryString.lastName or URL.lastName variable to the page.
The two variables should appear side by side, so that the output displays the user's entire name.
NOTE
If the first and last names run together, which seems to happen in ASP but not ColdFusion, insert a non-breaking space character ( ) between the two.
Save test_form_processor.asp, and in the Site panel, Shift-select test_form.asp and test_form_processor.asp and click the Put File(s) button.
Remember, you can't test your files unless you upload them to the server.
Click test_form.asp in the Site panel, and press F12 to test in a browser. Enter your first name and your last name, and click Submit.
As you've anticipated, the page now thanks you, using your first and last name.

What's more of interest, though, is the URL. Appended to the page address is a question mark followed by three name-value pairs:
[View full width]http://localhost/newland/test_form_processor.asp?firstName=Yuki&lastName= Makimura&Submit=Submit
The appended three variables are the querystring. The output first and last names are pulled directly out of the URL. This URL appears the same, regardless of server model, because querystrings are a part of the HTTP protocol itself, rather than a dynamic Web page technology.
Generally, you should use POST, rather than GET, to send form data because with POST the data is not visible to the user. Imagine if your form requests that the user enter a username and password combo, and then that password is displayed for all to see in the URL! Also, you can embed quite a bit more data in the request body (using POST) than you could in a URL (using GET). For the sake of this exercise, though, GET is sufficient. As you will see momentarily, though, querystrings have some advantages that form variables don't.
Close your browser. In Dreamweaver's Site panel, click test_form_processor.asp, and press F12.

This time, when you test the page, it lacks the querystring data that ASP and ColdFusion are expecting, because you closed the browser and flushed that data from memory. Interestingly, ASP and ColdFusion handle this problem differently. ASP displays, "Thank you,, for filling out my form." ColdFusion refuses to display the page at all, showing an error: "The page cannot be displayed."
One of the challenges of dynamic site development is to make sure that no user enters a page without all of the data that the page needs to process. If this happens, the result is often an error that confuses and frustrates users. The solution to this problem is twofold: Prevent users from accessing pages without sufficient data in the first place, and if that fails, catch the error and redirect users to an all-purpose error page that enables them to notify the Webmaster, which is better than them seeing a cryptic ASP or ColdFusion error message. We'll use several different types of validation during the course of this book to prevent users from accessing pages without the required data.


