Redefining HTML Elements with CSS
One of the advantages to HTML is that it includes a wide range of logical tags, flexible enough to describe the logic of most basic documents. With its six built-in levels of heading (<h1>, <h2>, <h3>, and so on); tags for regular text (<p>); lists (<ol> and <ul>); tables (<table>, <tr>, <td>); block quotes (<blockquote>); address (<address>) tags and more, you can mark up documents quickly and in such a way that the tags actually describe the content and structure of the document. In addition, browsers recognize these styles and know how to render them. For example, content in the <h1> tag is large and bold with extra space above and below it, while content inside <p> tags is rendered in a normal body font, such as a 12-point system font.
If every page relies on the browser to render the documents, then all HTML pages would start to look the same. Every level one heading on the Internet might be in 18 point Times New Roman bold. Such a uniform appearance prevents organizations from differentiating themselves and bores users. For this reason, early on in the development of HTML, coders demanded some way to control the presentation of content. To meet this need, special presentation tags such as the <font> tag were added to the standard. As you know from the preceding lesson, the <font> tag has since fallen out of favor, largely because it is inefficient. It requires developers to add special formatting attributes to each and every paragraph that needs to diverge from the standard browser template.
With the emergence of CSS, developers have a much more powerful and flexible way of handling presentation. Perhaps the simplest, and ultimately most powerful, feature of CSS is that you can use it to tell browsers how to render standard HTML tags. For example, you can specify that the browser renders all content enclosed in <p> tags in Verdana 12 point black, and all level 2 heading as Verdana 16 point purple bold. What makes this so useful is that you specify these directions in one place, and every single <p> tag and <h2> tag in your site is automatically formatted correctly, without the need for any additional code. Further, if you make a change later to this small bit of code, the change will cascade throughout your entire site instantly. Anyone who came from the 20th century world of desktop publishing or even professional word processing would be familiar with the benefit of automatic styles.
You might be wondering what you need to do if you have a block of body text that needs to differ in some way from regular body text? CSS enables developers to create custom styles, called classes, which can be applied to any portion of text, whether it's a block level tag such as <p>, or a span of characters within a regular paragraph. The only catch to using classes is that not only must you define custom styles, you also have to add a small bit of code to apply them (in contrast to redefining HTML tags, which update as soon as you save the style).
In the first task, you will create a series of CSS styles that redefine the most common HTML tags used in the site. You will also attach these styles to each of the existing pages. When you are finished, you will have formatted the vast majority of the text for the siteas it stands now and as it will stand at the end of the book. In the next task, you will create and apply custom styles, which will take care of some of the remaining exceptions. Others will be added at appropriate times in the book. But for now, let's redefine the HTML elements to give the site the Newland Tours look.
Open index.htm and choose Window > CSS Styles to open the CSS Styles panel (if necessary) and select the Edit Styles radio button. If necessary, select index.htm at the top of the list in the CSS Styles panel.
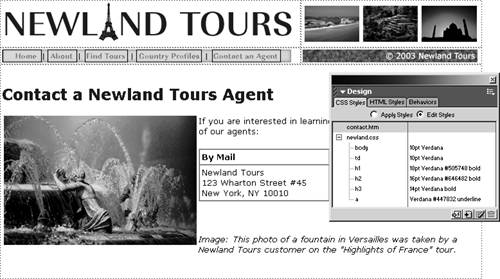
You create and (in some cases) apply styles using the CSS panel.
In general, you select Apply Styles to apply custom style classes once they've been created. You select Edit Styles to access redefined HTML styles as well as custom classes. You can use either one to add new styles (of either type). But since styles that are redefined HTML elements show up only in the Edit Styles category of the CSS Styles panel, you should activate it now.
The CSS Style buttons at the bottom of the panel are sometimes grayed out, unless you select the filename (in this case, index.htm).
Click the New CSS Style button. In the New CSS Style dialog, select Redefine HTML Tag in the Type radio group, and select [New Style Sheet File] in the Define In radio group. From the Tag drop-down menu, choose the body element. Click OK.
In this step, you are preparing to redefine the <body> tag. To do so, you have to tell Dreamweaver that the style you want to create redefines an HTML tag, and that you are not creating a custom style. The Define In radio group enables you to specify whether you want the styles stored in index.htm only (This Document Only) or in an external style sheet ([New Style Sheet File]).
The benefit of storing styles in an external style sheet is that all of the pages in the site can reference that same file, which means that a change made to that external file instantly affects every page that refers to it (which in the Newland Tours site will be every page in the site).
In the Save Style Sheet File As dialog, create a new folder called css. Double-click to open this new css folder. Name the file newland.css, and click Save.
Though Newland Tours does not, some sites require multiple style sheets. It's a good idea to keep them all in one place. For this reason, I always create a css folder that sits parallel with the images folder.
Notice near the bottom of the dialog that Dreamweaver writes the path of the style sheet relative to the currently active document in the URL field. In this case, it's css/newland.css.
In the CSS Style Definition for body in newland.css dialog, in the Type category, select Verdana, Arial, Helvetica, sans-serif from the Font drop-down menu, and 10 points (not pixels!) from the Size drop-down menus. Click OK.
In this step, you are creating a default text setting for all of the text on the page. How does this work, since generally all text inside the <body> tag is also inside another set of tags, such as <p> or <h1>? The answer revolves around the concept of inheritance. Tags nested inside other tags inherit (theoretically) the styles of their parent tags. Since all page content appears within the <body> tags, all page content should inherit the CSS style information from those tags.
Does this mean that text inside an <h1> tag will now be formatted using 10 point Verdana? No, because the <h1> tag has native formatting information already built into it. Where this formatting information conflicts with the formatting information in the <body> tag, it overrides the <body> tag information. Whether (and which) formatting is overridden is determined based on the order of precedence. In general, the closer a tag is to the text, the more heavily weighted are its formatting attributes. Since the content in an <h1> element is closer to the <h1> tags than it is to the <body> tags, the <h1> formatting takes precedence.
That's the theory, anyway. But browsers don't uniformly respect this CSS hierarchy, and sometimes formatting attributes get ignored when they aren't supposed to be. So in practice, you often have to define more information than you should have to in theory.
When you clicked the OK button, you probably noticed that the font throughout index.htm changed to Verdanawhich is what you specified, so that much is good. But you also specified that the font size be 10 points, and the font size didn't change at all. In fact, you can specify whatever size you want to for the <body> tag, and Dreamweaver will disregard it for all of the text on this page. The reason it ignores it is because all of the text on this page is inside a table, and the formatting of the <td> tags is overriding the size you specified in the <body> tag. But this is not a major problem: To fix it, you just need to redefine the <td> tag.
Click New CSS Style again, verify that the type is Redefine HTML Tag, and Define In is set to newland.css. Select td from the Tag drop-down menu, and click OK.
This dialog will become very familiar to you over time.
In the CSS Style Definition for td in newland.css dialog, select Verdana, Arial, Helvetica, sans serif as the font and 10 points (not pixels) as the size. Click OK to create the new style.
These are the same settings you associated with the <body> tag, but this time, you'll see that they stick in the document: The text is now noticeably smaller than before.
We need to redefine several more HTML styles using CSS, but index.htm doesn't actually have that many styles, so in the next step, you'll open a different file.

Save and close index.htm. Open tours.htm.
This more structured document makes use of <h1>, <h2>, and <h3> tags as well as some plain-looking <a> elements.
In the CSS Styles panel, click Attach Style Sheet, and in the Link External Style Sheet dialog, browse to newland.css in the css folder and click Open. Verify that Add As Link is selected, and click OK.
Before you start defining new styles, you need to attach the style sheet you already created. Otherwise, you'd end up creating a second style sheet. Again, the goal is to create a single style sheet to which all files in the site refer.
Why choose Link, rather than Import, to apply the external file? Had you chosen Import, Dreamweaver would have copied the styles in newland.css into the header of this file. In other words, importing replicates the style sheet on each page, negating one of the primary benefits of using style sheets.
You should now see that all of the text on the page is converted to Verdana, and that the body text is 10 points. When you see that, you know the style sheet has been attached and applied.
Still, the three levels of heading are somewhat bland. Let's spruce them up with some color.
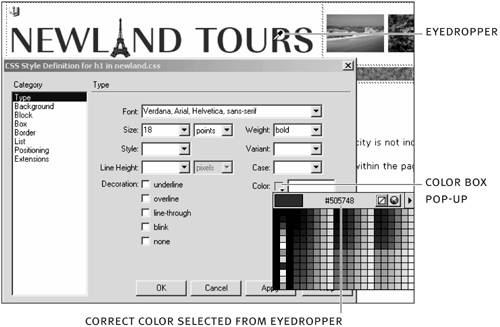
Click the New CSS Style button, and make the appropriate settings to redefine the h1 element, saving it in newland.css. Once in the CSS Site Definition dialog, set the font once again to Verdana, Arial, Helvetica, and sans serif; the size to 18 points; the weight to bold; and the color to #505748. Click OK.
You should be getting comfortable creating style definitions at this point. The only new thing here is that you are specifying a color. You can click the color box to choose a color from a pop-up, or you can enter the color value directly.
TIP
Another way to select a color is to pick it up from somewhere else onscreen. To do so, click the color box pop-up, and then click with the eyedropper tool anywhere onscreen, and Dreamweaver will select that color. In this step, if you click any of the letters in the Newland Tours banner, the correct color value should appear automatically.
Redefine the <h2> tag using the following settings: Font = Verdana, Arial, Helvetica, sans serif; Size = 16 points; Weight = Bold; Color = #646482.
Look at the continent names on the page to see the results. They should appear dark purple.
Redefine the <h3> tag using the following settings: Font = Verdana, Arial, Helvetica, sans serif; Size = 14 points; Weight = Bold.
On the tours.htm page, this setting affects the tour names. You'll probably notice little difference. We only redefined this HTML style to ensure it fits in consistently with the two headings you just defined.
Redefine the <a> tag using the following settings: Font = Verdana, Arial, Helvetica, sans serif; Decoration = Underline; Color = #447832.
You probably know you can specify link colors in the <body> tag in HTML (or in the Dreamweaver Modify > Page Properties dialog). But, again, why specify the same information on every page, when you can specify it once in a CSS and have it apply to all pages?
When you are finished, the links at the top of the page should become green, which suits the color of the site better than the default blue color.
Save and close tours.htm.
We are done redefining all of the HTML tags used in the site. We have yet to create our custom stylesthat's covered in the next sectionbut first, take a moment to attach newland.css to each of the remaining files.
One at a time, open about.htm, contact.htm, and profiles.htm, and use the Attach Style Sheet button in the CSS Styles panel to attach newland.css to each of these pages.
Take a quick look at the contents of the pages to verify that the styles have indeed been applied. If you are successful, not only will you see that the text is in Verdana and in the appropriate color, but you'll also see a series of styles listed in the CSS Styles panel.