Creating the Form Interface
Most CMSs are form-based, so building them involves creating lots of forms. The key to developing forms is to analyze the structure of your data in the database, and make the forms match accordingly. In this case, you will be inserting a new record into a table that has only three fields, including one that's a primary key. So this form will be easy, containing only two elements and a Submit button. In this task, you'll mock up the visible part of the form.
Open admin_template.asp, title the page Newland Tours: Admin Update Traveler's Journal, change the heading to read Update Traveler's Journal, and save the file as admin_update_tj.asp.
As usual, you begin a page by mocking up its core elements.
Replace the placeholder body text with the following two paragraphs:
Use the form below to update the Traveler's Journal. Be sure not to overwrite any of the HTML, only rewriting the content in between the HTML tags.
Tip
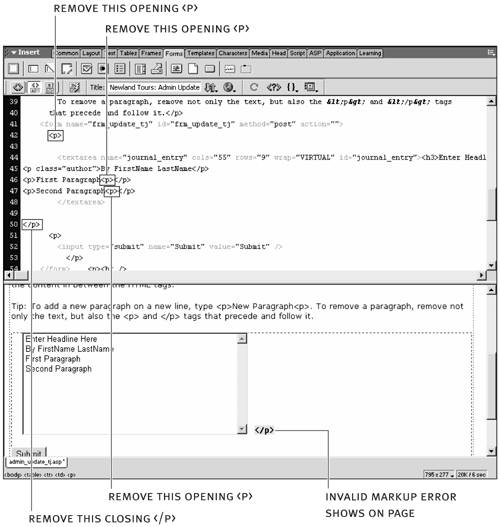
To add a new paragraph on a new line, type <p>New Paragraph<p>. To remove a paragraph, remove not only the text, but also the <p> and </p> tags that precede and follow it.
Again, when you create a CMS, it is incumbent on you to document its use and train its users. Adding page directions is a simple way to meet user needs.

Below the directions, insert a new form (frm_update_tj). Inside, place a text area and a Submit button.
The text area form element is used to enable users to enter longer blocks of text than are generally allowed in a text field.
TIP
When using text areas that output to an Access database, make sure the target field's type is Memo. The normal Access Text type is limited to 255 characters and defaults to 50. The Memo type allows 65,535 characters.
Select the text area, and in the Property inspector, name it journal_entry, set its Char Width to 55, its Num Lines to 9, and its Wrap to Virtual.
These settings give the text area a name and make it a bit larger, so users have more space to write. They also set the text to wrap automatically when it reaches the end of the line.
With the text area still selected, switch to split-design and code view (if you are not already there). Between the opening and closing <textarea> tags, add the following HTML. If desired, switch back to design view.
<h3>Enter Headline Here</h3>
<p class="author">By FirstName LastName</p>
<p>First Paragraph</p>
<p>Second Paragraph</p>
This HTML will be the default text that appears in the text area when the page loads. Thus, the only thing users have to do is type over "Enter Headline Here" to enter a new headline, and as long as they don't disturb the surrounding tags, the new headline will appear in the <h3> format.
TIP
You can also enter default text in the Property inspector. To do so, select the text area, and type directly in the Init Val field. This technique is fine for two or three words, but you'd better have a strong pair of bifocals if you want to type much more. That's why I switch to code view.
Dreamweaver may add superfluous <p> tags at some point during the previous step, resulting in an error on the page. If this happens, switch back to code view, remove any extra <p> tags in the default text, and remove the opening and closing <p> and </p> tags that surround the <textarea> tags.
This problem occurred to me in two different operating systems, using two different server models (ASP and ColdFusion). It appears to occur because Dreamweaver places the text area inside <p> tags when you create the form in design mode. Then when you add default HTML for the text area with <p> tags in it, Dreamweaver sees that <p> tag pairings are illegally nested in another <p> tag pairing, and tries to fix the problem, ultimately making it worse. At any rate, it is easy enough to fix.
Open admin_index.asp, select Update the Traveler's Journal, and link it to admin_update_tj.asp.
Once you've created new pages, don't forget to add links to them. Save and close admin_index.asp, and save admin_update_tj.asp.