Building a Simple, Dynamic Application
You have now tested the site going through the remote server, andassuming you saw index.asp (or index.cfm) in your browseryou have everything correctly configured. But nothing in the Newland site is actually dynamic yet. At this point, you've done all the work and haven't seen any of the benefits. In this task, you will create a very simple dynamic application, which will reward you with a taste of what's to come, both conceptually (how dynamic sites work) and behaviorally (the sequence of steps needed to create the functionality).
Creating the Input Page
You're going to build a page containing a form that asks users their names. Then they will click Submit, at which point they will be redirected to a second page, which will display the name they entered. No, this application doesn't exactly push the limits of ASP or ColdFusion. It does, however, introduce you to building forms, dealing with dynamic data, and distinguishing between server-side and client-side code.
With the Newland site open, choose File > New. In the New Document dialog, choose Dynamic Page in the Category list on the left side, and then choose either ASP VBScript or ColdFusion on the right. Make sure Make Document XHTML Compliant is checked. Click Create.
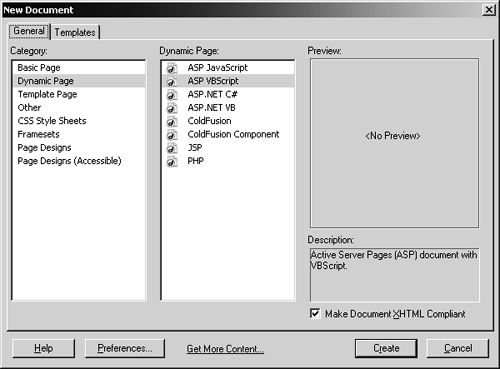
In this step, you are creating a new dynamic page. By specifying the type of dynamic page, you tell Dreamweaver what code to use when you use Dreamweaver's ready-made server behaviors, which extension to use when you save the file, and in some cases, which additional code to add to the document header. ASP users will see <%@LANGUAGE="VBSCRIPT" CODEPAGE="1252"%>; this line specifies which language the page is using. (ASP allows you to use VBScript and JScript, so this line tells the server which one you are using.) ColdFusion doesn't have multiple scripting languages, so a new ColdFusion page has no equivalent for this line.
Click anywhere in the design window, select the Forms tab in the Insert panel, and click the Insert Form button to insert a form. Click the Insert Text Field button, and then click the Insert Button button.
You have just added a basic form to your page.
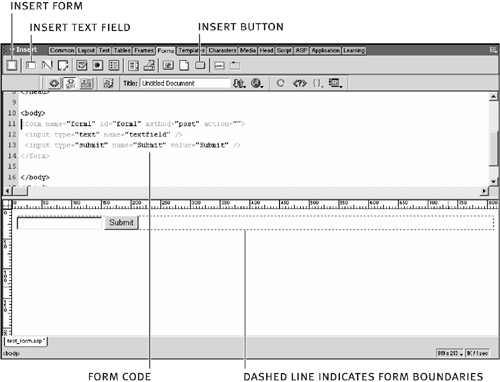
The red dashed line indicates the form's boundaries. This will not appear in the browser; it is there just to help you know where the form begins and ends on the page.
The form at this stage is not yet customized and does not do anything. Lacking even a text label beside the text field, it doesn't tell you anything about itself.
Click the text field, and then press the left keyboard arrow once to position the insertion point before the text field. Type First Name.
If you don't label your text fields, no one will know what to type in them!
Click the text field, and in the Property inspector, name the field firstName. Press Tab or Enter/Return.

You will use this name to retrieve the value in ASP or ColdFusion in a few minutes. Always give your form fields meaningful names. Code is hard enough to write as it is don't make it worse by sticking with Textfield1, Textfield2, and Textfield3, which Dreamweaver inserts by default.
You press Tab or Enter/Return to apply a setting entered in the Property inspector.
Click <form#form1> in the tag selector, to activate the Property inspector for the form. Name the form frm_name, and type test_form_processor.asp (or .cfm) in the Action field.
The Action field points to the page (or other resource) that contains the script that can process the form data. It is always a URL. In this case, it points to a URL that doesn't exist, because you haven't created test_form_processor.asp (or .cfm) yet. The method should be set to POST. I'll explain what POST means in a later lesson.
NOTE
Henceforth, I will assume you can figure out your own extensions. It wastes space and insults your intelligence for me to specify "(or .cfm)" every time I refer to a file. I will always use .asp, so if you are using ColdFusion, just use the .cfm extension instead.

Choose File > Save As and name the file test_form.asp.
This is a throwaway file that you are creating just to test a simple dynamic site feature. I often prefix such files used for testing purposes with "test_"; that way, when I am finished, I can easily find and remove them.
Creating the Output Page
You have completed the input page. Now it's time to show how ASP or ColdFusion can collect that information, insert it into regular XHTML code, and return it to the client browser.
Create a new dynamic page.
See step 1 from the previous task if you forgot how.
Save the new file as test_form_processor.asp.
I often use the suffix "_processor" for pages that exist to process some sort of data. This page will process the data entered by the user in the form.
In design view, type Thank you,, for filling out my form. With the cursor anywhere inside this paragraph, choose Paragraph from the Format menu in the Property inspector.
Eventually, this text will say, Thank you, [whatever the user's first name is], for filling in my form. Most of the sentence is just static text. The dynamic part will be the actual value of the first name, which will be pulled in from the form.
By selecting Paragraph as the Format, you wrap the text string in <p></p> tags.
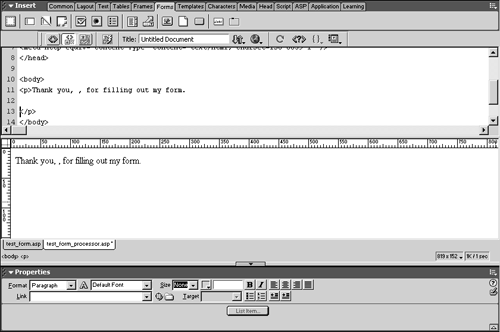
Position the cursor in between the commas, where you would enter someone's name. Open the Bindings panel (Window > Bindings).
The Bindings panel is used to specify all of the data that is available to the page. Data is typically stored in a name-value format. In this particular case, the name is firstName. The value doesn't yet existit won't exist until someone fills out the form. Remember also that this value comes to the page from a form on the test_form.asp page. Other possible sources besides forms (and you'll get quite familiar with these later) include the URL, a recordset (data retrieved from a database), a cookie, and more. But this time, it's from a form.
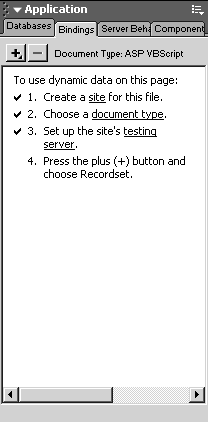
Click the + button to add a new binding. From the menu, choose Request Variable (ASP) or Form Variable (ColdFusion). In the resulting dialog, for ASP, select Request.Form in the Type Menu and type firstName in the Name field, or for ColdFusion type firstName in the Name field. Click OK.
The Bindings panel is updated to show the firstName variable. The screenshot shows what the Bindings panel looks like in ASP. It looks slightly different in ColdFusion (the word Request is replaced with Form, and the word Form.firstName is replaced with firstName).
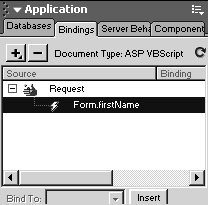
You might be wondering what exactly you've just accomplished. If you take a look at your code, you'll see that you haven't changed the document at all: The code is the same as it was before you opened the Bindings panel. What you've done is use Dreamweaver's graphic interface to tell Dreamweaver how to write a block of dynamic code.
Back at the beginning of the chapter, I listed two code snippets side by side: one in ASP and one in ColdFusion. The code in those snippets specified a variable (firstName); its origin (a form); and what to do with it (output it to XHTML). What you've just done in the Bindings panel is specify that logic in a way that Dreamweaver can understand and translate into code.
For ASP, you specified a Request variable. In ASP, the Request object is used to retrieve information from a given location. In the dialog, you then specified Request.Form, which tells ASP to look in the Request object for the variable in a form. Finally, you specified the name of the variable itself. In a word, you have provided a road map for Dreamweaver/ASP to find the value of the firstName variable.
For ColdFusion, you specified a form variable, which is sufficient for ColdFusion to look in the right place (no need to worry about Request objects and such). Then you provided the name of the variable. Again, to summarize, you have provided a road map for Dreamweaver/ColdFusion to find the value of the firstName variable.
At this point, though, you have told Dreamweaver only how to find the variable. You haven't actually asked it to find that variable; nor have you asked Dreamweaver to do anything with that value once it has it.
Make sure that the variable Form.firstName (ASP) or firstName (ColdFusion) is selected in the Bindings panel, and click the Insert button at the bottom.
A blue highlighted {Form.firstName} appears on the page, in between the commas. Blue highlighted text signifies the presence of dynamic content in Dreamweaver. The text won't appear blue when viewed in a browser. For that matter, it also won't display {form.firstName}, either: It will display instead the user's first name.

NOTE
Though {Form.firstName} looks like code, it's actually pseudocode. This appears the same regardless of server model. One assumes Macromedia used pseudocode to create a generic and descriptive language to communicate what was actually specified in the dynamic content. That's fine as long as you don't attempt to use that syntax to write code.
If you look in the actual code, you should see that <%= Request.Form("firstName") %> (ASP) or <cfoutput>#form.firstName#</cfoutput> (ColdFusion) has been added. These are the same snippets I showed you earlier in the chapter, with one small exception in the ASP code.
The way to tell IIS to output an expression is to use the Response object. The most common use of the Response object is Response.Write(). This is a command that tells IIS to insert whatever's inside the parentheses into the document. With a few nuances, Response.Write() is more or less the equivalent of <cfoutput>. However, Response.Write() is so popular that it has a shortcut. When you see an ASP code block that begins <%= rather than simply <%, it means <% Response.Write(). In other words, the following two lines of code mean the exact same thing:
<% Response.Write(Request.Form("firstName")) %>
<%= Request.Form("firstName") %>
To summarize what you have done in the last two steps, you told Dreamweaver/ASP or Dreamweaver/ColdFusion how to find the firstName variable, using the Bindings panel's + button. Then, you inserted that binding onto the page, which told ASP or ColdFusion how to find the variable and also to display the current value of the variable.
Save and close all open documents. In the Site panel, hold down the Shift key and select both test_form.asp and test_form_processor.asp. Click the Put File(s) button in the toolbar at the top of the panel.
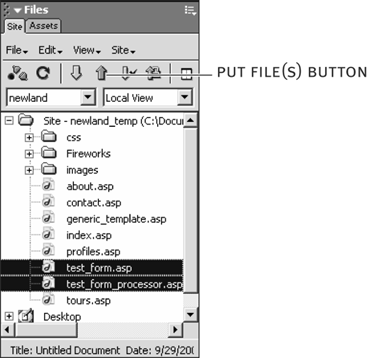
You can't test the site unless you run it through a server, and your server is not your local site. So, to test your site, you have to upload, or Put, your file to the server.
TIP
This is a step I forget about time and time again. If you get an unexpected error during development, your first point of troubleshooting should be to verify that you uploaded all of the requisite files.
Select test_form.asp in the Site panel, and press F12 to test it in a browser. When the page loads, type your first name in the field and click Submit.
You are redirected to the test_form_processor.asp page. As I hope you anticipated, the first name you entered in the form now appears on the screen.
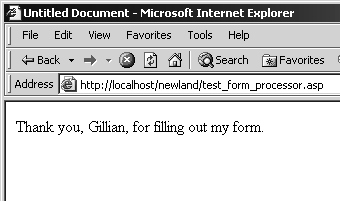
Still in your browser, choose View > Source (or your browser's equivalent). Look at the line enclosed in <p> tags.
This is the interesting part. The dynamic code has been completely removed! The code for this page is that of a static XHTML Web page. Even the dynamic part, the first name, looks as though it were hard-coded in there. But of course, you know it wasn't.
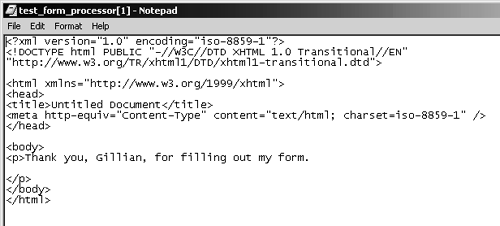
Our review of the output code brings up a critical concept. The page you code in Dreamweaver is different from the page the user sees in a browser, even though they both have the same name (and still, of course, a great deal in common).
The difference between the two versions of the page is that all of the original page's ASP/ColdFusion code is processed and removed, with its output values written into the XHTML as regular XHTML.
The two versions of the page also share some similarities: All of the standard XHTML code written into the original, including the <body> and <p> tags, and most of the text, are passed unchanged to the output version of the page.
If you like, return to Dreamweaver and remove test_form.asp and test_form_processor.asp from the site.


