Building the Log-In Page
Now that your registration is page is functioning, you can build the log-in page. Remember, the role of the log-in page is to obtain (through a form) the user's username and password. Then, it will compare these values with the records in tbl_users. If there's a match, the log-in script sets a session variable indicating that the user is logged in. If there is no match, the user is redirected to a log-in failed page.
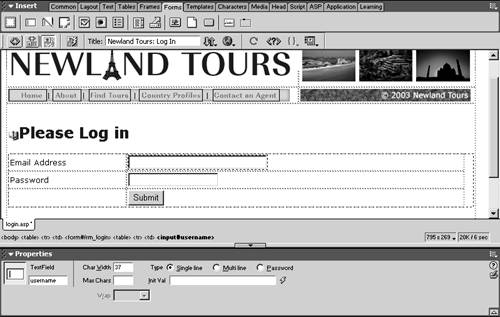
Starting with generic_template.asp, create a new file, login.asp. Title it Newland Tours: Log In. Type Please Log In as its heading.
Now you've created the basic page framework.
Replace the first line of body text with a form. Call the form frm_login. Inside the form, insert a table with 3 rows, 2 columns, a cellpadding of 3, a cellspacing of 0, a width of 98 percent, and a border of 0.
Once again, the table inside the form is used to structure the form elements. Also, as before, you don't specify the action or method attributes of the form. These are both required, but they will be completed automatically for you when you add the Server behavior, so you can leave them alone for now.

Insert the text labels, text fields, and Submit button as before. Name the text box beside Email Address username, and name the one beside Password, pwd. Make sure the pwd text field is set to the Password type in the Property inspector.
The form is built, but it doesn't do anything yet.
Click to select the Submit button, and use the Server Behaviors panel to add a User Authentication > Log In User behavior.
This behavior will do all the work of both verifying that the user's credentials match a pair in the database; that a session variable will be set, if the log-in was successful; and that the user will be redirected to an appropriate location, based on whether the log-in was successful.
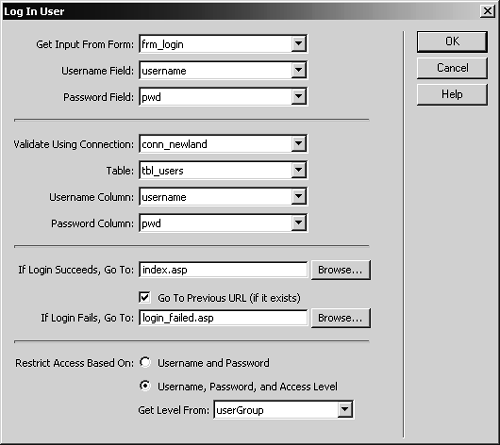
In the top quarter of the Log In User dialog, verify that frm_login is the selected form, that username is set as the Username Field, and that pwd is set as the Password field. In the second quarter of the dialog, choose conn_newland as the Connection, tbl_users as the Table, username as the Username Column, and pwd as the Password Column.
With these settings, you are providing the parameters the script needs to compare the authentication entered into the log-in form with the list of registered users in the database.
In the third quarter of the Log In User dialog, enter index.asp for the successful log-in redirection, and login_failed.asp for the failed log-in redirection. Make sure that Go To Previous URL is checked. In the fourth quarter of the dialog, select Username, Password, and Access Level, and choose userGroup in the Get Level From menu. Click OK.
In this step, you are accomplishing two tasks. First, you are specifying where the user should be redirected depending on the success or failure of the log-in.
The Go To Previous URL setting needs some explanation. There are two ways that users will access this log-in page. First, they can access it directly by following the Log In link on the homepage. But they'll also see this page if they try to access a page that requires log in, and they haven't logged in yet. That is, the log in page may intercept their progress in the site. Upon successful log in, users won't want to be redirected to the homepagenot when they clicked a link to access tours or country profiles. By checking this option, you add functionality to the script that ensures that once these users have logged in, they are redirected to the page they attempted to load before they logged in.
The options in the fourth quarter of the dialog create the separate user group functionality discussed earlier. This will enable you to distinguish between registered users who have logged in and employees who have logged in. Since these access levels are stored in the userGroup field of tbl_users, you specify that information in the Get Level From menu.
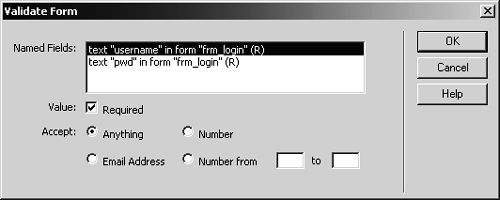
Click the Submit button, and add a Form Validation behavior that makes both fields required.
Every form needs some mechanism for validation.
Beneath the form, in regular body text, enter the following: If you don't already have an account, please register for a free account. Link the word register to register.asp. Save and upload the page.
Because the log-in page may intercept the user's path to information, and because the user may not even have realized that registration is required, adding a simple explanation with a link is a helpful usability feature.

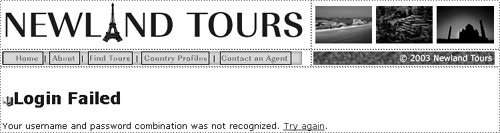
Starting with generic_template, create login_failed.asp. Title it Newland Tours: Login Failed. Type Login Failed as the heading. Type the following as the body text: Your username and password combination was not recognized. Try again. Link the words Try again to login.asp.
Static pages are passé, I know, but they have their uses.
ASP users can test the whole log-in application. Open register.asp, and create a profile. Then log in with your username and password. As always, try to break the application as well. Register the same name twice. Try logging in with the wrong password. Try typing your phone number instead of your email. And so on.
ColdFusion users have a quick chore to do before they can test the application: They need to create the application.cfm file that governs the Web application framework. ASP users don't have to worry about creating a global.asa fileASP will handle session management just fine without it.


