Defining a Static Site
The Newland Tours site as you are inheriting it is a static HTML site. For this reason, you can easily pull it into Dreamweaver and start working on it.
As you probably know, Dreamweaver's integrated site management system doesn't let you open just any HTML fileyou have to define a site first. Defining a site has several benefits, many of which you will see quickly. It helps prevent broken links, automatically updating files site-wide if you move or rename a file. The Site Manager also enables you to perform site-wide operations, such as Find and Replace, which greatly boosts productivity. Another key advantage of the Site Manager is that it has built-in file uploading capabilities (including FTP), which means you can put your files on the Web whenever you want, with the click of a single button.
In this task, you'll define a regular, static site in the Site Definition dialog box. In a few lessons, once you've made appropriate preparations, you'll return to this dialog box and define a dynamic site. Dynamic site definition is a little more involved, and the additional overhead won't do us any good at this early stage. Fortunately, you can always change a site definition, so we've nothing to lose by defining a static site for now and getting right to work.
Create a new directory on your hard disk called Dreamweaver MX Dynamic Applications.
You'll store the local version of the site in this folder.
Copy the contents of the newland folder, found in the Lesson01/Start folder on the CD-ROM, into this new directory.
Often enough in real life, you'll inherit an existing site and be asked to upgrade it. With any significant upgrade, it's best to make a copy of the existing site and work on that. You should never directly edit a site in production (that is, the site that the public sees), unless you are doing minor work on it, such as correcting a typo.
Open Dreamweaver MX.
Once the files are present on your system, you should edit them exclusively in Dreamweaver. Any text editor can open any HTML file, and every operating system has a file management utility (such as Macintosh Finder or Windows Explorer) that lets you move and delete files. But you should avoid using these tools, because any change is likely to foil Dreamweaver's Site Manager. So once the files are there, go straight to Dreamweaver and avoid the temptation to do anything to them by any other means.
Choose Site > New Site.
Though the files are on your hard disk, Dreamweaver doesn't yet see them. By defining a site, you enable Dreamweaver to seeand managethe files. Once you have chosen the New Site command, you'll see the Site Definition dialog box. If the dialog you see doesn't look like the one in the screenshot, it's probably because you are in advanced view. Click the Basic tab near the top of the dialog to bring up the basic view shown in the screenshot.
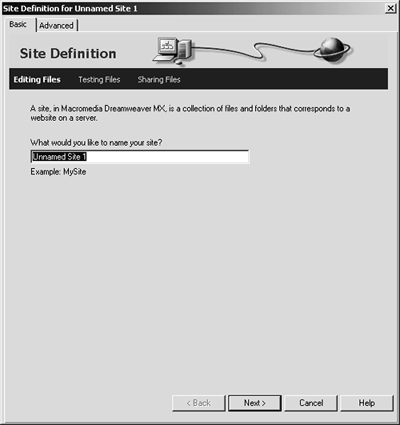
Enter Newland Tours in the only field on the screen, and press Next.
The Site Definition dialog's basic view uses a wizardlike approach, unlike the more complex dialog box in previous versions of Dreamweaver.
TIP
If you prefer the old-style Site Definition dialog better, you can access it by clicking the Advanced tab.
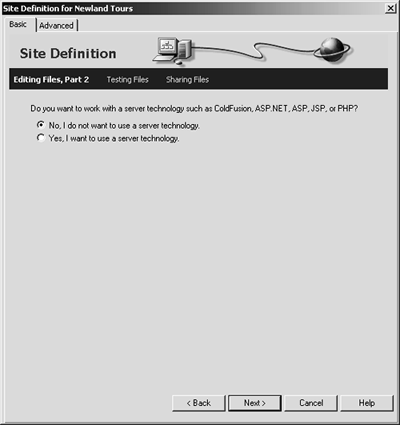
On the Editing Files, Part 2 screen, select "No, I do not want to use a server technology." Click Next.
Later in the book you will use a server technology. But by choosing No now, you get to skip several complex steps.
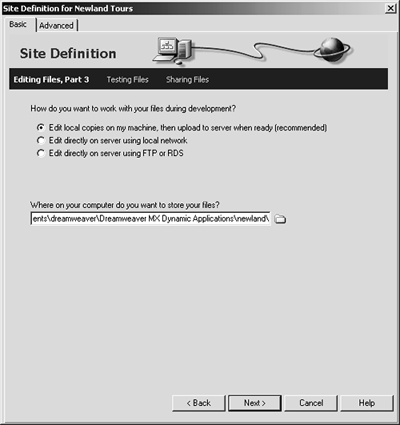
On the next screen, select "Edit local copies on my machine, then upload to server when ready (recommended)." Then, click the folder icon beside the "Where on your computer do you want to store your files" field, and browse to the newland folder within the Dreamweaver MX Dynamic Applications folder, and click Select to select the folder and return to the Site Definition dialog box.
In this step you are defining the local site which is where all the action takes place. Whenever you edit a file, you will be editing the file as it appears in the local site. The local site is generally not seen by the public, which means if you temporarily break the functionality of the site as you work, no harm is done.
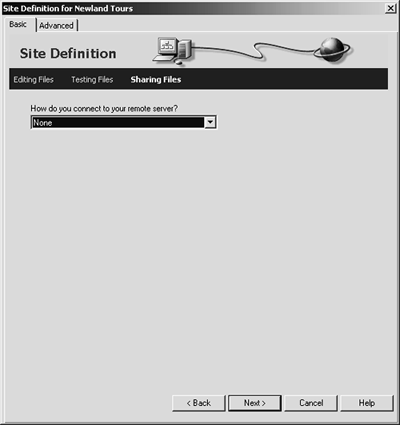
On the next screen, choose None in the drop-down menu.
Normally, you specify either a staging server or production server as the Remote site. A staging server is the server where developers test sites. Staging servers are qualified servers, with all of the technologies that the site uses installed, such as ColdFusion or a database. The only thing that distinguishes them from the production server (which is the site that the public sees) is that a staging server is not publicly accessible.
Later in the book, you will define a remote site, which you will use as a staging server. That staging server will be able to handle fully dynamic sites, which the local site you are defining can't doas you'll see later. But for now, a remote site is an unnecessary complication.
NOTE
There is no production server for the site you are building in this book, because Newland Tours is fictional.
Click Next. Review the summary, and click Done.
When you are finished, a dialog box appears, indicating that Dreamweaver is building the site cache. What this means is that Dreamweaver is analyzing all of the files in the site, checking all of the links, and storing them in memory. This way, if you do decide to rename a page or move an asset to a different folder, Dreamweaver will automatically update all of the files that link to the modified file. Once Dreamweaver has built the site cache, the dialog disappears on its own.
When you are finished, the Site panel (by default, in the lower-left corner of your screen) should be filled with files. You'll probably also notice that a lock icon appears beside each of the files. This lock indicates that the files are read-only, which means you can't modify them.
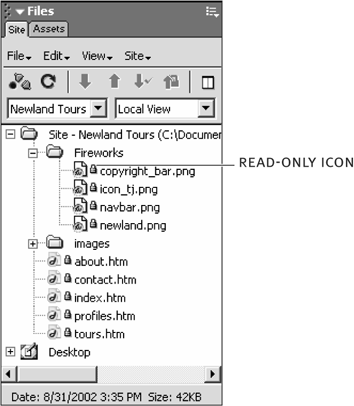
This is obviously not the behavior you wantthe whole point of working with files in Dreamweaver is to change them. The reason why they appear as read-only is that you copied them from a CD-ROM, and CD-ROMs are read-only (in fact, that's what the RO of CD-ROM stands for). If you click to expand the Fireworks or images folders, you'll see that all of those files have lock icons as well.
Before you start working on the files, you'll need to turn off the read-only status.
Position your cursor over the top-level folder (which should say Site Newland Tours) and right-click (Windows) or Control-click (Macintosh) to open up the contextual menu. In that menu, choose Turn off Read Only.
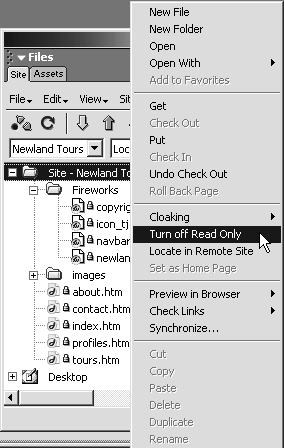
If you glance through the site at this point, you'll notice that all of the lock icons have been removed. The site is defined and you're ready for action!


