Redefining the Newland Tours Site for Dynamic Development
Configuring Dreamweaver to work with dynamic Web sites is somewhat more complicated than configuring it to work with static Web sites. Either way, you use the Site Definition dialog to configure the site. What makes defining dynamic sites so difficult is external to Dreamweaver: To develop dynamic sites, you need access to (and permissions on) a bona fide Web server.
This may be a new workflow for many readers. In the past, you may have developed a site locally on your hard drive, and then uploaded it to the production (or public) server when you were ready to publish. When developing dynamic Web sites, you can still develop locally on your hard drive, but you also need access to a development server. Only when you have completed the site using the development server do you upload it to the public Web server.
NOTE
The only difference between a development Web server and a regular Web server is that the development server is not publicly accessible. But from a technical standpoint, a development server is identical to a regular Web server.
Windows Running IIS or PWS Locally
The easiest setup is if you are on a Windows 98, 2000, or XP system, because you can use PWS or IIS as the development server. Then, all development happens on your own hard drive. You use IIS or PWS to serve and process your pages until they are perfected. Then you can upload them wherever you want. Since the server is located on your machine, all of the files are local, even though they may be listed in Dreamweaver in the Remote section.
To install and run PWS or IIS, use the Add/Remove Programs utility in the Control Panel, and from there, select Add/Remove Windows Components. You'll find PWS or IIS in the list of components. The default setup should work fine for our purposes.
TIP
If you are not sure whether you have IIS or PWS installed, look on your hard drive. If you see a folder called Inetpub, then the server is already installed.
If you intend to develop with ColdFusion locally, then after you have installed IIS or PWS, you can install ColdFusion from the Studio MX CD on your system, so that it runs alongside IIS or PWSthe default arrangement. Alternately, you can install ColdFusion to run as a standalone. The version of ColdFusion on the Studio MX CD is a 30-day trial edition of the enterprise edition of the server. After that expires, it reverts to a development edition of ColdFusion, which means that you can develop ColdFusion applications all you want; you just can't serve them publicly from your machine. Since you are using ColdFusion on your local system as a development, or staging, server, the freebie edition should be sufficient.
Macintosh or Windows with Network or FTP Access to Development Servers
But the local server configuration is not for everyone. Macintosh users obviously have no access to IIS or PWS. Further, many Windows users are not permitted to install and run Web servers. Even behind a university firewall, I am not allowed to run IIS on my XP machine. The reason for this is security. Web servers need regular maintenance to deal with the viruses and security holes that make corporate or university networks vulnerable. To prevent, or at least minimize, the chance of infiltrators circumventing an overall security system, administrators often forbid users from installing Web servers on their own machines.
Obviously, if you don't have access to a local server, you'll need to find access to some other development server. This may be a dedicated server (which is what I use at the university), or it may be a nonpublic folder inside your public Web server. You can access the server over a network, if you have a network connection to the server, or by using FTP. Either way, you will need to get the network path or FTP specifics from the server administrator before you can continue defining your site in Dreamweaver. The server needs to be IIS (for ASP development) or have ColdFusion MX installed (for ColdFusion development).
In addition to an account, and permission to add and remove files and folders within that account, you'll also need one of the following pieces of information from the site administrator:
The path to the folder on the network, which could look something like this:
\\webdev.bigcompany.com\your_site\NOTE
If you have network access to a server, you should map a network drive to your account on that server.
The FTP information to access the site, including the Host Name/Address, which is usually an IP address (and looks something like 100.10.100.10) and a username/password combination to access your account on that server.
The preceding information is enough to give you access to upload your content to those folders. But you will also need some way to browse the content. Specifically, you need a URL to access your content on the server. Typically, the URL will be something such as http://webdev.bigcompany.com/your_site/. When you migrate your site into production, the production URL (in this example) would be http://www.bigcompany.com/your_site/. The important thing to look for is a full URL, complete with http://. Only your server administrator can give you this information.
Defining a Dynamic Site in Dreamweaver (All Users)
Regardless of which section above applied to you, use the following steps to define your site in Dreamweaver. Before you begin, you must resolve all of the issues described in the two preceding subsections.
Specifically, before continuing, you either must have IIS or PWS installed and running on your local system or you must have network or FTP access to an IIS and/or ColdFusion server elsewhere.
With the Newland site open in Dreamweaver, in the Site panel, choose Site > Edit Sites. In the Edit Sites dialog, make sure Newland is selected, and click Edit.
Remember, the Newland site is already defined. You don't need to start from scratch. You just need to add the remote and testing server information to the existing site.
In the Site Definition for Newland dialog, select the Advanced tab. Then, select the Remote Info category from the Category list on the left side. From the Access drop-down menu, make a selection and enter the appropriate information in the fields that appear, using the guidelines below.
If you are developing on a computer with a local version of IIS or PWS installed, choose Local/Network from the Access drop-down menu. Next to the Remote Folder field, click the browse button, and browse to the C:\Inetpub\wwwroot\ folder. Click the Add New Folder button to create a new folder, called newland. Double-click this folder to select it as the Remote folder.
NOTE
The Inetpub/wwwroot folder is the server's root folder on your system.
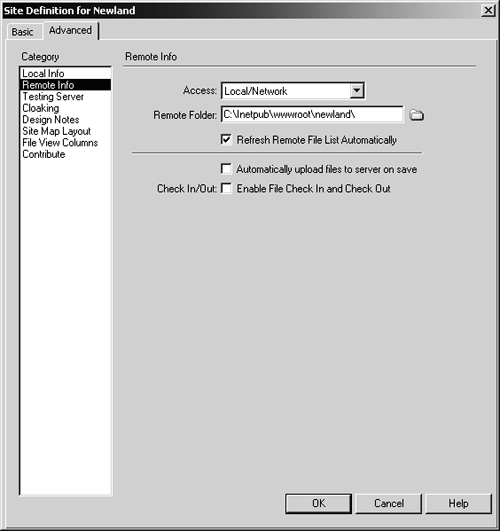
If you are developing on a computer that has a network connection to the server, choose Local/Network in the Access drop-down, and browse to your folder on the server. Most likely, this appears in a mapped network drive. Use the Choose Remote Folder dialog to add a new folder called newland, and select that as the Remote folder.
If you are developing on a computer that has FTP access to the server, first make sure that there is a folder in your account called newland. Then, in Dreamweaver's Site Definition dialog, select FTP from the Access menu, and type the IP or Web address in the FTP Host field. Enter the path to the newland folder in the Host Directory field. Then fill in the Login and Password fields. When you have done all this, click the Test button to make sure you have configured it all correctly.
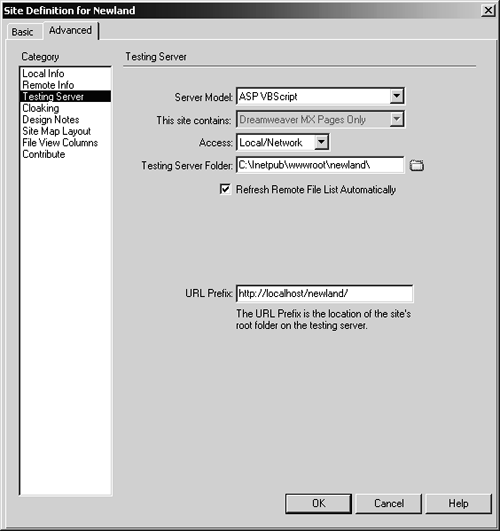
From the Category list at left, select Testing Server. From the Server Model menu, select either ASP VBScript or ColdFusion, depending on which server model you have decided to use. In the Access menu, and also any options that appear beneath it, enter the same information you did in the previous step.
For the Newland Tours site, the Remote site and the Testing Server site are essentially the same. The difference is that the Remote site exists to enable Dreamweaver to save files to the correct folder, while the Testing Server site enables Dreamweaver to test files after they have been processed on the server.
In the URL Prefix field near the bottom of the Testing Server category tab, enter the site's URL.
If you are using IIS or PWS locally on your computer, enter http://localhost/newland/. The word localhost is a shortcut that activates IIS on your computer, and tells it to look in the Inetpub/wwwroot folder, where you created a newland folder in a previous step.
If you are using a remote server, whether through a network or through FTP, enter the server's URL, which the site administrator should have given you. It probably looks something like http://www.bigcompany.com/newland/.
Either way, the URL prefix must begin with http:// and should not have any drive letters (such as h:\) anywhere in it. Also note that the slashes in the URL are forward slashes, not backslashes.
TIP
If the site doesn't display properly later in the lesson, the URL prefix is the first place you should look when troubleshooting. If this information is wrong, you will not be able to browse your site and see it in action.
Click OK to save and close the dialog, and then click Done to close the Edit Sites dialog.
The site is now redefined and should be ready for dynamic development.
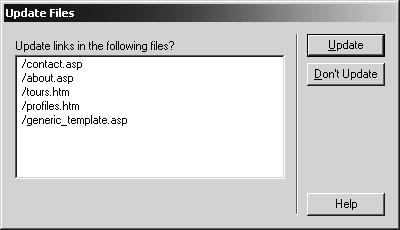
One at a time, right-click (Windows) or Control-click (Macintosh) each of the HTML files in the Site panel, choose Rename, and change the extension from .htm to .asp or .cfm, as appropriate. Whenever the Update Files dialog appears, click Update.
Changing the extension is required when you upgrade to dynamic sites, because the server uses the extension to determine whether to process any special code on the page.

When you change the extension, all of the links that point to that page are broken. Dreamweaver's site manager catches this and fixes the problem when you choose Update.
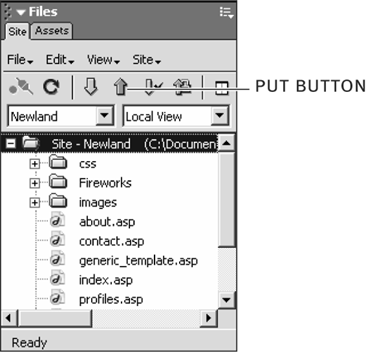
Click once on the top-level folder, and click the Put File(s) button.
This uploads the entire site to the remote folder and testing server.
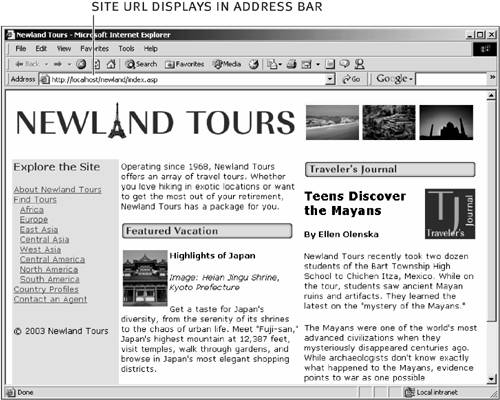
Click once to select index.asp in the Site panel, and press F12.
Pressing F12 tests the site as it runs through the server. This test results in either good news or bad news. If you can see the Newland Tours index page, then you have correctly configured the site, and you are ready to start developing. If you get an error message or the site doesn't display properly, then something has gone amiss. To troubleshoot, take a second look at the URL prefix. Also, use Windows Explorer or Macintosh Finder to make sure that the files really were uploaded to the remote site. If you are still hung up, talk to your site administrator, who should be able to help you resolve this problem.