Planning for the Master-Detail Pages
As you saw from your earlier experiences developing the country profile and tour description master-detail page sets, creating these sets often requires quite a few server behaviors and other dynamic elements working in unison.
You create a recordset to populate the menu on the master page.
Because you are dealing with multiple records, you often need to create a Recordset Navigation Bar, which itself is made of several behaviors, including the behaviors from the Show Region group as well as from the Recordset Paging group.
You output records using Dynamic Text, and apply the Repeat Region server behavior to ensure that all of the records are output.
If the records are hyperlinked, you bind a unique querystring or URL parameter to the href attribute.
A SQL statement that uses a dynamic value in a WHERE clause filters the recordset using criteria the user supplied on the master page.
Building master-detail pages by hand can be slow and tedious. Dreamweaver speeds up the development of this common structure with a special application object that adds all of the needed server behaviors and creates the pages for you. This server object is called a Master-Detail Page Set, and is available in the Insert > Application Object menu. This is a very convenient tool, as you'll see in this lesson.
The Master-Detail Page Set object works by collecting all of the relevant information needed to build the page set. Some of this information is derived from a query, so you'll have to create a recordset first. All told, the application object requires quite a bit of information, and a single mistake derails the entire process. For this reason, you should figure out what you want in advance. (When writing this lesson, it took me six tries in the dialog before getting it right, because I tried to cut this corner.)
The main thing you need to sort out is what information you want to appear on the master page, and likewise what information you want to appear on the detail page. This information is all retrieved from a database, so what you are doing here is determining what you should retrieve in your initial recordset.
For this master-detail page set, you want the master page to contain the following information as a menu, which should be sufficient for the employee to find and select the correct user account.
Last Name | First Name | Username | Current User Group |
The detail page should include the following information.
Last Name | First Name | Current User Group |
In this case, ironically, the detail page contains less information than the master page. But remember, the purpose of this detail page is not to display lots of information about the record (as you would with a product description in an online catalog), but rather to offer extended functionality to the record (in this case, the power to update the record).
At the very least, you will need to make the information shown above available to the page (via a recordset). But these four elements do not represent a complete listing of information needed from the database. Do you remember when you created the master-detail page sets for the country profile and tour descriptions that when users clicked the link a URL parameter was appended to the URL? This URL parameter is needed to filter the query on the detail page, so it can display only the desired record. In this case, you need some piece of information that can cause the detail page to display one unique record. And any time you need to use something unique to identify a database record, you should immediately think of the table's primary key, in this case, userID.
To summarize, then, the recordset on which your master-detail page set will be built will require the following fields from tbl_users:
userID
firstName
lastName
username
userGroup
In addition, this data will need to be ordered alphabetically by last name to facilitate lookup, so you will need to sort on last name, ascending. Go ahead and create this recordset now.
In admin_addUser_master.asp, add a new recordset, called rs_registeredUsers, according to the specifications just outlined.
By creating this recordset, you have made available the data needed to build the master-detail page set.
TIP
Remember, it's always a good idea to click the Test button in the Recordset dialog, just to make sure you are getting everything you need, and in the right order.
Position the cursor on a new line below the directions, and choose Insert > Application Objects > Master-Detail Page Set.
Selecting this option opens a large dialog.
In the Insert Master-Detail Page Set dialog, make sure that rs_registeredUsers is selected as the recordset. In the Master Page Fields section, select userID and click the minus button to remove it. In the Link to Detail From menu, choose username. In the Pass Unique Key field, choose userID. Check Show 20 Records at a time.
The top half of the dialog, which you have just completed, is used to control the appearance and functionality of the master page. The Master Page Fields section represents all of the fields of each record that you want shown. The four selected here correspond to the four discussed in the introduction to this task. That is, they will appear on the page as four columns, making up a menu for the user.
The Link To Detail From menu lets you specify which field's data will be hyper linked to the detail page. The field username is a good choice, because it is unique.
The Pass Unique Key menu lets you specify which piece of data will be used to filter the data on the detail page. Again, that should be unique, so the table's primary key, userID, is the right choice.
When you choose to show 20 records at a time, you are providing Dreamweaver with the information it needs to insert a Recordset Navigation Bar server object for you. Given that the number of registered users will likely grow to many, a recordset navigation bar is a good idea. Otherwise, employees are forced to download potentially hundreds of records all at once.
In the lower half of the Master-Detail Page Set dialog, type or browse to admin_addUser_detail.asp. Select userID and press the minus button to remove it. Select username and press the minus button to remove it. Click OK.
Dreamweaver may take a moment at this point, because it is adding quite a few server behaviors to two different pages. When it is done, though, the master-detail page set should be complete and functional.
NOTE
The master page may be quite a bit wider now than it was before. This stretching accommodates the pseudocode strings Dreamweaver has inserted in each of the cells (for example, rs_registeredUsers.lastName). The actual data that will go in these fields is not as wide as the pseudocode, so the page will not appear stretched at all when viewed in the browser, so just disregard the stretching in Dreamweaver. Most important, do not try to fix it.
Open admin_addUser_detail.asp. If necessary, move the new table so that it is inside the main page table, just below the directions.
Dreamweaver has to guess where to put the table on the page, and it doesn't always guess correctly. Moving the table won't affect any functionality, so this change is entirely cosmetic.
Save and upload both files. Test their functionality.
You'll be intercepted by the log-in screen first. Use the following credentials to get in:
Username: zfrome@starknet.com
Password: hypochondriac
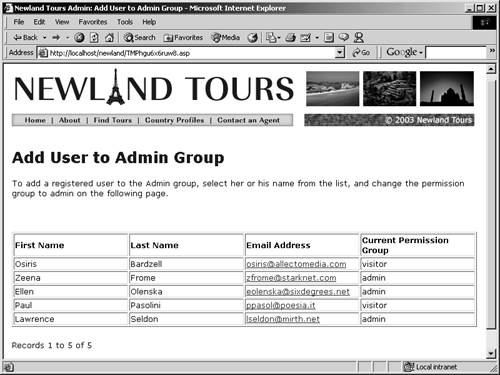
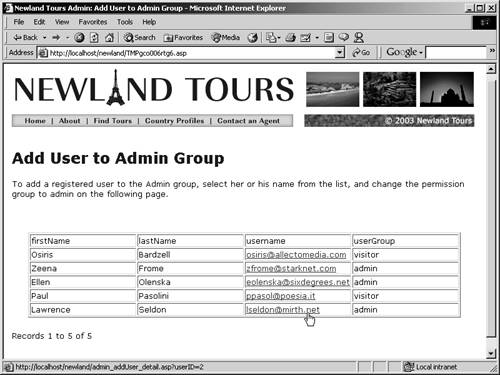
The master page contains a table with the four columns you specified. In addition, the usernames are all hyperlinked, and if you roll over the links, you'll see the URL of the detail page with the unique userID appended as a URL parameter in your browser bar.
Also, you'll see Records 1 to 5 of 5 (or however many records you have at this point in your database). This is created with the Recordset Navigation Status application object (Insert > Application Objects > Recordset Navigation Status), which is inserted automatically as a part of the Master-Detail Page Set application object.
Once you've clicked one of the usernames, you'll see the detail page, with a small table containing the information that you specified in the dialog. The table is still read-onlyyou can't update it yetbut you can at least see that the correct record has been retrieved.
One thing you probably noticed on both pages is that the column/row headers were neither prominent nor meaningful.
On admin_addUser_master.asp, one at a time, select firstName, lastName, username, and userGroup, and make them bold. Then replace each as follows:
firstName: First Name
lastName: Last Name
username: Email Address
userGroup: Current Permission Group
When it generates the table, Dreamweaver uses the database column names as the default table headers. But the database was structured to hold data, not to serve as column headings. These changes make the table easier to understand and use.
NOTE
Customizing table headers also improves security. Had you not changed them, malicious users such as hackers could glean a fair amount of information about your database schema just by looking at table headings.
On admin_addUser_detail.asp, make the three row headers bold, as in the previous step, and replace the text as follows:
firstName: First Name
lastName: Last Name
userGroup: Current User Group
You are making these changes for the reasons described in the preceding step.
TIP
You can drag the line that separates the two columns to the right to create more space for the row headers. You might also need to increase the size of the table by dragging its right edge.
Save, upload, and test the pages again, to make sure they look right.
Though the changes made were cosmetic, it never hurts to double-check the effect before moving forward.