Connecting to a Database
Enough theory and exploration: It's time to connect this database to your pages. As you have must have gathered, a number of preliminary steps are involved to get everything set up. And the steps vary depending on how you are connecting to your server and the server technology (ASP or ColdFusion) you are using.
Broadly speaking, there are two steps you need to take to connect to a database. First, you have to create the DSN on the server, so you can take advantage of an ODBC connection. Second, you have to get Dreamweaver and the page to see this DSN.
The variations in configuring the database are so extreme that rather than attempting to create a generic set of instructions, I've separated them.
ASP Users (Running IIS or PWS Locally or Connecting to a Remote Server)
This section is for all ASP users, regardless of how they connect to their server.
In this section, you will configure Dreamweaver to connect to an existing DSN. ASP users who are working locally will need to first setup the DSN, and instructions to do so are included in this section. Then they will enable Dreamweaver to connect to that DSN.
ASP users who connect to a remote server must have the administrator for that server create a system DSN for them, using the following information: The DSN should be called "newland." The database type is Microsoft Access (which uses the JET driver). The database is located in the newland/database folder in your directory. Assuming you have in fact copied the database folder to that directory, your server administrator has enough information to create the DSN for you. Unfortunately, you cannot continue until this DSN has been created. Once it has, you'll use the steps in this section to enable Dreamweaver to connect to that DSN.
Open index.asp.
It doesn't matter which page of your site is open when initially creating the connection. Dreamweaver creates the connection for the whole site. You've opened index.asp, because you will add dynamic content to that page, shortly.
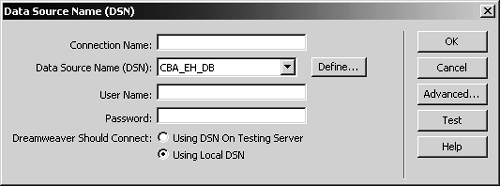
Open the Databases panel, in the Application panel group. Click the Connection (+) button, and choose Data Source Name (DSN).
This opens the Data Source Name dialog, which is used to create a database connection for the site.

Users connecting to remote servers, skip to step 8 below. Users running IIS or PWS locally only: Click the Define button to begin the process of creating a System DSN.
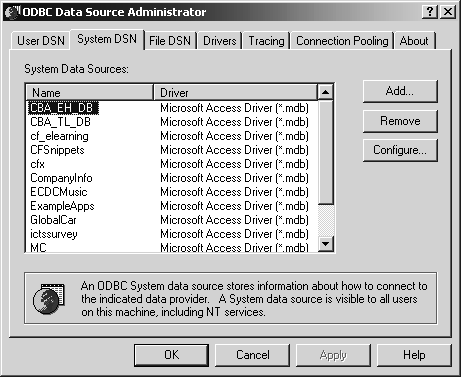
The ODBC Data Source Administrator dialog opens. This is a Windows dialog, not a Dreamweaver dialog, which you can also access using the Control Panel.
Click the System DSN tab.
To give Web access to your data source, you must add the DSN using the System DSN tab, and not the User DSN tab that appears by default.
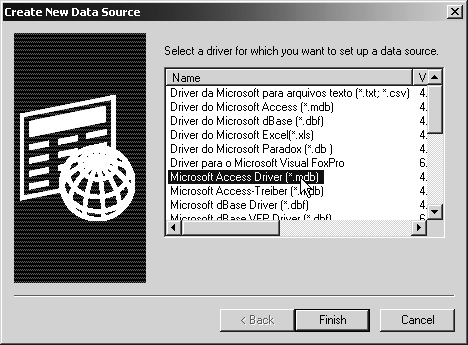
Click the Add button. In the Create New Data Source dialog, choose Microsoft Access Drive (*.mdb) from the dialog, and click Finish.
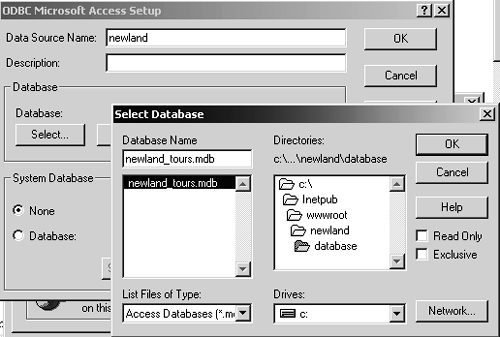
A DSN needs three pieces of information: The driver needed to communicate with the database, a name for the DSN, and the path to the database on the server. In this dialog, you provide the first piece of information.
In the ODBC Microsoft Access Setup dialog that appears, type newland as the Data Source Name. Click the Select button, and in the Select Database dialog, browse to the newland_tours.mdb file, which should be in the following directory: C:\Inetpub\wwwroot\newland\database.
In this step, you are supplying a name for the DSN and the path to the database.
Click OK three times to close the windows and return to the Data Source Name dialog.
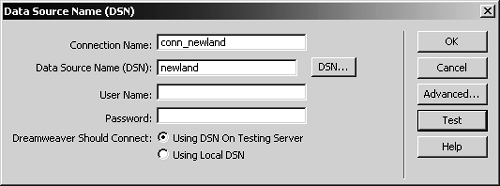
Now that the DSN is complete, you can return to Dreamweaver and use the new DSN to connect to your data source.
In the radio group at the bottom of the dialog, choose Using DSN on Testing Server, which erases all content in the dialog (this does not affect the DSN you created). Return to the top of the dialog, and in the Connection Name field, enter conn_newland. Enter newland as the Data Source Name. Click the Test button to verify the connection was made, and click OK.
By completing this dialog, you are providing Dreamweaver with sufficient information to connect to your database using ODBC.
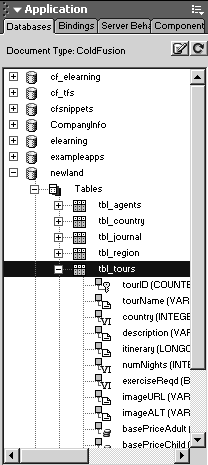
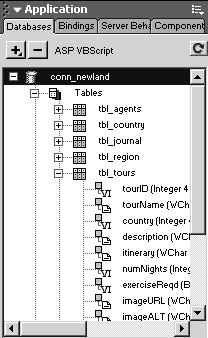
When you close the dialog, Dreamweaver creates a new folder in your site, called Connections, with a new file inside called conn_newland.asp. You should also notice that the Databases panel now has an expandable listing of the database and its assets. You are ready to create a recordset and start binding database data. Skip ahead to the task, "Creating Recordsets and Displaying Database Information."
Coldfusion Users (Running Coldfusion Locally or Connecting to a Remote Server)
This section is for all ColdFusion users, regardless of how they connect to their server.
ColdFusion users who connect to a remote server must have the administrator for that server grant them RDS login informationwhich consists of a password. Without RDS login, you will not be able to complete this book.
Open index.cfm.
It doesn't matter which page of your site is open when initially creating the connection. Dreamweaver creates the connection for the whole site. You've opened index.cfm, because you will add dynamic content to that page in the next task.
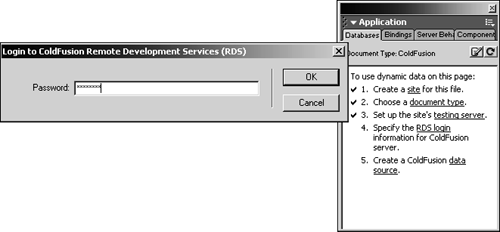
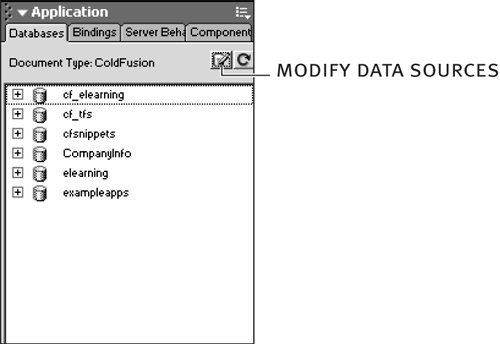
Open the Databases panel, in the Application panel group. Click the Specify the RDS login for your ColdFusion server link, enter your password, and click OK.
RDS login grants developers permission to access the ColdFusion server, which is necessary for defining and using data sources.
At the end of this step, if there are already many data sources existing on the ColdFusion server, they are all visible in the Databases panel.
The only problem is, the Newland database is not among them.
Click the Modify Data Sources button in the Databases panel.
When you click this button, after a moment, the ColdFusion administrator opens in a browser, to the Data Sources page.
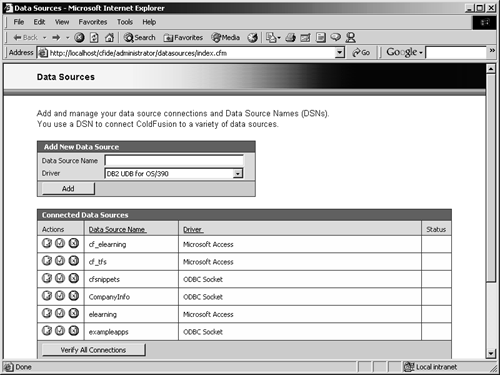
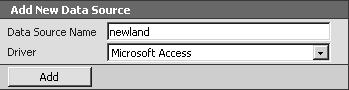
In the Add New Data Source box, enter newland as the Data Source Name. In the Driver drop-down menu, select Microsoft Access. Click Add.
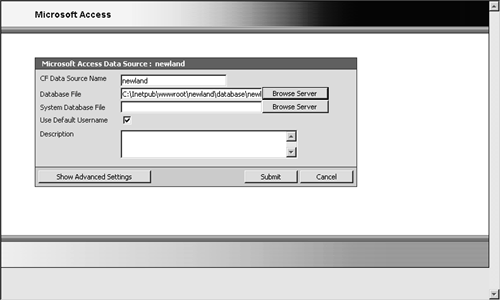
A DSN consists of a name, a driver that enables the application to communicate with the database, and the path to the database. In this step, you have entered the first two of these three pieces of information.
In the Microsoft Access Data Source box that appears, click the first Browse Server button and browse to the newland_tours.mdb file on the site. Click Submit.
This step provides ColdFusion with the remaining information it needs to connect to your database.
Close the ColdFusion Data Sources Web page to return to Dreamweaver. In the Databases panel, click the Refresh button beside the Modify Data Sources you clicked earlier. The newland DSN should show up. Click the + button beside it to expand it and explore the data source.
Now that you can see the contents of the newland_tours.mdb database, you know that Dreamweaver has successfully made the connection. You are ready to create a recordset and start binding database data.