Implementing Recordset Paging
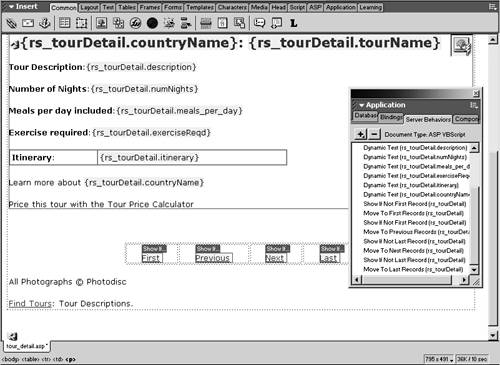
Other than the two links near the bottom of the description, which link to other applications (the country profiles and tour price calculator applications), the description is complete. One glaring problem, however, is that Newland appears to only offer one tour (the one to Argentina). You need to make the output loop so that it includes each of the tour descriptions, not just the first one returned.
You used a Repeat Region server behavior in Lesson 10 to output each of the country names on profiles.asp. You'll use that behavior again with the descriptions to output more than one. The problem, though, is that unlike with the country names you output on profiles.asp, which contained a country name only, here you will be outputting an entire description, complete with an image. That could result in a long page and download time.
The functionality of the page would be better if you could limit the number of records shown, so that, for example, only five descriptions appeared at once, and users could navigate back and forth through them. This is possibleand quite easyusing a set of built-in Dreamweaver server behaviors. The Repeat Region behavior lets you limit the number of records (in this case, tour descriptions) that are displayed on a page. Another behavior, called Recordset Navigation Bar, automates the process of creating the First, Previous, Next, and Last links (or buttons) that enable users to access all of the descriptions. You'll use both behaviors in this task to create the desired functionality.
Drag to select everything from (and including) the horizontal rule through the "Price this tour with the Tour Price Calculator" paragraph.
This will be the repeated region. You don't want to include the copyright notice or the second Find Tours link in the repeated regionthose should appear beneath all the tours.
Use the Server Behaviors panel to add a Repeat Region behavior to the selection. In the Repeat Region dialog, enter 5 for the number of records to be shown at a time. Click OK.
A Repeat Region square is drawn around the entire selection, indicating its boundaries.
Save, upload, and press F12 to test the page, to view it in a browser.
You'll see the first five records, listed alphabetically by country name. The first is still Highlights of Argentina, while the last record on the page should be Highlights of France.
At this point, though, there is no way for you to display the next five records or skip to the end. You are stuck with only the first five tour descriptions.
Return to Dreamweaver, and insert an empty line beneath the Repeat Region area. With the insertion point in that empty line, choose Insert > Application Objects > Recordset Navigation Bar.
This "application object" is actually a group of server behaviors. It creates First, Previous, Next, and Last links or buttons (your choice). Each of these links tells ASP or ColdFusion which five recordsets to show when they are clicked. In addition, if the user is viewing the first set of recordsets, the First and Previous links/buttons will be hidden, because they don't apply. Likewise, the Next and Last links/buttons won't be visible if the user is browsing the final set of records. All four links/buttons are visible in the middle.
In the Recordset Navigation Bar dialog, accept the defaults (rs_tourDetail as the Recordset, and Text as the Display Using option), and click OK.
When you are finished, you'll see a new table added to the page, containing the four links. If you look in the Server Behaviors panel near the bottom, you'll also see several new behaviors, including several that begin, "Show if not…" and several "Move to XXX Record." Again, these are the individual behaviors created when you add a recordset navigation bar.
NOTE
You can build the navigation bar manually, if you like, since all the server behaviors you need are individually available in the Server Behaviors panel, in the Recordset Paging and Show Region portions of the menu.
Click anywhere inside the table that contains the four links, select the right-most <table> tag in the tag selector, and use the Property inspector to set the cell padding to 3, the cell spacing to 0, and the border to 1.
By default, the table that holds the links is invisible. Often, that's OK, but given how prominent other elements on the page are, the navigation bar is easily overlooked. By giving it a border, you make it stand out a bit more.
Save, upload, and press F12 to test the page. Use the navigation bar to move backward and forward through the records.
The navigation works as expected. The only problem is that the table holding the navigation bar doesn't look quite right on the first and last pages. That's because it is illegal in HTML to have table cells with no content. On the first and last pages, the conditional regions are suppressing the First/Previous or the Next/Last links, so the cells are empty. You can get around this by adding a blank space to each cell.
One at a time, click after each link (ASP users) or before each link (ColdFusion users) and choose Insert > Special Characters > Non-Breaking Space.
Though the space is obviously invisible, it fulfills the need to have some content inside every table cell. If you test the file again, the table will look normal.
Before or after doesn't make any difference, as long as the space is entered outside the conditional region. Clicking after the link in ColdFusion tends to put the link inside, so I suggest that ColdFusion users place the space before the link.


