Inserting the Record
The form is now ready, except that nothing is set to happen when the Submit button is pressed. In this task, you'll use the Insert Record server behavior to insert the data stored in the form into tbl_journal of the database, also causing the instant updating of the site.
Thanks to Dreamweaver's Insert Record server behavior, all of the SQL code will be written for you. Still, you should be familiar with the basic syntax of the INSERT statement, in case you ever need to edit it.
INSERT INTO tbl_table(
  fieldname1,
  fieldname2,
  fieldname3)
VALUES(
  'value1',
  'value2',
  'value3');
You might think of the Insert Record dialog (and for that matter, the Update Record dialog, though you haven't seen it yet) as a matching exercise, where you match form elements to table fields. The underlying SQL reveals why the dialog behaves this way. You specify a table in the INSERT INTO line, and then you list each of the table fields you want to insert data into one at a time, in the order you want data inserted, in parentheses.
Then you use the VALUES statement to specify the data itself that you want to insert; this data too goes inside a set of parentheses. Each piece of data that is a text string (as opposed to a number or an expression) is placed within single quotes. The individual pieces of data are separated by commas. The values at the bottom are matched in order to the fields listed at the top, so not only do the number of fields and the number of values have to match, but also you have to make sure you list them in the correct order.
TIP
One of the most common typos when building INSERT INTO SQL statements is to add a comma after the last field name or the last value. The last value should not be followed by a comma, and if it is, you will see an error message.
Select the Submit button, and begin the process of adding an Insert Record server behavior.
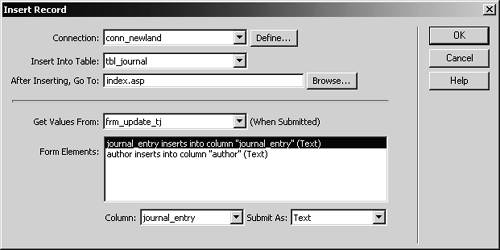
This server behavior will be used to input the text area (journal_entry) and the hidden field (author) into tbl_journal's journal_entry and author fields.
In the Insert Record dialog, specify conn_newland as the connection, tbl_journal as the Insert Into Table, and index.asp as the After Inserting, Go To. Verify that the lower half of the dialog provides Dreamweaver with the instructions it needs to insert journal_entry into journal_entry and author into author.
This is the matching exercise part, where you specify which field of which database table is populated with which field of the form. Since you gave the form elements the same names as their destination table field names, Dreamweaver correctly matches everything for you.
You specify index.asp as the redirection page, so that users can verify that what they entered is now showing on the homepage.
Again, ColdFusion users will note that the dialog they see, though functionally the same, varies cosmetically from the one shown in the screenshot.

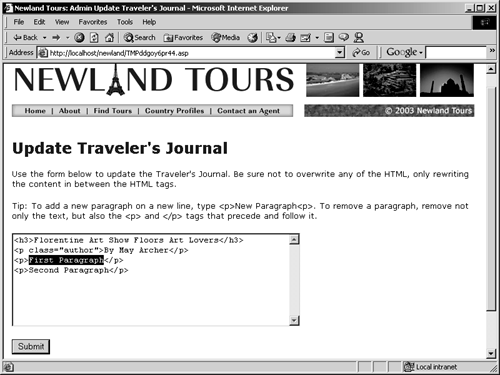
Test the new functionality, making sure to log in as an administrator.
The homepage now contains whatever you entered, formatted using the specified HTML.
If you look in the tbl_journal table of the database, you will see both the first line of the text you entered (text entered after line breaks is not displayed in Access' table view) and zfrome@starknet.com, because that is the account you used to log in, and that identity was stored as a session variable and passed through the form to the database.


