Creating the Web Form
In this task, you will create a form to collect data from the user, and you will send that data to messageSent.asp. Before you continue and start reading through the steps, test your knowledge. How do you send data to messageSent.asp? Should you use GET or POST? What fields should the form contain?
Open contact.asp. Change the table on the page containing the mailing, phone, and email information so it appears as in the screenshot. Also, change the first body paragraph so it reflects the new page structure.
One benefit of placing your email address in server-side code is that spammers have no access to it. If you put your email address on the page, as in the current version of the site, spammers' automated email address harvesting tools have easy access to it and can (and will) add it to their lists. By switching to a mail-based form, you keep your email address more private.

Position the insertion below the image caption, and choose Insert > Form to create a new form. Without moving the insertion point, choose Insert > Table, providing the following settings. Click OK.
Rows: 4
Columns: 2
Cell Padding: 3
Cell Spacing: 0
Width: 95 Percent
Border: 0
People often forget that they can put all sorts of HTML inside tables. By using a table, you can present your form in a more structured way.
Insert two text fields, one text area, and a Submit button in the right column of the table. In the first three cells of the left column, enter the following text: Your Email Address, Subject, Message Body.
In this step, you are building the presentation of the table. You are not yet dealing with its datae.g., naming the fields you've created or worrying about the form's action statement. You'll get to those shortly.
Select the table in the tag inspector, and use the Property inspector to change its bgcolor (background color) attribute to #eeeeee, which is a light gray.
The gray background sets apart the form from the rest of the page, while also drawing attention to its text fields, which suddenly appear much whiter.

Insert a Heading 2 element above the table that reads, Send Us a Message.
The form itself is conspicuous, but until you label it, its purpose is not.
The effects of this and the preceding steps are visible in the accompanying screenshot.
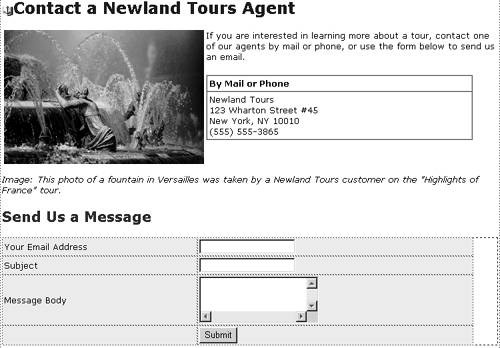
In turn, select each of the first two text fields and name them emailAddress and subject. Select the text area and name it body, and specify its Char Width as 55, its Num Lines as 6, and Wrap as Virtual.
In this step, you take care of much of the behind-the-scenes logicgiving each field a meaningful ID, which will make it easier to collect that data on messageSent.asp.
By customizing the text area, you make it easier for users to enter a longer message than the default text area settings made convenient.

Select <form#form1> in the tag selector, and in the Property inspector, name it frm_message. In the Action field, type messageSent.asp. In the Method drop-down, select POST.
Hopefully, you had anticipated the Action and Method settings at the beginning of this task. As a review, they mean that the form will call messageSent.asp and include the data entered in the form in name-value pairs in the body of the HTTP request.

Save, close, and upload contact.asp.
The form is ready. To make use of it, though, you'll need to load the form values dynamically into the mail object.


