Other Save Options
You can't be too careful with your data. If you operate on the premise that an ounce of prevention is worth a pound of cure, you'll always be protected against the unexpected. Most of the options discussed here take only a few seconds to set up. This small time investment will pay for itself.
What About Backups?
Backup copies of important files are essential to your peace of mind. Keeping backup copies of important files ensures that you can always retrieve workbooks that are damaged or lost.
Options for the Home User
If you're working with Excel on a home computer or your office computer, whether or not it's linked to a network, keeping backup files of your work is essential. Excel offers a backup option that creates a copy of your workbook every time you save the file. The backup copy of the file is saved in the same folder as the original file. If the original file is lost or damaged, you can open the backup copy.
To set the automatic backup option for the current workbook, click File, Save As to display the Save As dialog box. Click the Tools button on the Save As toolbar and select General Options. Check the box next to Always Create Backup. Click OK to close the box and return to the Save As dialog box. Now click Save to save the file. You need to set the option for each file you want to backup automatically.
One problem associated with Excel's automatic backup system is that Excel workbooks can take up a lot of hard drive space. You might not want to fill your hard drive with duplicate copies of files. In addition, automatic backups can create a false sense of security. If the hard drive of your computer crashes, the original file and backup will be gone.
Instead of setting automatic backups, consider using the CD burner to back up files. Even though you'll throw the backup CDs away eventually (and those costs can add up), with CD-Rs at a around a quarter a piece, it might be cheaper and easier to do that. For a relatively small investment, you can back up all your computer files?not only the ones you create with Excel.
Network Users Have Other Options
If you're using Excel over your company's network and saving the file to a network drive, check with your network administrator before you worry too much about backup copies. Most networks have an automatic backup system that runs every night. If you need to obtain a backup copy of your file, your administrator can furnish a recent copy of the file.
Saving Workbook Summary Information
Workbook summary information, such as the name of the person who created the file, the company name, and keywords that identify the file are helpful if you work on a lot of files. If you're working in a corporate setting, summary information tells everyone in a workgroup important details about the file.
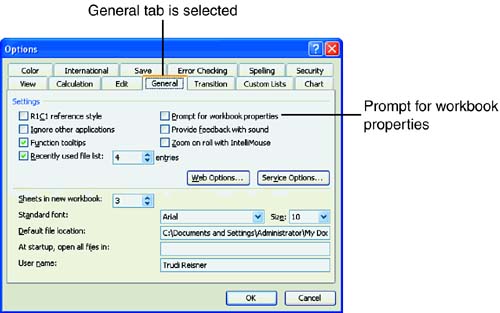
Summary information is not completed unless you fill it in manually. To set up Excel to display the Properties dialog box every time you save a file, click Tools, Options, and select the General tab. Check the box next to Prompt for Workbook Properties, as shown in Figure 3.3, and click OK. Subsequently, the Properties dialog box appears each time you save a file for the first time. If you don't want to fill in any information, click OK.
Figure 3.3. Set the option to prompt for Workbook Properties each time you save a file for the first time.
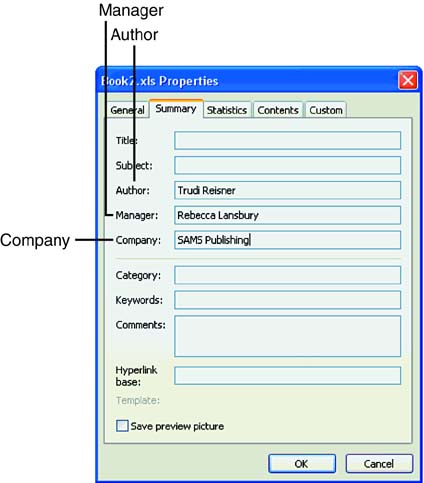
To view the summary information about a file, click Save As. Right-click the file in the list of files (if the file isn't in the current folder, you'll need to navigate to it first). Click Properties from the pop-up menu. The Properties dialog box for the file has five tabs across the top: General, Summary, Statistics, Contents, and Custom. Click the Summary tab to view the information that's been entered about the file, as illustrated in Figure 3.4. Typically, the author and company are filled in, the information entered when your computer was initially set up.
Figure 3.4. The summary information for the current file was entered previously.
You can view or change any of the information that's displayed. Click OK to close the Properties dialog box for the file. When you return to the Save As dialog box, click Save if you made changes to the summary information. If not, click Cancel to close the Save As dialog box and return to the file on the screen.


