Protecting Your Files
Anyone can sit down at your computer and look through your files. Maybe you share your home computer with other family members who can open your files. In today's computing climate, most offices and corporations work over a computer network. A network offers many advantages, including the capability to print your work to several different printers and to share your work with others. However, working on a network means that other people can access the files you create.
The people who can view your files can also change and delete them. If you're working with sensitive or personal data or you don't want someone to alter your files, you might consider protecting them in a few different ways.
Setting a File Password
Anytime you want to protect a workbook from prying eyes, you can require a password on the file. However, before you set up file passwords, check with your network administrator to make sure that passwords are allowed. Some networks frown on user-created file passwords and provide other options for securing data.
If you set up a file password, make sure it's one that you can remember. Passwords are serious business; if you lose or forget the password, your file becomes inaccessible to you. "Cracking" a password is almost impossible.
Play it safe: Jot down the password you assign to a file and store it in a safe place. Make sure that one of your co-workers or your network administrator knows where to find the password in an emergency. |
To Do: Set a File Password
When the file you want to protect is on the screen, click File, Save As. The File Save As dialog box appears.
Click the Tools button on the Save As toolbar and choose General Options. The Save Options dialog box appears.
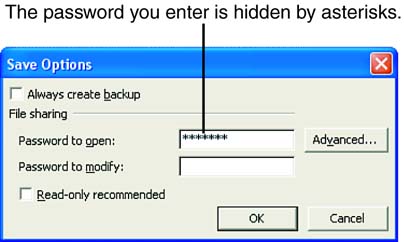
Type the password in the Password to Open text box. For security purposes, the letters you type are shown as symbols, as shown in Figure 14.24. Click OK when you're done typing.
Figure 14.24. The Save Options dialog box where you enter a password.
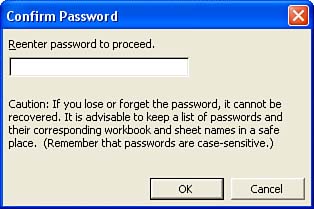
The Confirm Password dialog box appears, asking you to re-enter the password, as shown in Figure 14.25. Type the password exactly as you typed it before and then click OK. Excel returns you to the Save As dialog box.
Figure 14.25. Confirm the password by typing it again.
Click the Save button to save the file and enable the password-protection option. Choose Yes when asked whether you want to replace the existing file.
The next time you open the file, you'll be prompted for the password. If you share the password with others, they too will be able to open the file.
Assigning Modification Rights
If you're working on very sensitive data, you can include an even greater level of security to password-protected files. In addition to assigning a general password, you can add a password that allows only certain people to modify the file. That way, you can ensure that the data in the workbook can be changed by only a select group.
To assign a modification password, click File, Save As. Click the Tools button on the Save As toolbar and select General Options. Type a password in the Password to Modify box and click OK. Type the password again in the Reconfirm dialog box and click OK. When you return to the Save As dialog box, click Save to save the changes you made to the file. Choose Yes when asked whether you want to replace the existing file.
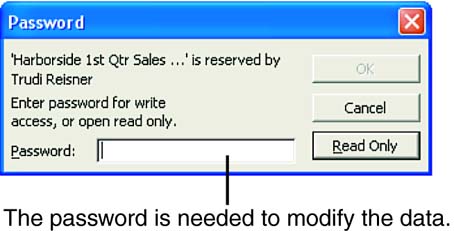
The next time the file is opened, you will be prompted for your password. After you enter your password, a box, similar to the one shown in Figure 14.26, appears. If the correct password is not entered, the user will be able to look at the file, but not modify the data.
Figure 14.26. Password dialog box.
Loose lips sink ships! If the data in your files is sensitive enough to warrant password protection, make sure you provide the passwords to only the people who need to see the files. |
Always check with your supervisor or network administrator before you add passwords to your worksheets. In a collaborative work effort, passwords can sometimes create unwanted problems. |
Creating a Read-Only File
To protect your data without setting file passwords, you can turn on the read-only option. A read-only file doesn't need password protection. To assign the read-only option, check the box next to Read-Only Recommended in the Save Options dialog box.
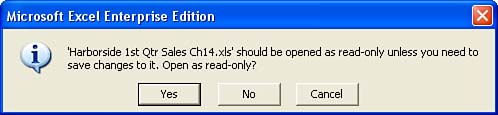
After the read-only option is assigned, anyone who opens the file will see the warning box shown in Figure 14.27. When the file is open, the words Read Only appear in parenthesis next to the filename on the title bar.
Figure 14.27. The Read-Only warning box specifies that the file should not be changed.
Unfortunately, the Read-Only option only recommends that users should view the contents of the file and not make changes. Any changes can be saved to a new file with a different name. If someone clicks No in the Read-Only warning box while opening the file, the file opens normally and changes can be made and saved to the original file.


