Applying Distortion Effects
Applying Distortion Effects
In this section, I cover the tried-and-true distortions that are part of the Illustrator Effect menu. While many of these effects are also located in the Filter menu, don’t even think of using the filters instead of the effects. Filters are one-shot, destruction-harboring relics of the twentieth century, while effects are fully editable and much more in line with the other capabilities of Illustrator.
Pucker & Bloat
No, this isn’t what happens after overdosing on lemonade during a heat wave. The Pucker & Bloat effect (formerly called Punk & Bloat), accessed by choosing Effect→Distort→Pucker & Bloat, squeezes and bulges paths by moving points and handles in the opposite directions from each other. Check out Figure BC1 to see what happens to text outlines when they get puckered and bloated.
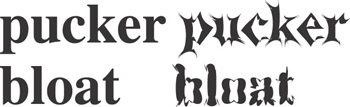
Figure BC1: Pucker & Bloat. Can you guess which is which?
| Tip? |
The Pucker & Bloat effect is related to the number of points on a path. The more points, the more pucker spikes and bloat bubbles. You can add points via the Add Anchor Point tool (in the slot with the Pen tool) or by choosing Object→Path→Add Anchor Points. For more on paths and anchor points, see Chapter 7. |
Roughen and Scribble & Tweak
For making artwork look messy, the Roughen effect and the Scribble & Tweak effect are your best bets. (To access these effects, choose Effect→Distort and then choose either Roughen or Scribble & Tweak.) The Roughen effect adds additional points to your paths and moves those points around, making the artwork look, well, rougher, as if it were drawn with a very shaky hand. Use the Scribble & Tweak effect to move existing points and handles around to make the artwork look a lot looser, as if it were hastily scribbled. What’s unique about these effects is that the results are totally random so that the graphic they produce appears much less rigid and more natural. As you can see in Figure BC2, applying these effects to existing artwork can result in unique effects, such as a hand-drawn appearance.
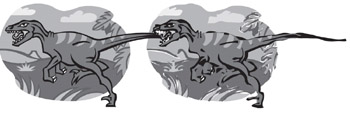
Figure BC2: This artwork is roughened to give the appearance of hand-drawn artwork.
Zig Zag
Using the Zig Zag effect adds points to your artwork and then moves every other point in and the remaining points out, giving an evenly saw-toothed appearance. That may sound contradictory, but hang with me. See the results of using the Zig Zag effect in Figure BC3. To access the Zig Zag effect, choose Effect→Distort→Zig Zag.
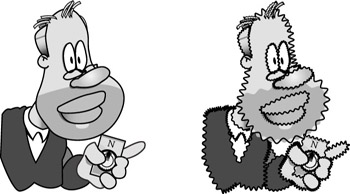
Figure BC3: Use the Zig Zag effect to create effects like this. (Another espresso, please.)
Free Distort
Use the Free Distort effect (Effect→Distort→Free Distort) to surround an object with a box and independently pull the handles of the box to distort that object. This is like warping (see later in this chapter) without all the curves. The Free Distort effect is quite handy for making Star Wars style type (see Figure BC4) or other forced perspectives.
Figure BC4: The Free Distort effect can make type appear to fade off into the background.
Twist
The Twist effect (Effect→Distort→Twist) twirls your object based on the value that you enter in the Angle field in the Twist dialog box. It’s like rotating the outside without rotating the inside, to create a sort of top-down-looking-in-the-blender effect, as shown in Figure BC5.
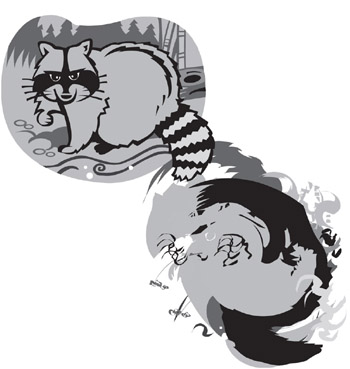
Figure BC5: Twist blends together artwork.
Warps
Any type of Illustrator object — vector- or pixel-based images — or text can be warped. The 15 kinds of warps may look familiar because they share the same names as those that appear under the Envelope Distort→Make With Warp Style menu. (Read the section, later in this chapter, called “At warp speed.”) Although these distortion warps may seem to apply the same results, there are some differences.
To apply a warp, select your artwork, choose Effect→Warp, and then choose your desired warp from the submenu. Warps, just as other effects, distort the look of the object without altering the actual object itself, as shown in Figure BC6.
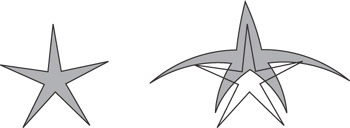
Figure BC6: A star appears warped, but its underlying skeletal structure remains unchanged.
Other effects goodies
Here are some other juicy tidbits on effects:
-
Edit an effect: Double-click the effect’s name in the Appearance palette (Window→Appearance).
-
Reuse a customized effect: Save the effect as a style, which can then be applied to other objects. For more on styles, see Chapter 11.
-
Edit the original object: Choose the Direct Selection tool and manipulate the anchor points of the object.
-
Edit text: Revise text without changing the effect.
| Tip? |
Select distorted text: Choose View→Smart Guides. Smart Guides make selection a snap. If Smart Guides doesn’t work, choose View→Outline, which shows the original, noneffected type. |


