Picking Up Stuff and Moving It Around
Picking Up Stuff and Moving It Around
Any time you want to do something to an Illustrator object, you must select it first. After you get the whole select-then-do thought lodged in your brain, many of Illustrator’s functions come to you much more easily.
Illustrator has a wide variety of ways to select things, including five tools, a bunch of keyboard commands, and several menu items. Fortunately, even if you know only one or two of these methods, you can be off and running with Illustrator selections in no time, just like a pro. Using the selection tools enables you to select virtually anything in your document.
In Chapter 6, I detail the process of selecting paths and objects. In this chapter, you discover the basics — all the ways of selecting, from tools and commands to menu items.
Discovering selection tools
Illustrator has five selection tools. You choose a tool according to the type ?of object(s) that you want to select. The selection tools are as follows (I love a parade):
-
 ?Selection tool: This solid black arrow is the regular Selection tool. Use the Selection tool to select entire paths or groups by clicking them or dragging around them. If the object you click or drag around is part of a group, all the paths and objects in that group are selected as well. The Selection tool, located at the top left of the Toolbox, is plain but powerful.
 -
 ?Direct Selection tool: Also known as the hollow arrow, the Direct Selection tool enables you to select portions of paths — single points or segments — by clicking or dragging said points or segments. You can also use the Direct Selection tool to select other objects, such as placed images or text. The Direct Selection tool, located at the top right of the Toolbox, selects only the portions of the path that you click or drag.
 -
 ?Group Selection tool: This tool looks like a hollow arrow with a + symbol beside it. It selects “up” through paths and groups. The first click selects the entire path you click. Click the selected path again and you select the group that the first path is in. If you keep clicking, you continue to select groups of groups, all containing the group that the first group is in. The Group Selection tool shares a toolslot with the Direct Selection tool. Just click and hold on the Direct Selection tool, and the Group Selection will spring out from behind it.
 -
 ?Lasso tool: This tool looks like an anemic loop of string, until you use it to select points and path segments within an area you designate by dragging the mouse pointer — at which time it still looks anemic. The Lasso tool is a go-anywhere version of the Direct Selection tool.
 -
 ?Magic Wand tool: Photoshop users will recognize this much-beloved tool. The Magic Wand tool selects multiple objects with similar attributes — fills, strokes, transparency — within a specific tolerance range. For example, you can select all objects that have a stroke weight of between five and ten points. The Magic Wand palette controls the various attributes and tolerance settings. For more on the Magic Wand, see Chapter 6.
Illustrator provides two primary ways of using the Selection, Direct Selection, and Group Selection tools: by clicking and releasing the object or group you want to select, or by dragging a marquee around the objects you want to select. Marquee is techno-speak for the dotted line that’s created when you drag with these tools (and all this time you thought it had to do with movie theaters).
The Select menu also provides a handy way to make selections. All the Illustrator selection commands are centralized within this new menu. Find more on the Select menu in Chapter 6.
You can tell when an object is selected in Illustrator: Any selected object shows its “guts” on-screen — the path used to create the object, as well as any points needed to create the path. Text and placed images also show points (and sometimes paths) when they’re highlighted, even though they aren’t made up of paths and points (weird, isn’t it?). Figure 3-1 shows a pair of star illustrations; the star on the left is unselected, and the one on the right is selected.

Figure 3-1: The left object is unselected; the right object is selected. Note the points and paths that appear on a selected object.
After an object is selected, you can do any number of things to it, such as change its color, move it, transform it, or even delete it. You may want to ?consider which tool you use to make the selection. One key difference between the arrow-shaped selection tools and the Lasso and Magic Wand selection tools is that the arrow tools also move objects that are selected; the Lasso and Magic Wand tools do not. If you’re attempting to use an arrow tool to drag a marquee around an object and happen to click the object first, you move the object instead of selecting it. No marquee appears.
Moving and transforming objects
To move a selected object (or objects), just follow these steps:
-
Select the object you want to move by using one of the selection tools.
-
Use the Selection tool or the Direct Selection tool; click and drag the selected object to the position you want to move it to.
Tip? Using the Selection or Direct Selection tools to click and drag an object that’s already selected doesn’t add to the selection or release the selection, but this action does enable you to move what’s currently selected.
-
Release the mouse button after the object is in position.
The object is all settled in at its new location.
| Tip? |
Instead of dragging with the mouse, you can use the arrow keys to nudge ?anything that is selected a little bit at a time. This trick works no matter ?what tool you’ve selected in the Toolbox. |
![]() ?llustrator power-users call the other things you can do to an object transforming it. These actions include rotating, resizing, reflecting, and skewing objects. Illustrator puts all these transformation tools together in the middle of the Toolbox. Regardless of which transformation tool you use, the process, shown in Figure 3-2, is much the same as for moving objects. Just follow these steps:
?llustrator power-users call the other things you can do to an object transforming it. These actions include rotating, resizing, reflecting, and skewing objects. Illustrator puts all these transformation tools together in the middle of the Toolbox. Regardless of which transformation tool you use, the process, shown in Figure 3-2, is much the same as for moving objects. Just follow these steps:
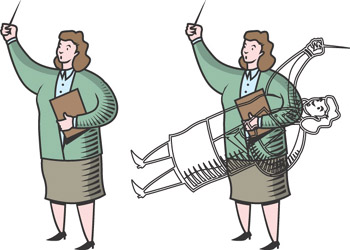
Figure 3-2: Rotating an object.
-
Select the object you want to transform, using one of the selection tools.
-
Choose the Rotate tool (or any transformation tool) from the Toolbox.
-
Click the selected object and drag.
While you drag, the outlines of the object show how the object will be transformed after you release the mouse button.
-
Release the mouse button when the object’s preview matches how ?you want the object to appear.
As soon as you release the mouse, the object is transformed.
For more in-depth information on transforming objects, see Chapter 12.
Distorting paths
Moving and transforming paths make them look different, but you can tell that the moved or transformed path is pretty much the original path in a different position, at a different angle, or maybe at a different size. Distorting paths, however, can make them look drastically different from the way they look originally.
Illustrator provides a number of different ways that paths can be distorted, but the majority of these ways fall into the category of effect-based distortions. These distortions, found in the Effect→Distort menu, can create all sorts of interesting (and some downright ugly) effects. Figure 3-3 shows how an innocent path can become grossly distorted in a number of ways by using some of the different distortion effects.
Figure 3-3: The original path (left) is (to the right) Puckered, Scribbled, Zig-Zagged, and Roughened.
Because distortion effects have no “right” settings, they produce immediate and profound changes to your artwork. They also all have previews, which show you what’s going to happen to your artwork before you make any permanent change to its appearance.
To use a distortion effect, follow these steps:
-
Select your artwork using any selection tool.
-
Choose Effect→Distort→Pucker & Bloat (or any of the other distortion effects).
A dialog box opens, showing a distortion effect that has a Preview check box. Put a check mark in this box to make the effect show you what it’s going to do to your artwork.
-
Use the slider (a little triangle under a straight line) to set the amount of the distortion.
Drag the slider to the left; watch what happens to the artwork. Drag it ?to the right and look again.
-
When you get something you like, click OK.
| Tip? |
If the effect doesn’t produce results that you like, click Cancel to exit ?the effect without changing the appearance of your artwork. |
| Tip? |
All effects change only the appearance of your artwork, not the artwork itself. At any time you can select the original object and delete the effect within the Appearance palette. |
For more information on distortions and other ways to mess up — er, enhance — your artwork, check out Bonus Chapter 1 on the Web at www.dummies.com/go/illustratorcs_fd.
Organizing objects
Illustrator provides many tools to help you organize your artwork. You can move objects above or behind each other, group objects together, and distribute objects to layers for heavy-duty organization.
To move an object behind all the other objects in a document, as shown in Figure 3-4, follow these steps:

Figure 3-4: Moving and object behind other objects.
-
Use any selection tool to select the object that you want to move behind another object.
-
Choose Object→Arrange→Send to Back.
The selected object moves behind all the other objects in the document.
Selecting Object→Arrange→Bring to Front moves the selected object in front of all the objects in the document. Use the Send Backward and Bring Forward options to move the selected object just one level to the back or front of a stack of three or more objects. The Send to Current Layer command moves the selected object to the active layer in the Layers palette. (For more on layers, see Chapter 13.)
These commands are the basic movement of objects back and forth in a document. You can also group a set of objects so that they always stay together (and are all selected at once, all the time). To group a series of objects, follow these steps:
-
Select the objects that you want to group together.
To select more than one object, drag a marquee around the objects or hold down the Shift key and click each object you want to include in the group.
-
Choose Object→Group.
The objects are grouped together. The next time you click any one of them with the Selection tool, all are selected.
Tip? You can group two or more groups together to form a bigger group, and you can select objects along with a group (or several groups) and create a group out of them. Then you can group that group with more groups or objects. If you haven’t turned into a full-fledged groupie by now, you can group that last group yet again with other groups or objects. And on and on until the men in white coats put you in a nice soft room.
Another, even more effective, method of organizing your artwork is to put related objects in layers. Using layers is like placing your artwork into separate sheets of clear plastic. A single layer can have as many pieces of artwork on it as you want. You can select all the pieces of artwork in a layer at the same time. You can lock the layers to keep them from being selected while they still remain visible. You can hide a layer (and everything on it) to get rid of artwork as if you’d deleted it but still have the option of bringing it back whenever you want. You can apply appearances and styles directly to layers. Layers are ?created, selected, and hidden (and that’s just for starters) by using the Layers palette. See the Layers palette in Figure 3-5.

Figure 3-5: The Layers palette.
You can do all sorts of amazing things by organizing your artwork into layers, so I devote a big section specifically to layers in Chapter 13.


