Editing and Adjusting Points
Editing and Adjusting Points
After you go through the trouble of selecting specific points, what do you do with them? Well, you can move them and change the kinds of points they are. You can also adjust their handles to change the shape of a curve.
A relocation bonus for points
You can move any selected point to any location. Because points (and not entire paths) are what you’re moving, use the Direct Selection tool. Click any point with the Direct Selection tool and then drag the point to move it. You can do this in one step (click and drag at once) or in two separate steps (click and release and then drag the point). Figure 6-8 shows a path with a point in its original location after it was moved with the Direct Selection tool.
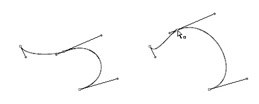
Figure 6-8: Left: The original path. Right: The path after you move the selected point with Direct Selection.
| Tip? |
To move points just a tiny little bit at a time — but with precision — use the arrow keys to nudge selected points in the direction of the arrow. One keystroke moves the point by an exact, smidgen-sized unit of measurement (1/72 of an inch, or .3528 millimeters) — a unit of measure known in the design and publishing trades as a point. |
Fine-tuning curves with direction points
If a point has direction points (those little gearshiftlike line segments) sticking out of it, you can use the Direct Selection tool to adjust the direction points, which adjusts the curves that shoot out from the points where the direction points connect to the curves.
| Tip? |
Incidentally, the line that joins the direction point to the curve is called the direction line. Don’t worry, only you can see the direction lines. They don’t print or show up in the graphic when it’s on the Web. Their only purpose is to show which anchor point is currently under the control of the direction point. The combination of the direction line and direction point is also commonly referred to as direction handles or just plain handles. |
You probably noticed already that sometimes you see those gearshiftlike direction lines and direction points sticking out of points and sometimes you don’t. When you click a point or a segment with the Direct Selection tool, you see the handles associated with that point or segment. However, if you Shift+click additional points, you lose those handles. Figure 6-9 shows what happens when you use the Direct Selection tool to click (or enclose in a marquee) a variety of different areas.
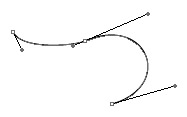
Figure 6-9: ?A selected curve reveals its direction points and direction lines.
When you can see the handles that you want to move, click and drag them. Note that missing a handle is very easy if you aren’t really careful. (And making crude remarks when you do miss them is still considered bad form, even if no one else is around.) Figure 6-10 shows the path from Figure 6-9 with the direction points moved to different positions.

Figure 6-10: The curve from Figure 6-9 after the direction points are moved
Converting anchor points
Illustrator has four types of anchor points: corner points, smooth points, and direction-changing points. Straight-corner anchor points are in the corners of squares or triangles. Two path segments join in a corner point when neither of the connecting ends has a direction point associated with it. Smooth anchor points are used when two path segments continue smoothly, as in a circle or in a curving path. Both path segments have direction points linked together so that when you move one point, the other point moves in an equal and opposite direction, preserving the smooth curve. A curved-corner anchor point has two direction points that move in different directions, enabling you to impose abrupt changes in direction. A combination-corner anchor point has one direction point, allowing a straight line to join a curved line at an abrupt angle. (For more on anchor point types, see Chapter 7.)
Use the Illustrator Convert Anchor Point tool (which looks like an acute angle located in the same slot as the Pen tool) to change a point from one type into another. (For more about the types of anchor points and their usual behaviors, see Chapters 2 and 7.) To use the Convert Anchor Point tool, put it on a point and click. What you do next determines the resulting point type:
-
To get a straight-corner anchor point: Click an anchor point and release to change it into a straight corner point with no direction points.
Tip? This is a quick-retract method of point conversion.
-
To get a smooth anchor point: Click an anchor point and drag it to change it into a smooth point with two linked direction points.
-
To get a curved-corner anchor point: Click a direction point and drag. It moves independently of the opposite direction point.
-
To create a combination-corner anchor point from a smooth point or a curved-corner anchor point: Click one of the direction points and drag it into the anchor point (leaving one direction point for the curved side of the point).
Adding and subtracting points (path math)
Illustrator has two tools that are used specifically for adding points to a path or for removing them. The Add Anchor Point tool adds points, and the Delete Anchor Point tool removes points. Both tools are located in the same slot as the Pen tool.
When you add an anchor point (or even several anchor points) with the Add Anchor Point tool, the path doesn’t change shape (as shown in Figure 6-11), but you can move the point or points with the Direct Selection tool or convert them to other types of points by using the Convert Anchor Point tool.
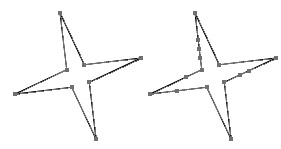
Figure 6-11: Left : Original path. Right: Unchanged shape with new anchor points to added to three of the star's arms.
When you remove a point with the Delete Anchor Point tool, the path can change shape — slightly or dramatically, depending on the shape. Figure 6-12 shows what happens in two different circumstances.

Figure 6-12: Left: Original path. Right: Removing two anchor points to create two different shapes.
Okay, have a squint at Figure 6-12 for a moment. (Ow, that’s gotta hurt. Not that hard.) You can probably tell immediately which anchor points were zapped with the Delete Anchor Point tool to change the image on the left into the upper- and lower-right images. In each case, only one point was removed. Powerful creatures, those anchor points.


