Creating Graphic Ooze with Liquification
Creating Graphic Ooze with Liquification
The next level of distortions is so much fun to play with that you may never get any work done. Partly because they’re tools, and partly because they only affect a small section of your artwork at once, you’ll find yourself tweaking and distorto-painting for hours.
Liquifying without a blender
The Illustrator Liquify tools enable you to easily apply distortions to objects directly on your page. In other words, you aren’t confined to the confines of a dialog box with sliders, like you are with the distortion effects that I describe in the earlier section, “Applying Distortion Effects.” Liquify tools offer you the freedom to pull, twist, and otherwise wreak havoc on your image with total liberty and creative abandon.
To perform the rite of liquification, first select your artwork and then select your torture tool of choice from the Toolbox. Check out Figure BC7 for an illustration of each liquification tool/type and name. I created each of these cartoons with default settings, applying different Liquify tools to adjust the hair curl and nose of my poor victim.
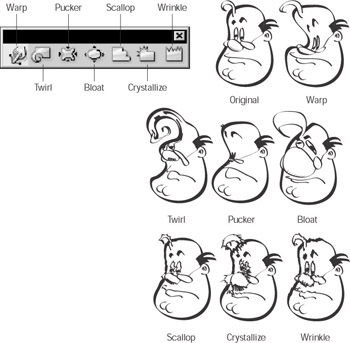
Figure BC7: One poor schmoe who's gone through the Liquidation mill.
Here are the Liquify tools and how to use them for maximum fun. Just click the tool that you want and follow the instructions from there. Refer to Figure BC7 to match each tool with its effect.
-
Warp: Drag your mouse to push the pixels forward — they move with your cursor.
-
Twirl: Drag or hold your mouse down to rotate the pixels. The longer you hold your mouse down, the greater the twirl.
-
Pucker: Hold your mouse to move the pixels toward the center of your cursor. Holding your mouse down longer results in more of a pucker.
-
Bloat: Hold your mouse to move the pixels outwards from the center of your cursor. Holding your mouse down longer results in a bigger bloat.
-
Scallop: Drag or hold your mouse down to create a rounded, scalloped edge. The longer you hold your mouse down, the more intense the scallop.
-
Crystallize: Drag or hold your mouse down to create a spiked edge. Holding the mouse down longer creates a spikier effect.
-
Wrinkle: Drag or hold your mouse down to create a distressed, “shaky-hand” edge. I know you’ve probably caught on that if you hold the mouse down longer, the effect will be increasingly wrinkled.
| Tip? |
Using a pressure-sensitive tablet with the Liquify tools gives you even more control over their effects. |
Liquify options
Each Liquify tool has a corresponding Options dialog box that controls the tool’s settings. This dialog box can be accessed by double-clicking any of the Liquify tools in the Toolbox. And although I recommend experimentation to get a real feel for how the Liquify tools operate, peruse the upcoming list for guidelines on how the various settings affect the tools’ behavior.
-
Brush options: Use these three options to define your brush size, angle, and intensity.
-
Global Brush Dimensions: Select the size of your brush from a range of 1 to 1,000 points (pt). Set width and height sizes independently to create oval-shaped brushes.
Tip? Hold down the Alt key (Option on a Mac) before clicking with a Liquify tool to change the brush size on the fly.
-
Angle: Specify the angle of your oval brushes — from –360? to 360?.
-
Intensity: Establish the intensity of your brush from a range of 0 to 100%. The greater the percentage, the greater (or more intense) the tool’s effect.
-
-
Use Pressure Pen: For those fortunate owners of pressure-sensitive tablets, select (check) this option to take advantage of greater control and finer tuning offered by these devices.
-
Warp/Twirl/Pucker/Bloat options: That’s a mouthful, eh? Use these options to set anchor points and edge smoothness.
-
Detail: Use the Detail option to control how many additional anchor points that you add to the path. A higher Detail value (10 is the max) results in more anchor points.
-
Simplify: Check the Simplify option in conjunction with the Detail option to eliminate unnecessary anchor points (those that don’t contribute to the shape) added by a higher Detail value. The higher the Simplify value, the smoother the edge.
-
-
Twirl Rate: A ballerina’s dream. The higher the rate, the quicker the twirl appears and the curlier it is. See Figure BC8 for an example of two different twirl rates.
-
Scallop/Crystallize/Wrinkle options: In addition to the Global Brush Dimensions and Detail options, these last three tools also offer a few additional options.
-
Complexity: The higher the Complexity value (1-15), the more anchor points are added to the object during the distortion, as shown in Figure BC9.
-
Brush Affects Anchor Points: Use the Brush Affects Anchor Points option to apply the distortion to the anchor points, as shown in Figure BC10.
-
Brush Affects In Tangent Handles: Use this option to apply the distortion to the first B?zier curve directional handles.
-
Brush Affects Out Tangent Handles: Use this option to apply the distortion to the second B?zier curve directional handles.
-
I recommend keeping the Always Show Brush Size options selected (checked). Doing so enables you to view the actual size of your brush while you work rather than just seeing a cross-hair icon.

Figure BC8: Different twirl rates affect the speed and curliness of the twirl distortion.
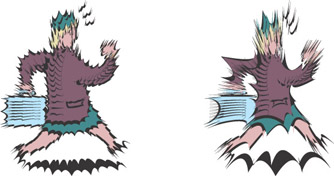
Figure BC9: A Scallop distortion with two different Complexity settings.
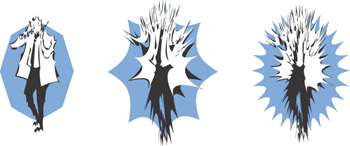
Figure BC10: A Crystallize distortion using three different brush settings.
| Tip? |
To distort live text by using the Liquify tools, you must first apply an Envelope Mesh effect to it (see the following tip). While the Liquify tools are indeed cool, use them sparingly on type. Your type must still be legible. How else are people going to find their way to your groovy garage sale of 1960s-era black-light posters? For more on creating and working with type, see Chapter 14. |
| Tip? |
You can use the Liquify tools as “live” effects on anything in your document, but there’s a catch: You need to use the Object→Envelope→Make with Mesh command on the selected artwork first. You distort the mesh, not the objects, but the visual result will be that the selected artwork/pixels/type are distorted (while in reality the original objects are intact). The higher the number of rows and columns you use in the Make with Mesh dialog box, the more detail you have with the Liquify tools. See more about the Envelope Mesh command in the section entitled, “What a mesh,” coming up later in this chapter. |


