Bringing Files Into Illustrator
Bringing Files Into Illustrator
You can bring graphics or text into Illustrator in several different ways, but the most straightforward, Joe-Friday way is to use the Place command from the File menu. Every type of graphic or text that can be inserted in Illustrator can be placed with this command, making it the one-stop location for all file importing. The “Getting Files Out of Illustrator” section (later in this chapter) contains a list of the most common file formats that Illustrator can both export and import.
When you place artwork into Illustrator, you usually have the option of either embedding or linking the artwork. Each of these processes has different implications for file size and storage:
-
Embedding: Makes the placed artwork part of the Illustrator file, even though the artwork was created elsewhere. That way, you need only the single Illustrator file for your artwork to print properly.
Remember? Embedding can dramatically increase the file size.
-
Linking: Creates a link in the Illustrator document to the placed artwork. The file size of the Illustrator document is smaller as a result, and any change to the linked file is automatically reflected in the Illustrator document. Linking also enables the file to be updated outside of Illustrator (while maintaining the link). In order for linked files to print properly, both the Illustrator file and all linked files must be present.
To place a graphic in Illustrator, follow these steps:
-
Choose File→Place.
The Place dialog box appears, as shown in Figure 17-1, so that you can choose the file that you want to place.
-
Select the file that you want to place.
If you don’t have any files lying around, look in the Sample Files folder (located in the Adobe Illustrator application folder) and pick one of those files.
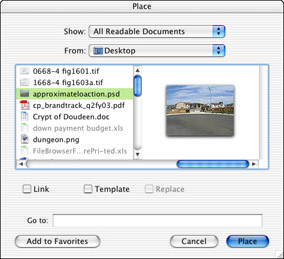
Figure 17-1: Select a document to embed or link with the Place dialog box. -
Choose to link or embed the file you want to place.
To create a link between the file you want to place and the Illustrator file (the default setting), make sure that the Link box (lower left) is selected. To embed the file you want to place in the Illustrator file, deselect the Link box.
-
Choose to use the graphic as an artistic element or a template.
If you select the Template check box (lower left), Illustrator creates a special layer for the pixel-based image. (See Chapter 13 for more on layers.) This layer is locked (you can’t change anything on the layer), and the graphic is dimmed, making the graphic 50 percent lighter. Template layers also don’t print and aren’t included in the artwork when you use the Save for Web command. Template layers are especially useful when you plan to use the pixel-based image as a guide for tracing in Illustrator.
-
Choose to replace or add the graphic to the rest of the placed graphics (if necessary).
This option is available only after you’ve already placed a graphic in the file and that graphic is selected. You have the option of replacing that graphic with the graphic that you’re about to place or bringing the new graphic in as a separate graphic. Just select the Replace check box to replace the selected graphic, or leave the box unchecked to leave the selected graphic alone.
-
Click the Place button.
Which is better, linking or embedding?
If you’re just playing around to see how the program works, it doesn’t matter whether you link or embed. But if you’re working on a production with tight deadlines and making rapid changes to your document and money is on the line, I recommend that you link whenever possible. Linking makes the chore of changing placed images much easier.
When you embed something, it exists totally within a single Illustrator file: Your artwork is locked down. You can’t do anything to it other than move it, scale it (and other such transformations), or run a Photoshop filter/effect on it. That’s all, folks — and that isn’t much. You can’t edit your artwork in another application; because it’s embedded in Illustrator, it won’t respond to other applications. The term embedding is quite literal — it’s stuck in there. You can’t get your artwork out unless you pry it out with the Export command. (More on that in the section, “Getting Files Out of Illustrator,” later in this chapter).
Here’s an example. You recently sent a completed job to your service bureau, but it can’t be printed because your five pixel-based images are embedded — two in RGB (red, green, blue) mode and the rest in CMYK (cyan, magenta, yellow, black). The images need to be in CMYK for the job to print properly. Illustrator can’t convert pixel data from RGB to CMYK. (Illustrator can only convert vector data.) You need to use Photoshop to convert the pixel images. If the images are linked, however, the folks at your service bureau can change them by opening the image in Photoshop, making the change, and then updating the link — a quick process that takes about a minute on a fast computer.
Because the images are embedded, however, you have two options. You can deliver the original pixel-based graphics over to the service bureau (assuming that your company has one, that you didn’t send the job over at the last minute, and that the service bureau is still open). Or you can rack up bad karma if you make the staff at the service bureau do this for you. This situation entails separating each image into its own layer in Illustrator, exporting the entire document as a Photoshop file; opening the document in Photoshop; deleting all the other layers; cropping the image to the right size; changing the color mode; saving the image; going back to Illustrator; and replacing the graphic. Whew! And this assumes that the service bureau staff actually knows how to do this, which not many people do.
| Tip? |
If you know beyond a doubt that your images are perfect, pristine, and final, and never need changing in any way, you can embed them. If your feet touch the earth like the rest of ours do, link your images. |
| Remember? |
The only hassle that comes with linking is that you have to provide all the linked images with your Illustrator file whenever it leaves your computer because your file won’t print properly without them. This procedure is a minor hassle, however, considering the amount of hassle it saves! |
Managing links
Whenever you place an image into Illustrator and link it, the image isn’t actually in your document — the same way that Dan Rather isn’t actually in your house when you watch the news on TV. What you see in Illustrator is a preview of the file — an image of the image, so to speak. Think of the actual file as broadcasting an image of itself to Illustrator while the file itself sits somewhere else on your hard drive. You look at the preview on-screen; when the document prints, the actual file supplies the image for the document. If the actual file gets moved, modified, or deleted, you have a problem — especially if you’re printing — because Illustrator uses the preview image instead of the real file. The preview image in Illustrator contains just enough info to be displayed on-screen, but not nearly enough info to print with any quality. Fortunately, Illustrator provides you with a powerful tool to help you manage links: the Links palette. You can find the Links palette by choosing Window→ Links. What you get looks remarkably like Figure 17-2, even if you don’t have thumbnails of all those people.

Figure 17-2: Use the Links palette for total link control.
The Links palette shows you all the placed images in your document; alerts you if anything is amiss; and enables you to update, edit, or replace the images — all with the click of a mouse.
| Tip? |
The Links palette includes embedded images as well, even though they aren’t technically links. |
To use the Links palette, you must first understand what the palette is telling you. The Links palette informs you about the status of the graphic through alerts. Alerts are tiny icons that appear beside the names of the graphics in the Links palette. They look a little like buttons, but they are strictly informative: Alerts warn you when there is a potential problem with the link. You can fix most problems by clicking the graphic within the Links palette, and then by clicking the Replace Link or Update Link buttons at the bottom of the palette (more on these options in just a second).
The alerts provide the following information:
-
Embedded: The Embedded icon shows a rectangle overlapping a triangle. This icon indicates that the image data is completely contained within the Illustrator document and not linked to an external file. This situation isn’t necessarily a problem, but it can be. See the section “Which is better, linking or embedding?” earlier in this chapter. No “un-embed” button exists. The only way to turn this embedded image into a linked file is to click the Update Link button at the bottom of the palette, locate the original file on the hard drive, and replace the file with the Link option checked.
-
Missing: A question mark inside a red octagon (or stop sign) shows that the actual image file is missing. This information is good to know because the linked image still shows up in Illustrator even if the information that the file needs to print properly is missing. You can fix this image by clicking the Replace Link button. (More about this in a moment.)
-
Modified: A triangle with an exclamation point (sort of like an emphatic yield sign) indicates that the actual linked image has been changed outside of Illustrator. This information is also vital because Illustrator still displays the original image.
-
No icon means that everything is okay: This isn’t really an alert. (Yeah, that would be pretty silly — Warning! Everything is normal!) But it’s worth noting that when nothing is wrong with a linked image, the palette shows just the filename of the image, its thumbnail, and nothing else.
After you identify the problems with the linked graphics, you can manage them by using the buttons along the bottom of the Links palette (refer to Figure 17-2), by clicking the problem graphic in the Links palette, and then by clicking one of the following four buttons:
-
Replace Link: This is the first button from the left. Click this button when your image is missing or when you want to swap the selected graphic with another graphic on your hard drive. After you click this button, the Place dialog box opens. Choose a different file or locate the missing file on your hard drive, and then click Place. The new image replaces the old one.
-
Go to Link: Second from the left, this button is handy for locating and selecting linked graphics. Click the linked graphic in the Links palette and click the Go to Link button. This action selects the graphic in the document as if you clicked it by using the Selection tool. Clicking this button also centers the view on the graphic, making the graphic easy to spot whenever you have a lot of other graphics in the document.
-
Update Link: Click this third button whenever you see the Modified warning beside a link. This action updates the selected link with the latest information from the original file.
-
Edit Original: This fourth button is available only for linked images — not for embedded images. After you click this option, the selected image opens in the original application that created it.
| Tip? |
The Edit Original option is a great way to modify images. After you place a Photoshop image, for example, click this button to launch Photoshop and open the image. In Photoshop, you can make the necessary changes and then save your image. When you go back to Illustrator, it asks whether you want to update your modified image. Click OK to update the information. |
Your goal, as you work with placed images, is to avoid all question marks and exclamation points in your Links palette. Fix these problems by using the buttons at the bottom of the palette.
The Links palette offers a few more tidbits through its pop-up menu to help you manage links. Click the triangle in the upper-right corner of the palette (refer to Figure 17-2) to access the Links palette pop-up menu. Here you find Replace, Go to Link, Update Link, and Edit Original commands that duplicate the functions of the buttons along the bottom. You also find various Sort commands, such as Sort by Name, which alphabetizes the linked images within the palette. You can also reorganize the palette by using Show commands, such as Show Embedded, which hides all linked graphics. The Show and Sort commands are useful only when you have several linked images, which is rare in an Illustrator document. The two most useful things in the Links palette pop-up menu are the Embed Image and Information commands. Here’s how you use them:
-
Embed Image: Click a linked image in the Links palette and choose the Embed Image command to embed the image into the Illustrator file.
-
Information: Click an image in the Links palette and choose the Information command to open the Link Information dialog box. This dialog box is strictly informative. You can’t make any changes here, but you find out lots of information about the selected graphic, such as the image’s location on the hard drive, the image’s file size, the image’s file type, when the image was created, and a whole lot more. You can also access this dialog box by double-clicking the name of the link.


