Printing Mechanics
Printing Mechanics
After you make sure that your Page or Print Setup settings are correct (typically they’re fine unless — ahem — somebody mucks them up), you’re ready to commit your masterpiece to paper.
Printing composite proofs
Printing a composite proof is really printing what you see on-screen to a single sheet of paper. You do this kind of printing all the time. If you have a color printer, your result looks really close (hopefully) to what’s on-screen. If you have a black-and-white printer, you get a black-and-white version of what’s on-screen.
The other kind of printing is called printing separations. Printing separations means generating a separate sheet of paper (or, more likely, film) for each ink to be used when the artwork is printed. I discuss separations in more detail in the section, “All about Way-Scary Separations,” later in this chapter.
You can print composite proofs by following these steps:
-
Choose File→Print from the menu.
The Print dialog box appears.
-
Select the appropriate printing options (as I detail in the next section, “Important printing options”).
-
Click OK (Print on a Mac).
Important printing options
The Print dialog box (Figure 15-3 is a mug shot of the Mac and Windows versions) has all sorts of options, but only a few of them are worth noticing. Fortunately, the default settings are usually what you want anyway — for example, one copy of whatever you send to the printer of your choice. However, for situations in which the current setting is not what you want, the following handy options are lurking in the Print dialog box:
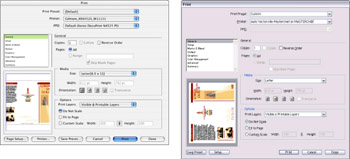
Figure 15-3: A typical Print dialog box for a Mac (left) and for a Windows PC (right).
-
Name (Windows)/Printer (Mac): The top of the Print dialog box indicates the printer that you intend to use. If you have only one printer, this setting is most likely correct all the time. If you have more than one printer, you can see which one you’re currently using. You can change the printer setting here as well.
-
Number of Copies (Windows)/Copies (Mac): This option shows the number of copies of your artwork that you want to print, each on a separate sheet.
-
Pages From (Windows)/Pages (Mac): Illustrator can’t really have multiple pages (a page one, two, three, and so on). It can, however, print one page across several pages (in effect, a very large single page). Before you print, choose File→Document Setup and then select the Tile Imageable Areas radio button in the Document Setup dialog box. Artwork that hangs outside the Artboard prints on separate pages. You can then print the artwork on multiple pages, tiling it so that you can cut and paste the artwork by hand into a big poster, if you want. (Using these options, you can make your artwork larger than your page size by as much as 18 feet!)
| Remember? |
Unfortunately, the implementation of this feature is abysmal (which is why I don’t mention it anywhere in this book beyond this paragraph). For instance, you have no way of telling which pages your artwork is on, even though you have to specify the pages in the Print Range option in the Print dialog box. This inevitably leads to paper waste. Even when you do get the thing to print out properly, you still have to cut up your pages and tape them together. If you need poster-sized output, you’re much better off printing it at your local service bureau on a large-format output device. |


