Working with the Different Brush Types
Working with the Different Brush Types
Here are the four brush types and some options that you can use when painting with them.
Art brushes for times when you’re a bit wacky
Art brushes take any Illustrator paths and stretch them along a path. Figure 9-6 shows several examples of Art brushes.
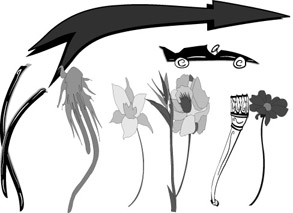
Figure 9-6: All these objects are (believe it or not) Art brushes.
You can use several Art Brush options to make Art brushes look exactly the way you want. Figure 9-7 shows the Art Brush Options dialog box, accessed by double-clicking any Art brush in the Brushes palette.
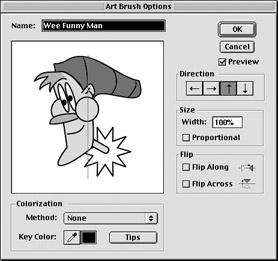
Figure 9-7: The Art Brush Options box.
In the Art Brush Options dialog box are a variety of options to affect the way the brush makes a stroke. The following list describes how to use some of those options:
-
Name: Give the brush a descriptive name here. This name appears when you choose View By Name from the Brushes palette pop-up menu.
-
Preview: Select the Preview option to see any stroke in your artwork that uses the brush stroke you’re changing. What you see is what you get — the stroke as it will look if you apply the new changes. This doesn’t alter your actual artwork. This feature is extremely handy because you don’t have to remember what all the different settings do — you can just watch what happens after you change them!
-
Direction: This option determines whether the graphic rotates clockwise or counterclockwise (relative to the path) as you stretch it.
-
Size: With the Proportional option selected, the artwork grows wider as the path gets longer. With Proportional option deselected, the artwork stretches. You can enter a scaling percentage in the Width box.
-
Flip: This option resembles the Direction option, except that it flips the artwork upside down instead of rotating it.
-
Colorization: Brushes have fill and stroke colors of their own. They are ordinary Illustrator artwork endowed with the power to be brushes, meaning that distinct fill and stroke values are part of the deal. The Colorization setting determines whether the brush keeps the colors of the original artwork or replaces them with Fill and Stroke colors from the Toolbox. A Method setting of None preserves the original artwork’s colors. Other settings blend the fill and stroke colors with the artwork. How they perform this miracle depends on the colors in the original artwork for the brush and on the specific options you choose.
| Tip? |
Click the Tips button for a visual illustration of the various colorization settings. |
Figure 9-8 shows the same brush with three different sets of options applied to it.
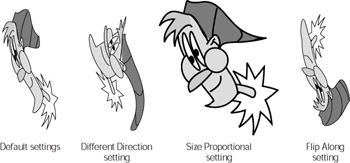
Figure 9-8: The same brush changed by only one setting produces variations like these.
Scatter brushes for times when you’re a bit wacky
Scatter brushes are similar to Art brushes; they’re made up of Illustrator paths. However, the similarities end there. Instead of stretching art along a path, Scatter brushes toss, fling, and scatter art along a path. Figure 9-9 shows the result of using a Scatter brush.
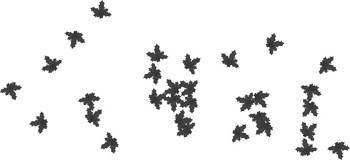
Figure 9-9: This artwork is actually a single path used as a Scatter brush.
| Technical Stuff? |
Scatter brushes have even more options than Art brushes, but Scatter brushes need more options. Imagine a brush of randomly scattered ladybugs becoming a brush of organized ladybugs that follow the path you create with the brush. To access the options of a Scatter brush, double-click any existing Scatter brush to view the Scatter Brush options dialog box (you see the same options when you create a new Scatter brush). |
The Scatter brushes repeat and randomize artwork based on four variables: Size, Spacing, Scatter, and Rotation. You set the specific amounts for these options by dragging their respective sliders to the left or right. How the brush uses these values is determined by the method (Fixed, Random, or Pressure) that you select in the drop-down list boxes to the right of each slider. The following list describes how each method works:
-
Fixed: This method uses the exact value in the associated text box, which you previously specified by using the slider.
-
Random: This method gives you two sliders instead of one so that you can specify Minimum and Maximum amounts of variance in the associated option. For example, after you set the Size to a Minimum value of 50% and a Maximum value to 200%, the Scatter brush varies the artwork randomly between half its original size and twice its original size.
-
Pressure: Like with Random, Pressure uses Minimum and Maximum amounts of variance in the associated option. This method works only when you have a pressure-sensitive tablet hooked to your computer. This feature is so cool that you may want to run out and buy one of these tablets, which is sort of using a mouse except that you draw with a pen-like stylus. Instead of just painting or not painting (your only options with a mouse), the stylus recognizes just how hard you press. The Minimum and Maximum settings correspond to the amount of pressure. The lightest pressure uses the minimum value; the hardest pressure uses the Maximum value. The values you get vary according to just how hard you press.
Two versions of the Scatter Brush Options dialog box appear in Figure 9-10. Next to each version is a brushstroke created with the option settings shown in the dialog box.
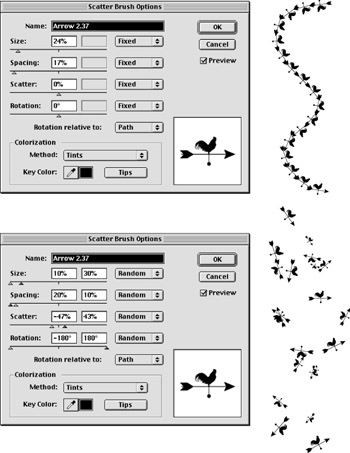
Figure 9-10: Two versions of the Scatter Brush Options dialog box and the artwork resulting from those options.
After you determine which method to use, set the sliders on the left side of the dialog box to specify how you want the artwork repeated along the path. Here are the options:
-
Size: This option controls the size of the scattered objects relative to the original.
-
Spacing: This option controls the amount of space that appears between the scattered objects.
-
Scatter: This option controls how far away objects can scatter on either side of the path.
-
Rotation: This option controls how the objects are rotated and whether they’re rotated in relation to the path or to the document. Figure 9-11 shows the difference between a Scatter brush rotation based on the path (left) and one based on the page (right).
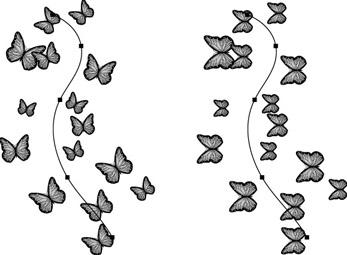
Figure 9-11: The Scatter brush on the left is set to rotate at 90 relative to the path; the one on the right is set to rotate at 90 relative to the page.
You probably noticed the glaring similarities between the Symbol Sprayer (discussed in detail in Chapter 4) and Scatter brushes. The results are often visually identical, and the process of making Scatter brushes is much like creating a symbol. Table 9-1 lists the differences between the two.
|
Thing |
Symbolism Tools |
Scatter Brushes |
|---|---|---|
|
Components |
Paths, type, pixel-based images |
Paths |
|
Editability |
Via Symbolism tools |
Via Pencil or Direct Selection tools |
|
Control |
Nonexact manipulation |
Precision changes via Options dialog box |
|
Examples |
Leaves on a tree, grass blades, hair, wisps of smoke |
Footprints, marching ants, |
|
Good for |
Fills |
Strokes |
Pattern brushes — too cool and utterly wacko
Pattern brushes (see Figure 9-12) are too cool for words, so I can just move on. Okay, no weaseling. For openers, you can use five different pieces of art for Pattern brushes rather than just one! Of course, that fact can also make them difficult to create. You need a graphic for straight lines and curves, one for inside corners, one for outside corners, one for the start of a line, and one for the end of a line. The results are worth the time and effort to make sure that these five graphics work together.
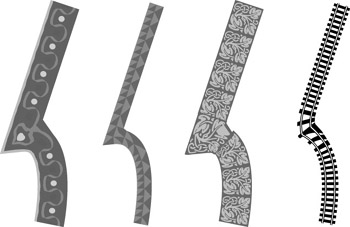
Figure 9-12: A sampling of the Pattern brushes.
| Tip? |
Well, okay, if making five pieces of art is too time intensive, you can get away with using just one. The Side pattern is the key pattern. If you don’t create five different graphics, the Pattern brush just repeats the Side pattern for any missing pattern. But come on, now, that’s cheating. If you want eye-popping results, make those five graphics and take full advantage of what this wonderful brush can do. |
Making the artwork for a Pattern brush
If you find that creating a Pattern brush is pretty tricky and counterintuitive, you’re not alone; a lot of trial and error is par for the course, especially at first. The first step in building a Pattern brush is to create the five pieces of artwork. Before you can do that, however, you need to know just what these pieces of artwork are for. Double-click a pattern brush in the Brushes palette to open the Pattern Brush Options dialog box for a peek at the possibilities. Figure 9-13 shows the Pattern Brush Options dialog box, in which you tell Illustrator just where to put the artwork on a path. Pattern brushes are context-sensitive: They know what the specific part of the path they are on is supposed to look like — so they use the graphic that corresponds to that part of the path.
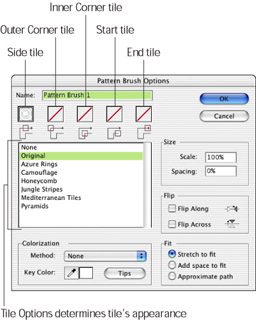
Figure 9-13: Each Pattern brush title knows where it is on a path and uses the corresponding artwork.
| Tip? |
You may find it helpful to examine existing Pattern brushes. The Tile Options list in the Pattern Brush Options dialog box offers a sampling. |
Setting Pattern Brush options
The Pattern Brush Options dialog box looks more complicated than it really is. Double-click any Pattern brush in the Brushes palette, and the Pattern Brush Options dialog box appears, displaying the following features:
-
Tiles: These squares are thumbnail representations of each piece of artwork. Beneath each tile, a graphic shows the artwork’s position on the path. Click a thumbnail to modify it by using the Tile Options list.
-
Tile Options: Click these options to change your pattern tiles. Click None to remove the selected tile’s graphic. (The Original option is already selected if you added your own graphics.) The remaining options correspond to the Pattern swatches in the Swatches palette. This arrangement enables you to use Pattern swatches as an alternative to creating your own tiles.
-
Colorization and Flip: See the earlier section, “Art brushes for times when you’re a bit wacky,” for details on these options.
-
Size: Use the Scale option to enlarge or shrink the tiles as they run along the path. If they get too big, the Spacing option enables you to increase the distance between tiles.
-
Fit: This option determines how the tiles get distorted to fit around spaces that don’t quite match the five different Tile types. The Stretch to Fit option distorts artwork the most, mashing it into whatever shape it needs to be to fit the path. The Add Space to Fit option adds space between tiles to distort them as little as possible. The Approximate Path option only works when the path is rectangular.
Positioning the artwork in the Pattern brush
After you create your graphics, think about what position each graphic is going to play. You may find it helpful to create a single guide that actually contains all five positions, as shown in Figure 9-14. Use this graphic as a way of visualizing how each graphic element is going to work at the different points.

Figure 9-14: Creating a guideline with all five pattern positions can be a big help when you create the artwork for the Pattern brush.
Using the guideline, create five pieces of artwork to correspond to the positions on the path. Knowing exactly how each piece of the artwork needs to change in response to its position takes practice. Some differences can be subtle (such as between the starting art and ending art) or obvious (such as between the side piece and corner pieces), as shown in Figure 9-15.

Figure 9-15: Left to right; The start, side, outside corner, inside corner, and end pieces.
After you have all the artwork, you’re ready to create the Pattern brush. Forward, intrepid artist! Just follow these steps:
-
Select the Side tile and click the New Brush button (it looks like a little piece of paper) in the Brushes palette.
The New Brush dialog box appears.
-
Click the New Pattern Brush option and then click OK.
The Pattern Brush Options dialog box appears, with the Side tile in the proper position. (For a refresher on how that looks, refer to Figure 9-13.)
-
In the dialog box, give the new brush a name by typing it directly into the name box and click OK.
The new Pattern brush shows up in the Brushes palette. (Don’t worry about the other options right now. I come back to those!)
Technically, the new brush is ready to use right now. (The side artwork fills in the other positions.) But true artists (no slackers here!) want to add the rest of the artwork to the brush. Naturally, this part of the process gets tricky. Notice that the brush, as it currently appears in Figure 9-16, has six slots, two of which are filled by the side artwork. The remaining four slots are for the remaining four pieces. The next set of steps creates them.
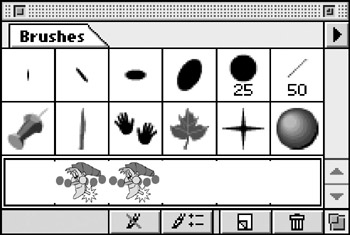
Figure 9-16: The new Pattern brush, awaiting the four remaining pieces.
Here’s how true artists (the aesthetically dedicated) add the rest of the artwork to the brush, one piece at a time:
-
Select the artwork and press and hold down the Alt key (Option on a Mac).
-
While holding down the Alt key (Option on a Mac), drag the artwork onto the Pattern brush, over the appropriate slot, and then release the mouse button.
Tip? You’re over a slot when a bold, dark line appears around the slot. Ah, but how do you know what the appropriate slot is? The brush has no label to tell you what’s what. The Pattern Brush Options dialog box obligingly labels the slots, but tragically the order of the Pattern bushes in that dialog box does not correspond to the order in the Brushes palette. The only way to add a new brush to the Pattern brush is to hold down the Alt key (Option on a Mac) and drag it (kicking and screaming) onto the slot in the Brushes palette. But you’re in luck! I labeled the slots in the brush for you in Figure 9-17. So feel free to use the figure as a map.
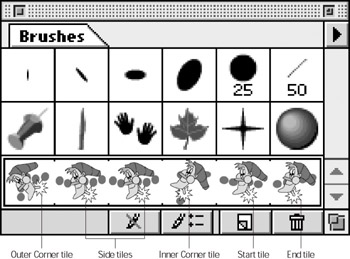
Figure 9-17: The Pattern Brush with its slots labeled.Warning? Nothing stops you from putting a corner piece into the straight section or vice versa. Pay careful attention to where you drop your artwork when creating a pattern brush, or you can get some nasty-looking art as a result!
-
The Pattern Brush Options dialog box appears, displaying the artwork in its appropriate place. Click OK.
Don’t worry about the other options for now.
-
Drag all the remaining graphics to their appointed places.
| Tip? |
Each time you add a graphic, the Pattern Brush Options dialog box appears again. Just click OK and keep going. |
Testing your new Pattern brush
When you finally have all your graphics in place, you can test the new brush by applying it to open and closed paths: After making sure that the new brush is selected in the Brushes palette, you create two simple graphics. Anything you create when a brush is selected uses that brush as its stroke, even when you aren’t using the Paintbrush tool. Any path will work, but because the Pattern brush uses different artwork at corners, testing the shape on an object that has corners (such as a rectangle) is helpful. In this example, I use the Rectangle tool to create a square. With the new brush still selected, I choose the Paintbrush tool and paint a squiggly line. This procedure shows how the corner, side, and end tiles look on both curved and straight lines. Testing this way (as I did in Figure 9-18) gives you a good idea of whether all your artwork is working well in the new brush.
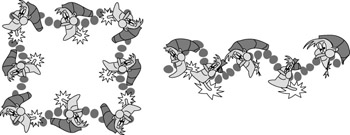
Figure 9-18: The new Pattern brush tested on a square and a squiggle.
| Tip? |
If any of your tiles aren’t working, tweak the original artwork, select it, and drag it back to the appropriate slot. |
If you’re suddenly inspired to create more Pattern brushes, a good way to start is by examining the Pattern brushes (nearly a hundred of them) that come with Illustrator. Tinker with them to figure out how they work and how to create them.
Calligraphic brushes for formal occasions
Calligraphic brushes create strokes that emulate the kind of strokes you make with real calligraphic pens; the strokes they make vary in width depending on the direction of the stroke. As the only brushes that aren’t created by paths that you can drag into the Brushes palette, Calligraphic brushes are the nonconformist brushes in Illustrator. You set them up by using controls in the Calligraphic Brush Options dialog box (accessed by either creating a new brush or by double-clicking on an existing Calligraphic brush), as shown in Figure 9-19.
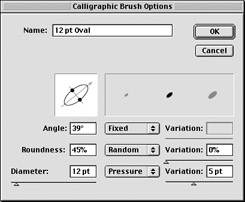
Figure 9-19: The Calligraphic Brush Options dialog box.
Calligraphic brushes are deceptively simple. Don’t let the name fool you; you can use them to create any type of artwork, not just calligraphy. (Although they’re especially good for emulating traditional pen-and-ink type drawings.)
| Technical Stuff? |
Yep, the Calligraphic Brush tool seems a lot more like a real pen than the powerful-but-weird Pen tool. It may help to think of it this way: Calligraphy is an art practiced with brushes. |
To create a Calligraphic brush, just follow these steps:
-
Click the New Brush icon (it looks like a tiny piece of paper) in the Brushes palette.
The New Brush dialog box appears.
-
Select the New Calligraphic Brush option and click OK.
The Calligraphic Brush Options dialog box appears — and though it may look intimidating, you have only the following three options to set (after you name the brush):
-
Angle: If you were using a real-world brush (or pen, as the case may be), this setting would be the angle at which you’re tilting the brush.
-
Roundness: This setting enables you to change just how round the brush is — from a narrow ellipse to a circle.
-
Diameter: This setting determines how large the brush is.
The boxes in the middle column determine how (and by how much) those first three options may vary, if at all. Select one of three options in these drop-down list boxes to determine whether the preceding three options may vary not at all (Fixed), randomly (Random), or according to the amount of pressure you apply by using a pressure-sensitive stylus (Pressure).
Tip? The boxes in the third column enable you to set the amount by which those first three options may vary (if the method by which they may vary is either Random or Pressure). The higher the numbers, the greater the range of sizes the brush will produce. Figure 9-20 offers a hint of what the Calligraphic Brush tool can do with a pressure-sensitive tablet. The variable width of the stroke adds sophistication to the cartoon.
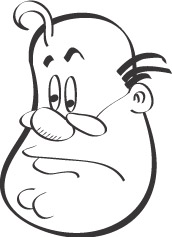
Figure 9-20: Artwork created on a pressure-sensitive tablet using Calligraphic brushes. -
-
After you set your options, click OK.
The new Calligraphic brush appears in the Brushes palette for you to use.
As you begin creating artwork with brushes, you discover that it’s just like painting with real paintbrushes — the best artwork requires a combination of several different brushes. Fortunately, you have an astonishing variety of brushes to choose from! The most well-stocked art supply store pales in comparison to the Brushes palette. Best of all, you don’t have to pay extra whenever you need a new brush. You can just build your own!


