Caps, Joins, and Dashes
Caps, Joins, and Dashes
A stroke can be (and often is) a continuous line of color that follows a path, even if the path is as convoluted as a strand of cooked spaghetti. But paths can also appear chopped up into dashes. You can tweak the shape of the dashes all at once, without having to fuss over every single one. You can set the shape that an individual dash (the basic unit of an open path) begins or ends with (its cap) and the shape of its corner points (its join).
Strokes can have any of three different caps and any of three different joins applied to them. Combine these with the almost-limitless combinations possible for dash patterns and weights, and you can see the incredible versatility of strokes. To access these additional options, choose Window→Show Stroke. In the Stroke palette that appears, select Show Options from the palette pop-up menu; refer to Figure 10-12.
Caps
Shaping the ends of the dashes that make up an open path can change the entire look of the path. For example, imagine a dashed line that’s 500 dashes long. Then imagine that all 500 dashes have identical ends, shaped like one of the three shapes in Figure 10-13.
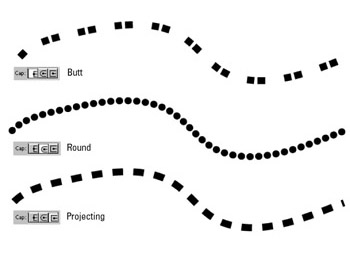
Figure 10-13: Three different caps on three paths.
Depending on which Cap setting you choose, you get three noticeably different capped lines. Here are the options:
-
Butt Cap: Chops off the stroke at the ends.
-
Round Cap: Extends the stroke past the ends (or around the dash location) with semicircular ends. (The radius of each semicircle equals half the stroke weight.)
-
Projecting Cap: Extends the stroke past the ends (or around the dash location) with squared ends. (The amount of each extension equals half the stroke weight.)
To change the way a line is capped, select it with any selection tool, and then click the desired cap in the Stroke palette.
Joins
The Stroke palette offers three different joins. Figure 10-14 shows how they appear on paths. Joins affect only corner points, not smooth points. (See Chapter 6 for more info on corner points.) They make corners appear sharp and pointy, blunt and rounded, or squared off.
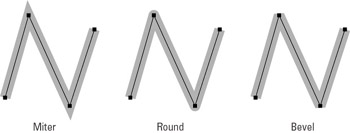
Figure 10-14: Three different joins on a path (left to right): Miter, Round, and Bevel.
Depending on which Join setting you choose, you get three noticeably different corners. Here are the options:
-
Miter Join: Causes the outside corner of the stroke to come to a sharp point.
-
Round Join: Causes the outside corner of a stroke to come to a rounded or smooth curve.
-
Bevel Join: Cuts off the corner so that the width of the stroke is the same at the bevel as on the rest of the stroke.
If these terms look familiar, then you’re probably familiar with woodworking — or you actually paid attention in industrial arts class.
Dashes
Dashes break up the stroke into repeating segments of any length, with gaps between them, also of any length. You can set up to three different dash sizes — and three different gap sizes — in any stroke, as shown in Figure 10-15.
Dashes work with the Cap settings. (What the heck, call it a labor-saving device.) Whichever Cap setting you use applies to the ends of all the dashes, not just to the ends of the path.
To create a dashed line, follow these steps:
-
Select the Dashed Line option in the Stroke palette.
-
Set a dash size in the first dash box.
Remember that the Round and Projecting Cap settings extend the dash from its center by half the width of the stroke. Therefore, if you use the Projecting Cap setting and your dash setting is 10 points, on a line with a 20-point stroke, the dash will be 30 points long.
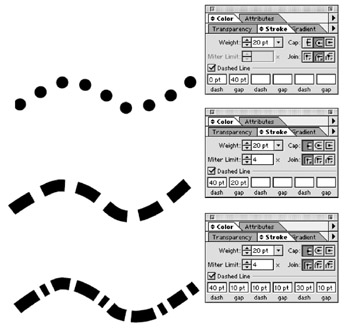
Figure 10-15: Three different dash patterns and the settings used to create them.Tip? Choose a Butt Cap setting when you want your dashes to be an exact length that doesn’t vary with the width of the stroke. If you want an exact circle for a dash (or a dot), use a 0-point dash. That creates a dot the width of the stroke.
-
Set the gap size in the first gap box (the distance between the ends of the dashes).
Warning? This setting can be a little confusing if you’re using the Round or Projecting Cap settings because these extend the length of the dash past the end of the dash and into the gap, based on the width of the stroke, creating a gap that looks smaller than what you specified. The width of the stroke also affects the gap size. If you want a gap of 20 points and you’re using a 10-point stroke, set the gap size to 30 points.


