Using the " Hard " Stuff
Using the “Hard” Stuff
Have you ever looked at an illustration and scratched your head and thought, “How did they do that?” Here’s a secret. Chances are that it wasn’t that hard. A slew of features in Illustrator let you do really cool things with little difficulty. The only catch is that you must walk before you can run. In Illustrator, this means being able to create simple shapes, color them, and move them in front of or behind one another (which I cover in Chapters 4, 5, and 6).
After you have those things down, you’re ready to move on to the fun stuff. You’ll be amazed at the things you can do with a simple command or two.
Transparency
When you draw a shape in Illustrator that’s filled with a solid color or a gradient, the shape covers up any objects beneath it. You can move the object behind other objects in the document by selecting it with the Selection tool and using Object→Arrange→Send to Back, but you can’t see through that shape to the objects behind it.
Transparency breaks those rules by enabling you to fade an object away (from 0%, or completely transparent; to 100%, or completely opaque; or any degree in between) to reveal the objects hidden beneath it. Figure 3-6 shows this basic transparency at work with a partially transparent ellipse appearing above a logo.

Figure 3-6: The ellipse on top of the logo is set to be partially transparent.
Transparency is used to see through one part of a shape more than another part or to blend the colors of a shape with the colors beneath it in strange and interesting ways. Thumb through Chapter 10 for more on transparency.
Blends
In the 1990s, morphing was all the rage in movies and TV shows. Morphing combines (averages) two images together in a series of steps so that the first image appears to be magically turning into the second. In Illustrator, you’re able to use a similar technique — blending — to transform one object into another in as many steps as you want.
Blending lets objects change color, shape, and size, resulting in exciting effects. Illustrator’s blends are “live:” You can blend between objects but still edit them after you create the blend. The objects in between change automatically to match the changes you make to the original objects, which allows you to tweak the way the blend looks without having to start over. The top figure in Figure 3-7 represents a step blend occurring between a small black circle and a larger gray triangle. Only the rightmost and leftmost objects were created by hand. The other objects are an average of the two created by the Blend tool. I cover blends in more detail in Chapter 12.
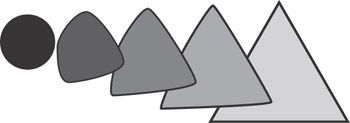
Figure 3-7: An example of a blend between two objects.
Clipping masks
An Illustrator clipping mask (commonly referred to as a mask by longtime Illustrator users) is a path used to hide objects outside itself. For instance, you can mask out everything in an Illustrator drawing except for the area inside the path so only the area shows. Creating a clipping mask is quite simple, as shown in Figure 3-8, with the following steps:
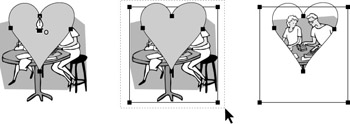
Figure 3-8: Masking artwork.
-
Create a path to use as a mask on top of some other art.
The fill and stroke of the path don’t matter because the path itself becomes invisible, along with anything outside the path. Be sure that the path you create is on top of the other art.
Tip? The art beneath the clipping mask can be as complex and have as many parts as you want. The top path masks all paths beneath it. You can use any tool to create this path (such as the Pen, Pencil, or Rectangle).
-
Use any of the selection tools and select both the path you just created and the object(s) you want to mask.
-
Choose Object→Clipping Mask→Make.
Anything selected that’s outside the masking path is hidden, and the masking path itself becomes invisible. Nothing is deleted when you make a mask; it’s just hidden. You can restore your artwork to its unmasked state by selecting Object→Clipping Mask→Release.
Compound paths and shapes
Compound paths join two or more paths together so that one path makes part of another invisible. Compound paths may sound complicated, but if you’ve ever typed anything in any computer program, you’ve been using them all along without knowing — many letters are really compound paths! Any letter that has a hole in it (such as B or O) is a compound path. If you want to place text over something else and see things through the holes in the text, use compound paths, as shown in Figure 3-9.

Figure 3-9: A compound path is laid over a piece of background art(which is visible through the two round holes).
A figure eight is a single compound path, made up of three paths. The two paths in the middle are holes — areas made transparent so you can see the background artwork through them.
As you may imagine, text characters have lots of holes in them — so they’re all compound paths. A typical character, such as a lowercase a, is made up of two paths; the hole in the middle is one of those paths. If you want to magically transform a bit of text into a graphic object made of paths, select the text with a selection tool and choose Type→Create Outlines. The text changes from a text object to a series of compound paths (which you can then edit as you edit any other path).
You can make any number of overlapping paths into a compound path by selecting them and choosing Object→Compound Path→Make. If you want to turn the compound path back into two (or more) individual paths, select the compound path and choose Object→Compound Path→Release. Figure 3-10 shows what happens when you release compound paths that were originally text objects. When you release the compound paths, the hollow part of the letter fills in, because the purpose of the compound path in the letter is to make those hollow parts of the letter transparent.

Figure 3-10: Text as text (left), as compound paths (middle), and as compound paths after release (right).
Compound paths work best when you keep things simple. If you stack too many objects on top of each other and try to make a compound path, holes may appear where you didn’t expect them. But if you try to keep things to a minimum (only use a few objects, and try not to have more than two objects overlapping in any one place) you’ll get splendid results from the Compound Paths command.
Illustrator has also gone one step better, providing you with an easy way to create better compound paths — by using compound shapes. Check them out in all their glory in Chapter 4.
Flares
No longer are cool effects, such as flares, reserved to Photoshop territory. The Flare tool allows you to create effects, such as lens flares and reflections, that are photo realistic yet totally vector-based (as shown in Figure 3-11). That is, the effects can be easily edited — moved and scaled — to produce just the right look.
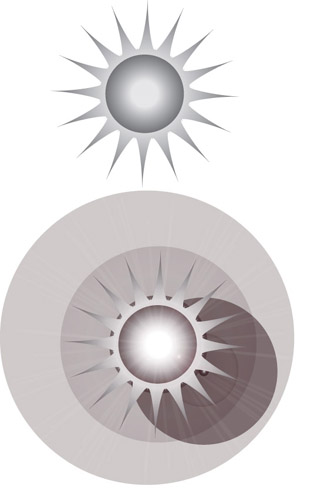
Figure 3-11: A boring ?sun gets trans-formed into a dazzling star of rays and rings.
To create your own lens flare, first create some interesting art and fill with the colors of your choice; then follow these steps:
-
 ?Select the Flare tool.
It shares a toolslot with the Rectangle tool.
-
Double-click the Flare tool to bring up the Flare Options palette. Play with the various settings and then click OK.
These are the settings used for Figure 3-11:
Center
100% Opacity and 50% Brightness
Halo
Growth 20% and Fuzziness 0%
Rays
Number 15, Longest 300%, and Fuzziness 100%
Rings
Path 100 pt, Number 10, Largest 41%, and Direction 42%
-
Place your cursor over the place on your art where you want to establish your light source; click and drag.
You should see the appearance of some funky lines and circles. These are the rays and the halo.
Tip? Use your up or down arrow keys to interactively increase or decrease the number of rays.
-
Place your cursor over the place on your art where you want to center your rings. Click and drag. The distance you drag also determines the length of the flare.
You should see the appearance of some circles of varying size and ?opacity. Your sun should now be decked out with a bright and beautiful lens flare.
-
Deselect the flare and admire the results. If you’re not quite happy, select the flare you just drew, double-click the Flare tool, and enter some different settings.


