Using Type as a Mask
Using Type as a Mask
Illustrator enables you to do a remarkable number of things to your type, but some modifications seem forbidden. For example, if you try to fill type with a gradient (read through Chapter 5), the type just turns black. And what if you want to get really fancy and fill text with another piece of artwork that you create in Illustrator? There’s just no way you can do that!
Or is there?
By using the Clipping Mask feature (read more about this in Chapter 10), you can create the appearance that text is being filled with a gradient, artwork, or anything that you can put the text in front of. And what can’t you put text in front of? Absolutely . . . nothing! (Say it again, y’all. . . .)
A clipping mask is a special feature of Illustrator: It uses the front-most object (called the clipping object) to hide the objects behind it in a unique way. Everything outside the clipping object is hidden, and the fill and the stroke of the clipping object become transparent, enabling you to see whatever’s behind and apparently filling the clipping object. A type mask is what you get when you use type as your clipping object. This may sound strange but makes a lot more sense after you create a type mask of your own.
Creating a type mask is simple. Here’s how:
-
1.Create the artwork you want to fill your type with.
Remember? This can be absolutely anything. The only catch is that it must be bigger than the type that you want to use as fill.
For example, if you want to fill your text with a gradient, you create a rectangle (or any other object, provided that it’s larger than your type) and fill it with a gradient (see Chapter 5), or create the artwork that you want to fill the type with. You can even use a pixel-based image, such as a scanned photograph of your loved one. The only stipulation is that whatever you fill the text with must be larger than the text. Think of the text as a cookie cutter and the object you’re filling the text with as cookie dough. You cut away everything outside the text.
-
2.Create type in front of whatever you want to fill the text with.
Create your type by using the ordinary Type tool. Using the Character palette, choose a font size large enough so that the type is almost (but not quite) as large as the artwork behind it. If you already created your type, select it with any selection tool and choose Object→Arrange→ Bring to Front and drag it in front of your object.
-
3.Use any selection tool to select the text and the object or objects behind the text and then choose Object→Clipping Mask→Make.
To select multiple objects, just hold down the Shift key while clicking each of them with any selection tool.
After you choose Object→Clipping Mask→Make, the fill and stroke of the text disappear and are replaced by the contents of whatever is behind the text. Anything outside the area of the text becomes invisible, or masked-out. See the process in action in Figure 14-28.
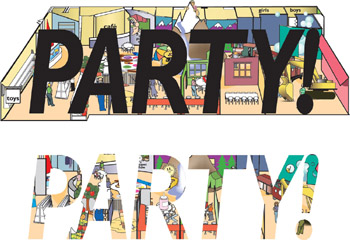
Figure 14-28: The type mask in action: text in front of objects (top) and type masking the objects (bottom).Tip? With type masks, the text is still ordinary text. You can highlight the text, change the font, type in different words, and so on, while retaining the masking properties.
Any time that you want to make the text stop masking out what’s behind it, select the text and choose Object→Clipping Mask→Release.


